
How to Cast Apple iPhone 7 Plus to Chromecast? | Dr.fone
How to Cast Apple iPhone 7 Plus to Chromecast?
Google has developed and designed a few gadgets that have taken over the world in no time due to its explicit feature set and impressive applications. Such a gadget is Google Chromecast, Smart-TV dongle that is an excellency in versatility. This device has been developed to allow the streaming of video content onto a bigger screen by connecting itself with a variety of devices and significant streaming websites. Considering its versatility, it can prove very efficient in situations where you wish to stream a movie to watch with your whole family. Rather than figuring out a method to get the video onto a TV Screen, Chromecast provides you with a simple and elegant solution of screencasting using the Apple iPhone 7 Plus device. This article particularly focuses on providing impressive solutions referred to cast Apple iPhone 7 Plus to Chromecast.

Part 1: Can iPhone cast to Chromecast?
Chromecast might not be compatible with an Apple Device directly, yet its diversity offers much more than we can imagine. iPhone can still be easily cast to Chromecast since the Apple iPhone 7 Plus device supports different third-party media applications that are available on iOS. These applications can be effectively used for screen mirroring and casting Apple iPhone 7 Plus to Chromecast. The complete procedure of casting and mirroring can be regarded as completely simple and straightforward while connecting the iPhone.
The problem arises at the point where you need to select the best application that is compatible with your Apple iPhone 7 Plus and allows mirroring iPhone’s screen to Chromecast easily. This article intends to target the point and provide users with effective solutions and the applications that would help them cast the Apple iPhone 7 Plus to Chromecast with ease. The applications will be discussed in detail, along with a definitive overview for helping you in understanding the system and procedures that are involved in the screencasting. With effective applications, you can easily play your favorite media across Chromecast without any delay or discrepancy.
Part 2: How to cast the Apple iPhone 7 Plus to Chromecast for free? - videos, photos, music
There are many different methods that can be adopted for fulfilling the process of casting the iPhone’s screen to Chromecast. Along with believing the availability of different mirroring applications as a solution to this issue, you can also access this feature directly on your Apple iPhone 7 Plus without any tentative cost through Google Home. This connection, however, calls for a wireless and detailed connection that might not be acknowledged by users. However, the video quality output provided with this method is pure excellent and effective. To understand the method of how you can cast the Apple iPhone 7 Plus to Chromecast with Google Home, you need to follow the steps provided below:
- You need to plug-in your Chromecast device through an HDMI cable onto the TV or surround sound to use it for mirroring your Apple iPhone 7 Plus’s screen.
- You need to download and install the Google Home application on the iPhone, followed by the addition of the account credentials along with turning on the Wi-Fi connection and Bluetooth. This process is important for connecting your Chromecast to the iPhone.
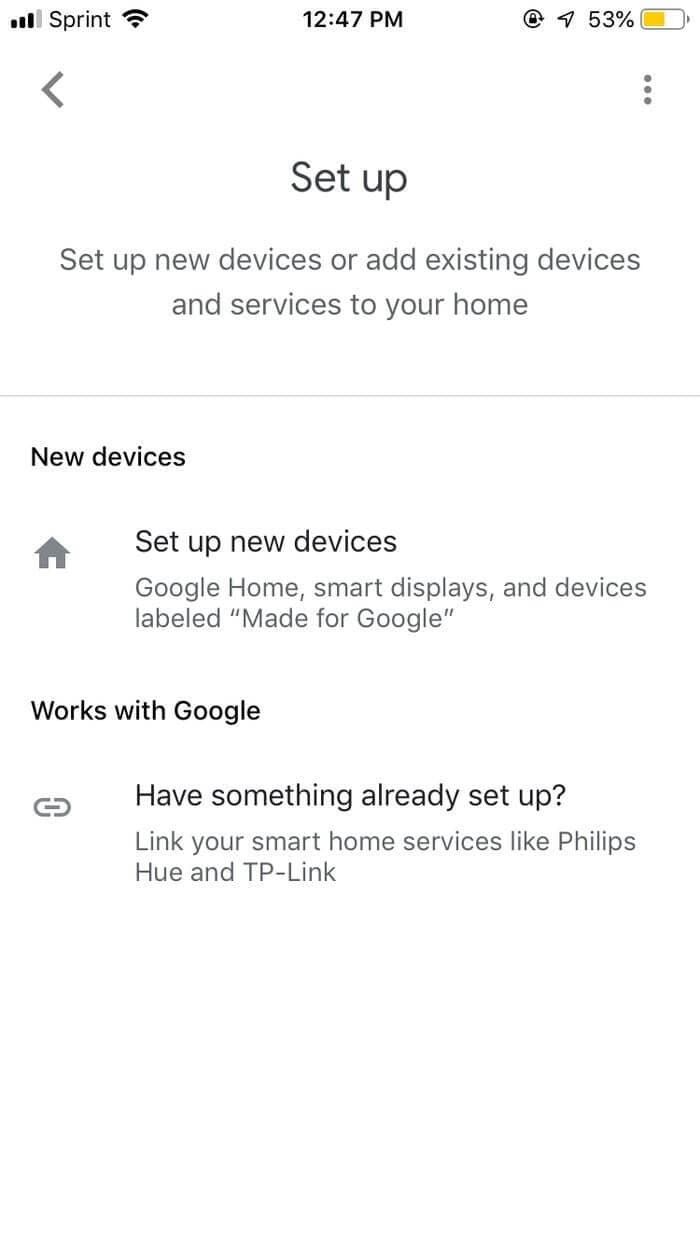
- The name of the Google Chromecast device can be observed on the screen of the application.
 With Screensaver Wonder you can easily make a screensaver from your own pictures and video files. Create screensavers for your own computer or create standalone, self-installing screensavers for easy sharing with your friends. Together with its sister product Screensaver Factory, Screensaver Wonder is one of the most popular screensaver software products in the world, helping thousands of users decorate their computer screens quickly and easily.
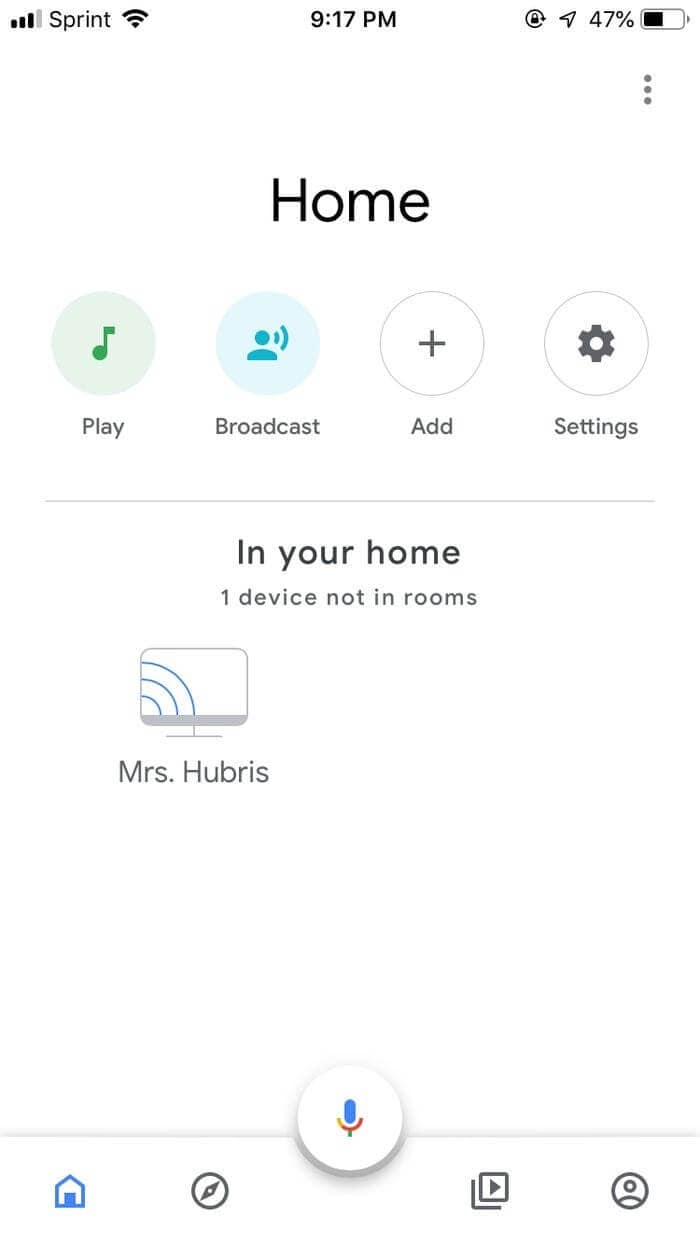
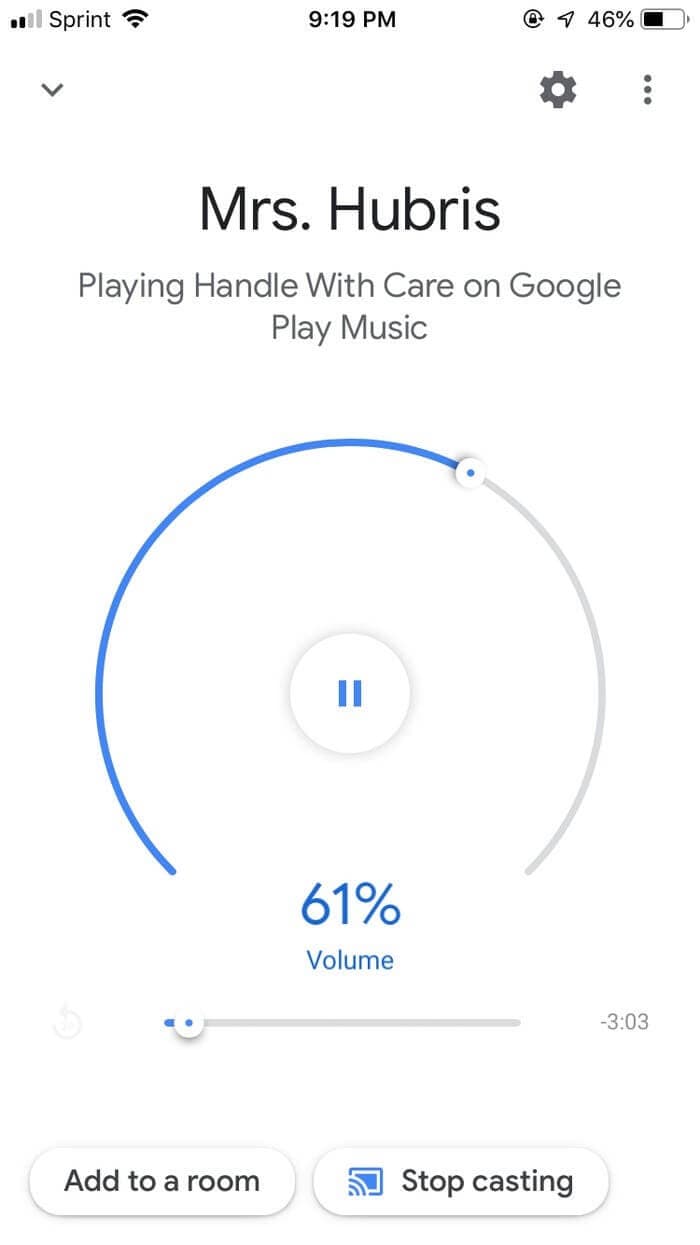
- The process of adding Chromecast to the iPhone is now completed. You can stream all kinds of content ranging from videos, photos, and music, by controlling it through the application. It would now act as a complete control center managing all kinds of controls.
Part 3: Mirror iPhone screen to Chromecast with mirroring apps
There are many mirroring applications available for iPhone users that allow them to stream their video content onto Chromecast easily. Considering the detailed list of applications, this article provides you with three impeccable screen mirroring platforms that provide you with casting options onto Chromecast.

IWebTV App
This application can be regarded as the best option to have your content streamed across Chromecast. With a versatile environment, it allows you to view and stream movies, TV shows, and live streams to your TV. Considering the impressive feature set is has to offer, you need to oversee the HD resolution output that is provided through the application. It also accommodates users with its advanced browser having all kinds of pop-up and ad-blockers. The control offered at the iWebTV App is appreciated throughout the world. It develops a very cognitive environment to cast the Apple iPhone 7 Plus to Chromecast easily.
The application is compatible with Chromecast, Roku, and Apple TV – 4TH Generation and works only on iPhone and Apple Devices. You can download iWebTV for free with no additional price add-ons. Its user-friendly and efficient management provides you with the best environment to have your device screencast to Chromecast.
Pros:
- It is a very secure application with an intuitive and frequent update system.
- Very impressively designed application with an interface grabbing the attention of masses.
- A properly formulated mobile application with impressive support.
Cons:
- Has a few missing features for screen mirroring.
The process of using the iWebTV App is quite simple and straightforward, with no excessive procedure. You need to follow the simple steps to cast your Apple iPhone 7 Plus to Chromecast using the iWebTV App.
Step 1: Download
Before using the application, it is important to have it downloaded on the iPhone. After downloading, you need to simply launch the application.
Step 2: Mirror your Apple iPhone 7 Plus
Assuming that the Chromecast and iPhone are at the same Wi-Fi connection, you need to tap on the screen mirror icon present on the top left corner of the main screen to start mirroring. You can simply stream the content of your Apple iPhone 7 Plus onto Chromecast.
MomoCast
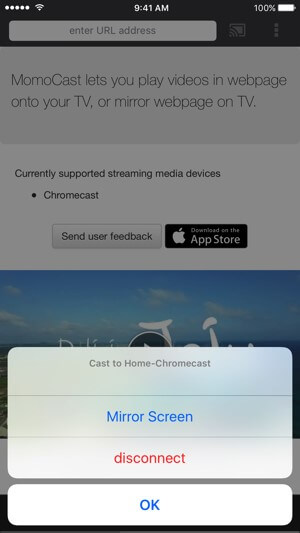
If you look for mirroring your Apple iPhone 7 Plus’s or iPad’s screen while operating a video from a webpage, MomoCast can prove to be very influential and supportive in casting the Apple iPhone 7 Plus to Chromecast. You can play videos on the webpage of the TV using MomoCast or mirror the webpage opened from Apple iPhone 7 Plus to the TV with the help of Chromecast. However, it is to be kept in mind that MomoCast operates with its extension within the Safari webpage, which can then be used for sending information to the TV with the help of streaming devices. The only device that is compatible with MomoCast is Chromecast, for now. It is available on the Internet for free. Though this application might seem quite straightforward in use, it provides impeccable services and results to the users, which is highly preferred.
Pros:
- It is a perfect platform that connects with Chromecast without a slight issue.
- It provides an effective remedy from avoiding using different browsers that might affect the quality.
Cons:
- There are not a lot of features as in different screen mirroring applications.
If you look forward to using MomoCast as a featured application for screencasting Apple iPhone 7 Plus to Chromecast, you need to follow the step-by-step guide as provided below.
Step 1: Install the application on the iPhone and check whether the Apple iPhone 7 Plus devices are connected over the same Wi-Fi.
Step 2: Open up the Safari browser, tap on the “Share” button, and select the option of “Cast with MomoCast.”
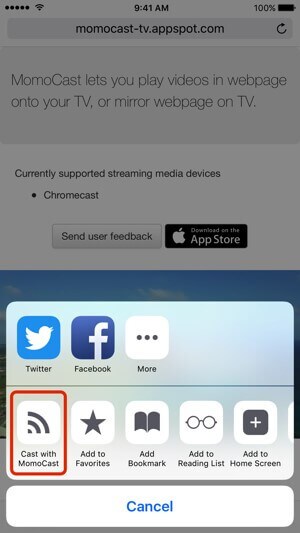
Step 3: A webpage opens up with having the MomoCast’s browser, with a Cast button on the top. You need to select the name of your Chromecast to connect.
Step 4: Tap on “Mirror Screen” for streaming after tapping on the Cast icon. The webpage is then visible on the Apple iPhone 7 Plus device. The casting can be ended by tapping on the “Cast” icon.
Reflector
Reflector is another cross-platform screen mirroring software that provides a very impressive feature set for its users. While providing screen mirroring features, it is a commemoration of screen recording, voiceover addition, and live streaming. This application allows multiple devices to get connected at a similar time-period, which can then be merged into a single video. This platform is available from pricing plans starting from $6.99 and is compatible with both Windows and macOS.
Pros:
- Reflector offers an intuitive and user-friendly interface.
- Variety of features are offered apart from screen mirroring.
- There is a variety in selecting the Apple iPhone 7 Plus device frames.
Cons:
- A watermark is present on the videos that are created on the trial version of the App.
- Reflector 3 is not installed on iOS-based devices.
Step 1: For casting Apple iPhone 7 Plus to Chromecast, you would need a combination of Reflector 3 and AirParrot 2 that is to be launched on the PC.
Step 2: Following this, you need to initially mirror your Apple iPhone 7 Plus on the PC with Reflector.
Step 3: Open up the AirParrot 2 menu present on the bottom right of the desktop. You need to locate the Media option to select a media file. This video will be cast on Chromecast. Conclusively, your Apple iPhone 7 Plus screen will be cast on a larger device.

Conclusion
This article has provided several methodologies that can be adopted to cast the Apple iPhone 7 Plus to Chromecast by using direct procedures as well as third-party platforms.
 PearlMountain Image Converter
How to Mirror Apple iPhone 7 Plus to Mac?
Screen mirroring has been recognized as a very significant feature in professionally handling situations that involve showing content during a meeting to the partners present at the spot. Even though displaying the content on a small screen to a considerable amount of people in a room can be very stressful and difficult to be executed on a single go, many users consider opting for the availability of screen mirroring applications for showing the content to the colleagues or friends on larger screens. In such instances, you can mirror your screen onto the laptop screens that can be projected to make it visible for everyone present. This article considers discussing different mirroring platforms that can be used for serving the purpose. Following this, their step-by-step guide would also be considered for giving good knowledge to the readers. This article shall be targeting Apple iPhone 7 Plus users who seek to mirror its screen to Mac using these platforms.
Q&A: Can I screen mirror Apple iPhone 7 Plus to Mac?
Considering the utility of screen mirroring devices onto larger screens, you can have your Apple iPhone 7 Plus’s screen mirrored onto the Mac. For that, a variety of screen mirroring applications can be consumed for perfectly covering your requirements and putting anything on the screen as per your requirement.
Part 1: Why should we consider using screen mirroring?
Screen mirroring has extensive utility if considered. However, the major factor that should be considered is its ability to control the discipline of the room where it is to be shared. Except for looking onto a single Apple iPhone 7 Plus screen, it would be better if a similar screen is being mirrored to a larger screen, such as a laptop that is visible to everyone present in the room while maintaining the decorum of the room. If we look over the environment of an office, we will save the inadequacies involved in sharing the content with the people present during a presentation without explanation. Conversely, if we take the example of a classroom in a school, mirroring the Apple iPhone 7 Plus screen to Mac saves a lot of disciplinary issues and would keep all the attendants in the class intact to their positions.
Part 2: How to Mirror Apple iPhone 7 Plus to Mac with USB?
Mirroring your Apple iPhone 7 Plus to the Mac with USB seems to be a simple solution with the help of QuickTime. QuickTime Player is known as the dedicated media player for Mac devices providing extensive services in managing the media of the Apple iPhone 7 Plus device. Along with that, QuickTime Player has come a long way in providing other services besides media management.
This conducive player has made a great mark in offering dedicated services mirroring Apple iPhone 7 Plus to Mac. To know more about how QuickTime Player makes itself a special option, we have set up some features as follows:
- You can record anything available on the screen of QuickTime, giving you the option of a screen recorder.
- The tool is completely free to use, saving the pockets of the user to mirror Apple iPhone 7 Plus to Mac.
- The process of mirroring an Apple iPhone 7 Plus to a Mac is quite simple and basic on QuickTime, making it a perfect choice for beginners.
We will now look into the steps that will explain to you how to share an Apple iPhone 7 Plus screen on a Mac with the help of QuickTime:
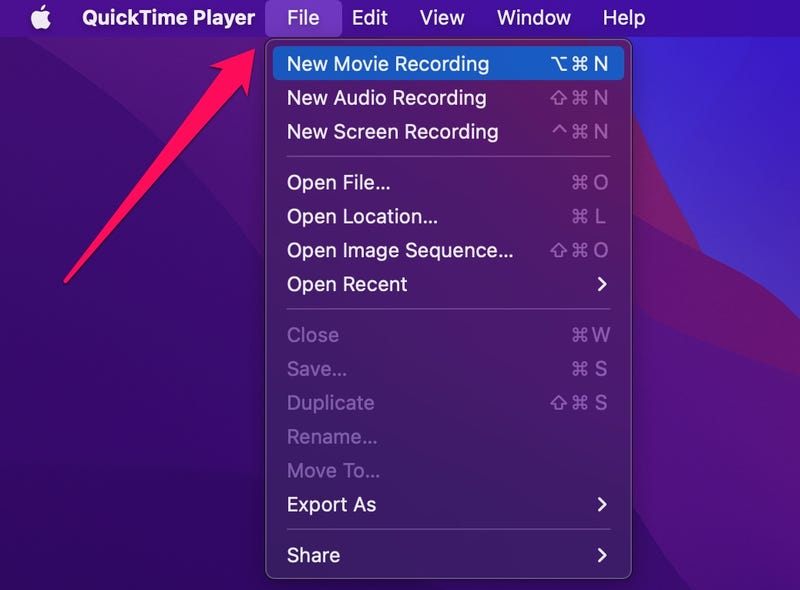
Step 1: You must connect your Apple iPhone 7 Plus to the Mac through a lightning cable, which will act as the USB connection. Launch QuickTime and select the “File” tab on the top bar.
Step 2: From the options that appear on the menu, select “New Movie Recording” to access the recording options.
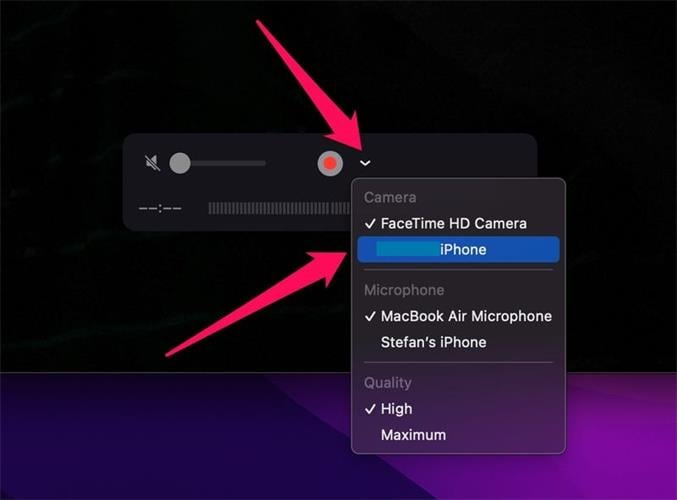
Step 3: Look for the “Red” button at the bottom of the window and click on the “arrow” next to it to open another drop-down menu. You must select your Apple iPhone 7 Plus from the available devices to mirror it on the Mac through QuickTime.

Part 3: Best Screen Mirroring App for Apple iPhone 7 Plus to Mac Wirelessly?
Although QuickTime sounds like a solution for mirroring Apple iPhone 7 Plus to a Mac, it is not a screen mirroring application, to be exact. If you look for better and directed solutions, you will need to look for proper screen mirroring applications for Apple iPhone 7 Plus to Mac. If you want to mirror your Apple iPhone 7 Plus on MacBook, you can consider using any of the provided options below for effective results.
1. Dr.Fone Air – Online Screen Mirror
For the first application, you can look for an online solution that provides quick and effective results. Wondershare Dr.Fone Air provides a dedicated online mirroring service that allows you to mirror your Apple iPhone 7 Plus to your Mac wirelessly. While the tool is free to use, it does not bind the user with any ads, making it a comprehensive and connected option to work with. Wondershare Dr.Fone Air does not hinder the user experience, in any case, making operations smooth and straightforward.
Key Features
- The screen mirroring solution provides an adjustable mirroring screen that can help users rotate, zoom, and take screenshots.
- There is no need to connect devices through Bluetooth and NFC.
- It features complete cross-platform compatibility, which includes Android and Windows alongside the systems in discussion.
Step-by-Step Guide to Mirror Apple iPhone 7 Plus to Mac Using Dr.Fone Air
We will now see how to screen mirror Apple iPhone 7 Plus to MacBook wirelessly using the right approach and technique through Dr.Fone Air:
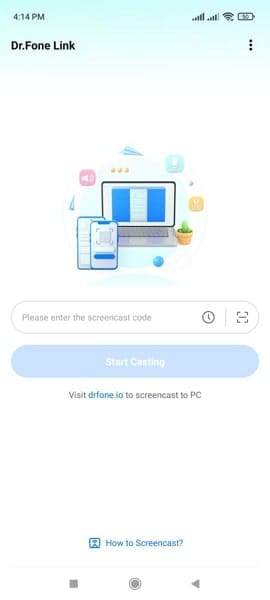
Step 1: Open Dr.Fone Air and Check the Internet
Launch Dr.Fone Air on your MacBook’s web browser and proceed to connect your Apple iPhone 7 Pluss under the same internet Wi-Fi.
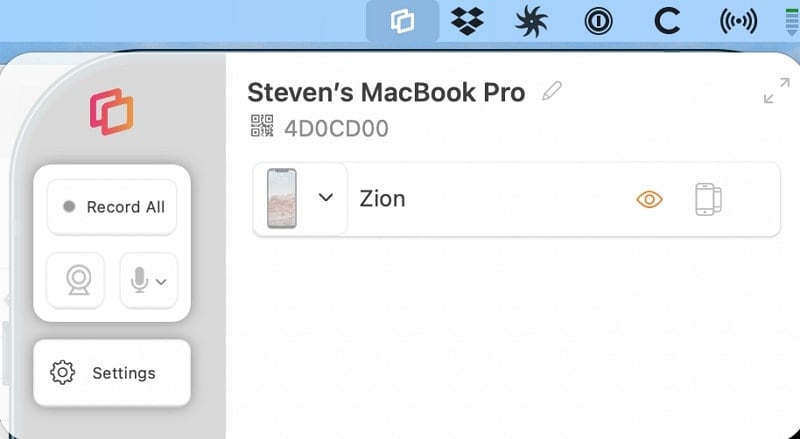
Step 2: Use Right Technique to Connect to the Apple iPhone 7 Plus device
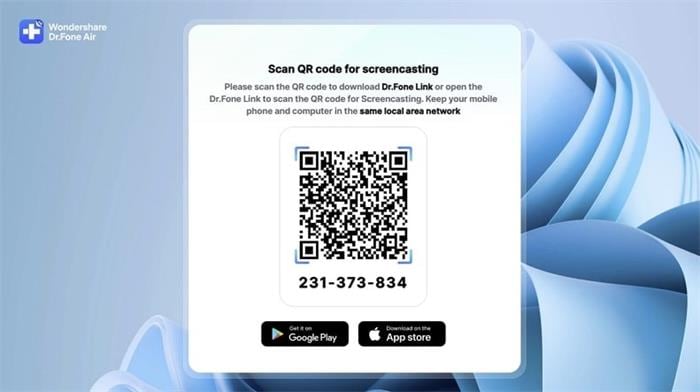
Look for the Dr.Fone Link application and download it on your Apple iPhone 7 Plus. Proceed to scan the QR code or use the cast code to connect the Apple iPhone 7 Plus device.
Step 3: Successfully Mirror Apple iPhone 7 Plus to Mac
As the Apple iPhone 7 Plus devices are detected, they are mirrored, and you can observe iPhone’s screen on your Mac.

2. Reflector App with AirPlay
If you seek the services of other tools in the market, Reflector is a great option that provides a professional experience in wireless screen mirroring. Known for its easy operations and quick configuration, Reflector utilizes the services of AirPlay, Google Cast, and other screening facilities offered in the respective drives. Rather than providing screening services, the tool also comes along as a great option for sharing its content.
Key Features
- It offers a unique option of utilizing multi-device screen mirroring, giving you the option of managing more devices at the same time.
- The tool is quite simple and elegant to work with, as there are no complex buttons.
- You will have to use the services of AirPlay to connect your Apple iPhone 7 Plus to the Apple iPhone 7 Plus device through Reflector.
How to Use Reflector for Mirroring Apple iPhone 7 Plus to Mac?
Let’s see how Reflector will help you in mirroring your Apple iPhone 7 Plus to Mac with ease using the step guidelines provided below:
Step 1: Starting with the process, you must first download and launch Reflector on your Mac. Proceed to connect your Apple iPhone 7 Plus and Mac with the same Wi-Fi connection.

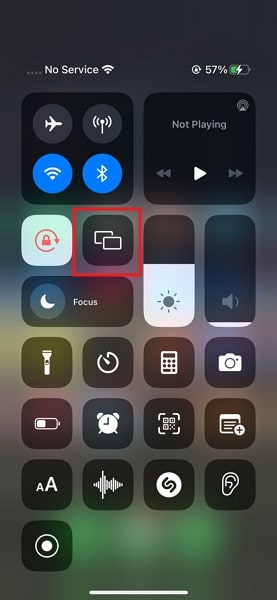
Step 2: As you launch Reflector on your Mac, move to your Apple iPhone 7 Plus and open its Control Center by swiping down the screen from the top right. If it is an Apple iPhone 7 Plus 8 or older device, you will have to swipe up from the bottom.
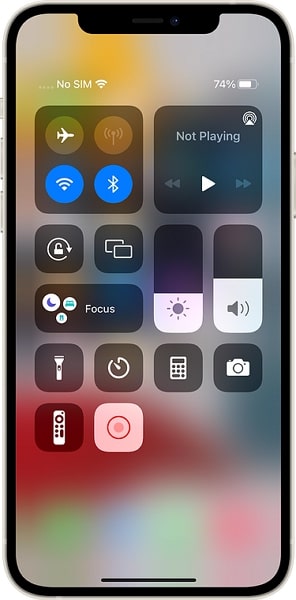
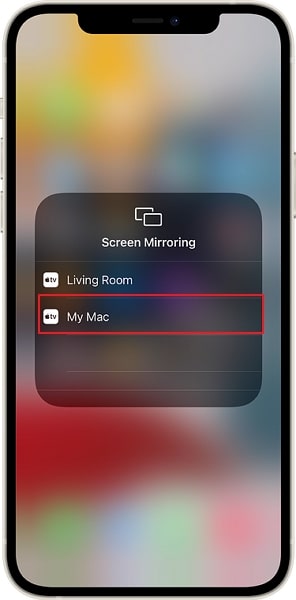
Step 3: Look for the “Screen Mirroring” button and hold it to access the following menu. Look for the Mac in the options appearing on the next window to establish a mirroring connection between Apple iPhone 7 Plus and Mac.
 /a>
/a>3. AirServer
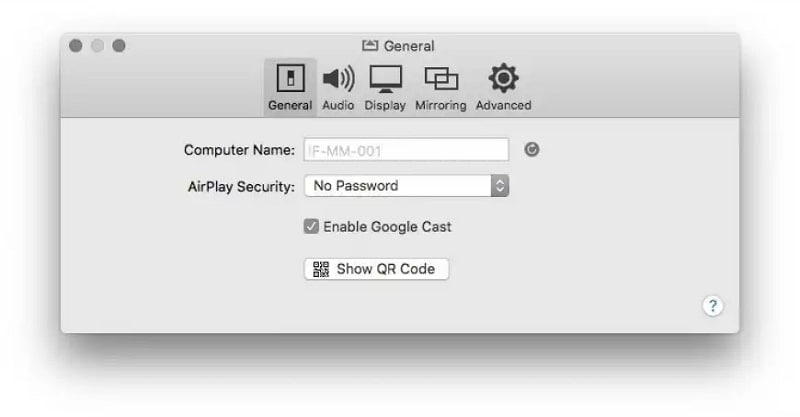
For users who are not satisfied with the services provided by other screen mirroring solutions, they can consider using AirServer to mirror Apple iPhone 7 Plus to Mac. This screen mirroring solution provides some of the best solutions in the mirroring facilities, which gives users a perfect platform to shift their screens. While it features support for AirPlay and Google Cast services, it gives other prominent options, such as high-quality recording.
Key Features
- With a coherent 1080p resolution, you can find crisp mirroring through AirServer.
- It also provides compatibility with Chromebooks and other desktop platforms that support Chrome.
- While connecting through AirPlay, the service protects the photos and videos of the user during transmission between devices.
Instructions to Mirror Apple iPhone 7 Plus to Mac Using AirServer
We will now see how AirServer helps you in screen mirroring your Apple iPhone 7 Plus to Mac with the available steps below:
Step 1: Look for AirServer on your Mac and download it successfully within the Apple iPhone 7 Plus device. During this, ensure that the Apple iPhone 7 Plus and AirServer are connected to the same Wi-Fi network.
Step 2: Continue to launch AirServer on your Mac and lead it to your Apple iPhone 7 Plus to access its Control Center.
Step 3: As you open the Control Center, find the “Screen Mirroring” option and hold it to open a new window. On the window, look for your Mac to execute proper screening through AirServer.
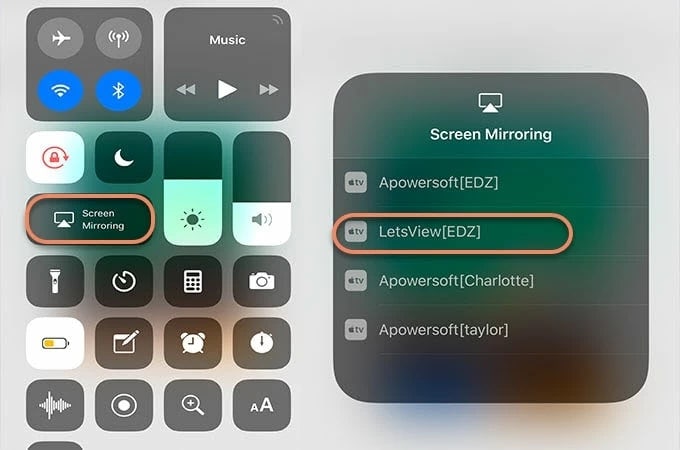
4. LetsView
Since you might be looking for a perfect solution to help you play games on a bigger screen, LetsView is a great option available as a screen mirroring app. This platform allows you to screen mirror from Apple iPhone 7 Plus to MacBook with the best-available services. Along with mirroring solutions, there are several casting options provided throughout this cross-platform application, making it a great tool to work with.
Key Features
- You can live to stream the mirrored content onto YouTube and other supported platforms.
- The process of connecting the Apple iPhone 7 Plus devices is quite basic and definite.
- It presents perfect displays of up to 120fps in quality.
How to Use LetsView for Mirroring iPhone?
To know how you can screen mirror your Apple iPhone 7 Plus to MacBook with this proficient screen mirroring solution, let’s look into the steps featured below:
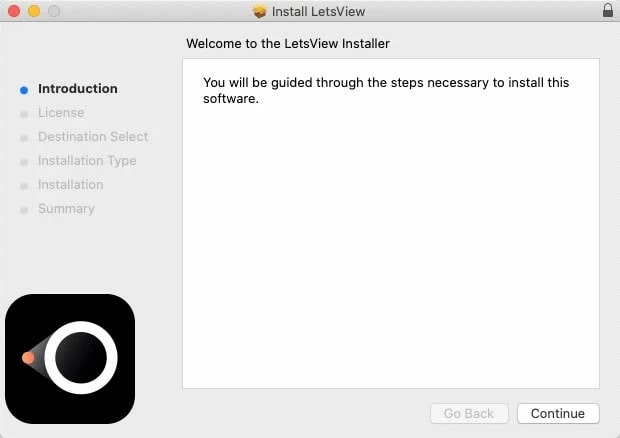
Step 1: You must ensure that LetsView is downloaded and installed on the Apple iPhone 7 Plus and Mac through the right sources. Following this, look into the Wi-Fi network connected to the Apple iPhone 7 Plus devices and ensure that it is the same.
Step 2: Access the iOS application of LetsView and select your Mac from the available list. Afterward, choose the “Phone Screen Mirroring” option to proceed.
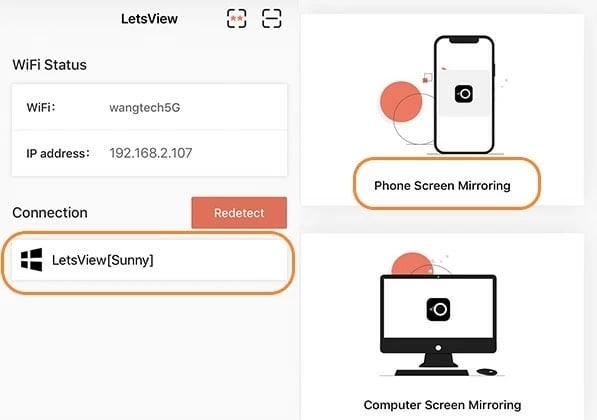
Step 3: Once done with it, go to the Control Center and select the “Screen mirroring” button. You should then select your Mac’s name in the list and continue mirroring the Apple iPhone 7 Plus to the Mac.
Bonus Tip: How to Choose Screen Mirroring Apps?
When selecting the right screen mirroring application, there are multiple factors to look into. From compatibility to ease of use, there are numerous reasons which make a screen mirroring app better the others. As this article has discussed a diversity of tools for this purpose, we will be helping you understand the pointers which should be considered while selecting a perfect screen mirroring app. For that, a comparison of the discussed tools has been provided in the table:
| Mirroring Tool | Price | Pros | Cons |
|---|---|---|---|
| QuickTime | |||
| 3.5/5 | Free | -No in-app pricing | |
| -Very easy to execute | -Not feature-rich | ||
| -It does not allow you to control the process | |||
| -Won’t work if the wire is damaged or glitchy | |||
| Dr.Fone Air | |||
| 4.8/5 | Free | -Does not require Bluetooth or NFC connection | |
| -Very easy to set up | |||
| -Highly controlling and effective in results | -Requires an internet connection to process | ||
| Reflector | |||
| 4.0/5 | $19.99 | -It can provide compatibility with different devices. | |
| -Easy to use for mirroring | -It can be quite glitchy in different instances. | ||
| -It can fail if AirPlay does not function properly. | |||
| AirServer | |||
| 3.6/5 | Educational - $7.99 to $11.99 | ||
| Consumer - $19.99 | |||
| Business - $39.99 | -It gives a robust and reliable connection between devices | ||
| -It can also screen mirror Xbox, which shows greater compatibility | -It is quite expensive from other options available. | ||
| -The connection can drop during a fast-paced process. | |||
| LetsView | |||
| 4.2/5 | Monthly - $19.95/user | ||
| Annual - $49.95/user | -The interface is simple and understandable | ||
| -You can screen record the Apple iPhone 7 Plus device during mirroring | -There is no option for device control available for smartphones | ||
| -It is pretty pricey compared to other screen mirroring tools. |
Conclusion
This article has provided a comprehensive overview of some of the best options available to mirror Apple iPhone 7 Plus to Mac. Where you can consider opting for a wired solution, a wireless solution gives you some of the best opportunities. Wondershare Dr.Fone Air does not disappoint with its quick functionality, making it a great option to consider in such situations.
6 Methods to Share Apple iPhone 7 Plus Screen with PC
Having an iPhone or iPad has many benefits as it has made our life easy. We can use iPhone/iPad for many purposes; connecting to the world, playing games, watching movies, capturing photos, etc. It becomes essential sometimes to share the screen of our iPhone with the PC for some purposes so we are going to teach you 6 different methods of sharing Apple iPhone 7 Plus screen with PC in this article. You can easily mirror your Apple iPhone 7 Plus screen on your personal computer following any of the mentioned methods.
Part 1: Sharing iPhone/iPad Screen using Wondershare Dr.Fone
In this part of the article, we are going to introduce you to Wondershare Dr.Fone. The Wondershare Wondershare Dr.Fone is the best tool for screen sharing of any iPhone/iPad with a PC. It helps you enjoy recording big screens and mirroring from your iOS devices as well. Using it, you can easily and wirelessly mirror your device to a computer, record videos, games, etc. Let’s learn now the steps of how to use this Wondershare Dr.Fone so that we can make of it whenever we need it.
Wondershare Dr.Fone
Easily record the screen of your Apple iPhone 7 Plus, iPad, or iPod
- Mirror your iOS device on your computer screen wirelessly.
- Record games, videos, and more on your PC.
- Wireless mirroring your Apple iPhone 7 Plus for any situation, such as presentations, education, business, gaming. etc.
- Supports devices running iOS 7.1 to iOS 12.
- Contains both Windows and iOS versions (the iOS version is unavailable for iOS 13/14).
3,660,936 people have downloaded it
Step 1. Run Dr.Fone
First of all, we need to run Wondershare Dr.Fone on our computer.
Step 2. Connecting Wi-Fi
We have to connect both our computer and Apple iPhone 7 Plus to the same Wi-Fi internet.
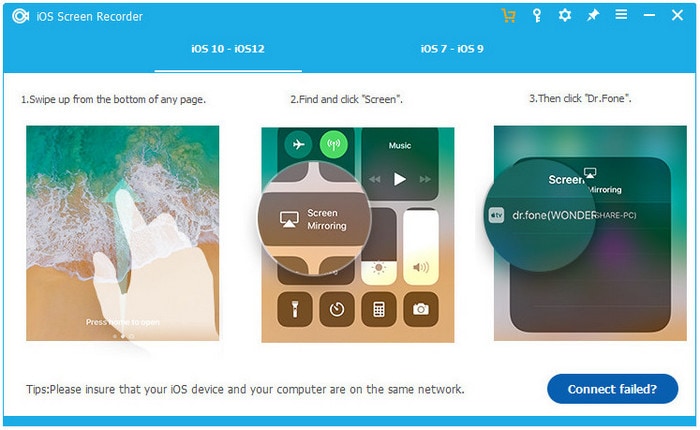
Step 3. Turn on Dr.Fone Mirorring
In this step, we have to enable Dr.Fone mirroring. If you have iOS 7, iOS 8, and iOS 9, you have to swipe and click on the ‘Airplay’ option and choose Dr.Fone as the target. After that, you check on Mirroring to enable it.

For those who have iOS 10, they can swipe and click on Airplay Mirroring. After that, you need to choose Dr.Fone.

Step 4. Click Button to Start Recording
We can see two buttons on the screen of our computer. In this final step, we have to tap on the left circle button to start the recording and the square button is for displaying the full screen. Pressing the Esc button on the keyboard will exit full screen and clicking on the same circle button will stop recording. You can also save the file.


Part 2: Sharing iPhone/iPad Screen using Reflector
The Reflector is a wirelessly mirroring and streaming receiver application that helps you share the screen of your Apple iPhone 7 Plus/iPad with your PC. You can mirror your device in real-time and the layout is adjusted by itself whenever a new device is connected. You can buy it for $14.99 from its official website and use it as per your need. Following the given steps will make you share your device screen on your PC in no moment.
Step 1. Download and Install Reflector 2
The first thing we need to do is to visit its official website and download it.

Step 2. Launch Reflector2
Now you have to launch Reflector 2 from the Start Menu in this step. You also need to click on Allow in Window Firewalls.
 WonderFox DVD Ripper Pro
Step 3. Swipe up to Control Center
Now you have to swipe up from the bottom of the Apple iPhone 7 Plus to open the Control Center.
 KoolReport Pro is an advanced solution for creating data reports and dashboards in PHP. Equipped with all extended packages , KoolReport Pro is able to connect to various datasources, perform advanced data analysis, construct stunning charts and graphs and export your beautiful work to PDF, Excel, JPG or other formats. Plus, it includes powerful built-in reports such as pivot report and drill-down report which will save your time in building ones.
 It will help you to write dynamic data reports easily, to construct intuitive dashboards or to build a whole business intelligence cockpit.
KoolReport Pro package goes with Full Source Code, Royal Free, ONE (1) Year Priority Support, ONE (1) Year Free Upgrade and 30-Days Money Back Guarantee.
Developer License allows Single Developer to create Unlimited Reports, deploy on Unlimited Servers and able deliver the work to Unlimited Clients.

Step 4. Tap on the Airplay
Here you have to tap on the Airplay icon and it will present you with a list of the available devices including your computer name.
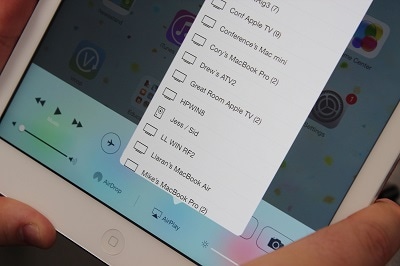
Step 5. Swipe the Mirror Toggle Switch
This is the final step and you have to swipe the mirror toggle switch after selecting your computer from the list. Now you have learned how to do it.

Part 3: Sharing iPhone/iPad Screen using AirServer
Airserver being an amazing screen mirroring app that allows you to share your Apple iPhone 7 Plus/iPad screen with your PC in no time following some easy steps. AirServer has many innovative features for enhancing our digital world. Whatever is your purpose behind screen mirroring, AirServer makes you feel proud of using it. Note that both the iPhone/iPad and the PC should be connected via the same networking. Now we will show how to use AirServeron your PC.
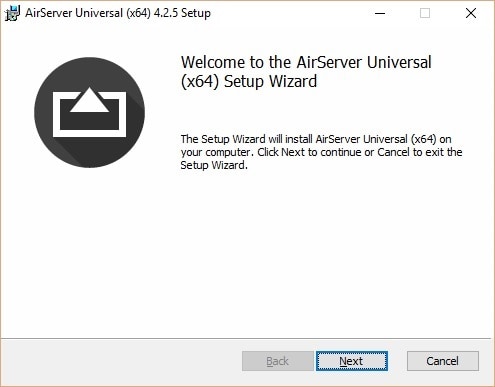
Step 1. Downloading and Installing AirServer
In the very first step, we will download and install AirServer on our PC.
Step 2. Activating AirServer after Launching
Once it is installed on our PC, we have to activate it using the activation code that we got after the purchase.

Step 3. Open Control Center of iPhone
Now we have to access the Control Center of our iPhone by swiping up from the bottom of the iPhone.

Step 4. Tap on Airplay & Enable Mirroring
In this step, we have to tap on the Airplay option as shown in the image. You also need to turn on mirroring by tapping on the Mirroring Slider. Now what you do on your Apple iPhone 7 Plus will mirror on your PC.


Part 4: Sharing iPhone/iPad Screen using 5KPlayer
When it comes to sharing the screen of an Apple iPhone 7 Plus to a PC and transfer files such as video, images to the PC, 5KPlayer is one of the best options. Having a built-in Airplay
sender/receiver, allows you to stream video from your Apple iPhone 7 Plus to your PC. Keep in mind that both the Apple iPhone 7 Plus devices: our iPhone and Computer must be connected to the same Wi-Fi. Let’s see how to share an Apple iPhone 7 Plus Screen to a PC using 5KPlayer.
Step 1. Download and install 5KPlayer
At first, we are going to download and install 5KPlayer on our PC. Once it is installed, we have to launch it.

Step 2. Open Control Center of iPhone
Now we have to access the Control Center of our iPhone by swiping up from the bottom of the iPhone.
 Project Manager - Asset Browser for 3Ds Max

Step 3. Tap on Airplay & Enable Mirroring
In this step, we have to tap on the Airplay option as shown in the image. You also need to turn on mirroring by tapping on the Mirroring Slider. Now what you do on your Apple iPhone 7 Plus
will mirror on your PC.
Part 5: Sharing iPhone/iPad Screen using LonelyScreen
In this last part of the article, we will talk about LonelyScreen which is a smart application for sharing an iPhone screen with a PC. As an airplay receiver for PC, LonelyScreen helps us cast an iPad screen easily to PC and we can enjoy music, movies, and whatever we want to mirror on the PC. Using LonelyScreen, we can easily change our PC into Apple TV and stream any content from our palm. Follow these simple and easy steps:
Step 1. Downloading and Running LonelyScreen
First of all, we are going to download and install Lonelyscreen on our PC. Here is the link for download for PC: http://www.lonelyscreen.com/download.html . Once installed, it will run by itself.

Step 2. Enable Airplay on iPhone
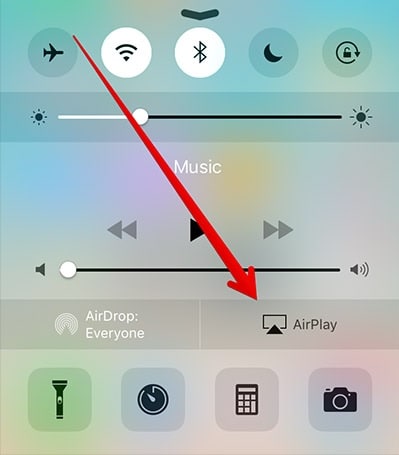
In this step, we have to enable Airplay on the iPhone. Swipe up from the bottom on the Apple iPhone 7 Plus to enter Control Center and tap on the Airplay option as in the image.


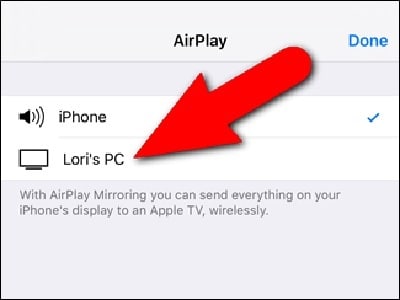
Step 3. Tapping on LonelyScreen Name
Now we have to tap on LonelyScreen or whatever name we assigned to the LonelyScreen receiver. Here in this, it is named as Lori’s PC.
Step 4. Tapping on Mirroring Slider
In this step, we are going to tap on the Mirroring slider to start mirroring on the Apple iPhone 7 Plus device. The mirroring slider button will turn green once it is connected. In this way, we have successfully shared the screen of an iPhone with the PC.

![]() FX PRO (Gold Robot + Silver Robot(Basic Package))
FX PRO (Gold Robot + Silver Robot(Basic Package))
Recommend: Use MirrorGo to share iPad screen with your PC

Wondershare Dr.Fone
Mirror your Apple iPhone 7 Plus/iPad to a big-screen PC
- Compatible with the latest iOS version for mirroring.
- Mirror and reverse control your Apple iPhone 7 Plus from a PC while working.
- Take screenshots and save directly on the PC
3,106,829 people have downloaded it
Step 1. Download MirrorGo software on the computer.
Download the software on the PC and launch it.
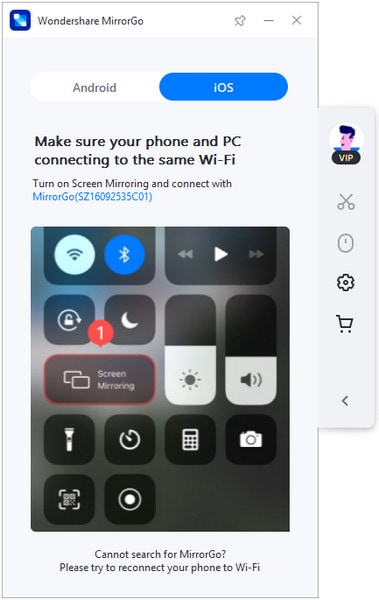
Step 2. Connect to the same Wi-Fi
Please connect your iPad and the computer with the same Wi-Fi thus they are in the same network. Select the MirrorGo under ‘Screen Mirroring’ as you see on the MirrorGo interface.
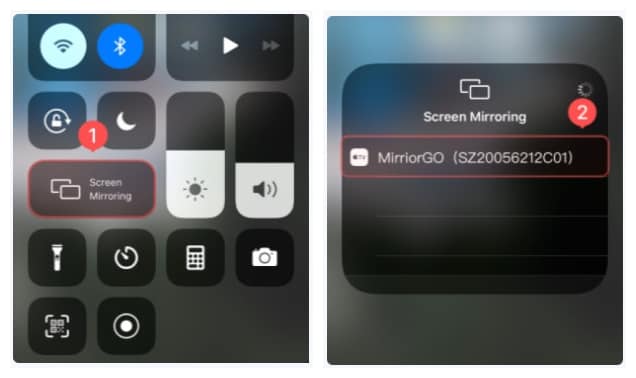
Step 3. Start mirroring your iPad
After you select the MirrorGo on your iPad, the screen will display on the computer.
This piece of writing is very useful to those who don’t know how to share the screen of an iPhone or iPad with a PC. You must have learned six different methods of sharing your Apple iPhone 7 Plus’s screen on your PC. You can use any one of the mentioned methods to enjoy screen mirroring.
- Title: How to Cast Apple iPhone 7 Plus to Chromecast? | Dr.fone
- Author: Seraphina
- Created at : 2024-07-26 05:20:00
- Updated at : 2024-07-27 05:20:00
- Link: https://screen-mirror.techidaily.com/how-to-cast-apple-iphone-7-plus-to-chromecast-drfone-by-drfone-ios/
- License: This work is licensed under CC BY-NC-SA 4.0.