How to Cast Vivo Y17s to Computer for iPhone and Android? | Dr.fone
How to Cast Vivo Y17s to Computer for iPhone and Android?
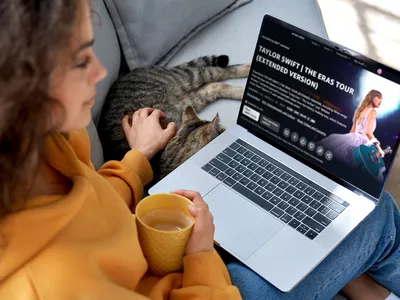
Screen Mirroring is a very common feature that is being adopted by many users as a cheap alternative to big, large screens. People have been managing to mirror their smartphone onto the screen of their PCs for viewing the content present on their phone with more detailing and precision. At times, people find the need to enjoy the contents present on their phones with their family, leading to the requirement of bigger screens. This article discusses various screencasting software providing the services to cast your Android or iPhones to PC that would help you in deciding what and how to use a specific software effortlessly.
When you can’t mirror phone to computer, view the guide of how to mirror Android to PC and how to mirror iPhone to PC.
Part 1: Cast Contents of iPhone and Android to Computer with MirrorGo
Sometimes the smaller Android or iPhone screen isn’t enough to accurately manage the app or files available on the Vivo Y17s device. Under such circumstances, the best solution is to cast Vivo Y17s to PC using a mirroring application.
Wondershare Dr.Fone is the safest option to perform such an activity, no matter the phone’s platform is Android or iOS. The app offers you to display your phone’s games, videos, and similar files to the much larger computer screen, where it is easy to complete the task at hand.
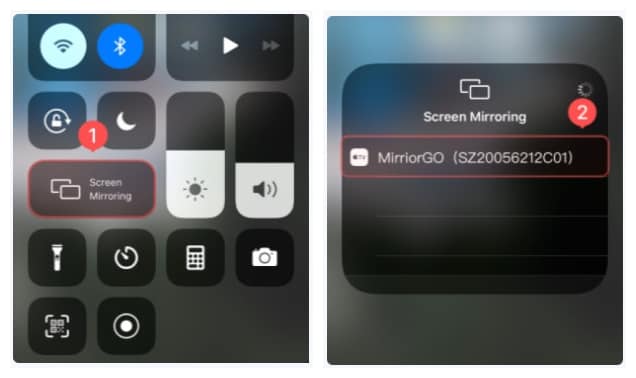
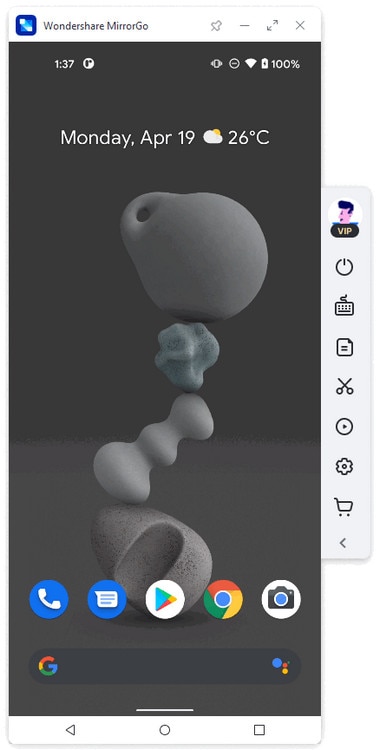
Step 1: Download MirrorGo and Connect the Phone with PC
MirrorGo is available for Windows PC. Download the application and launch it on the Vivo Y17s device. You will need to connect the Android phone with a USB cable. On the other hand, the iOS device needs to be connected to the same Wi-Fi network as the PC.
Step 2: Log in with Same credentials
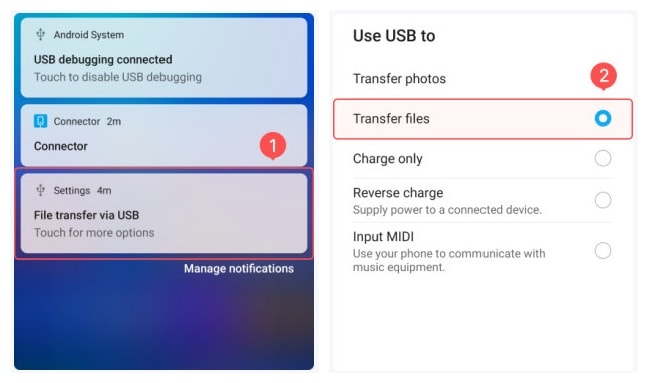
To enable casting with an Android device, you need to tap on the Developer Option 7 times under the About Phone button. After that, navigate to Additional Settings, where you need to toggle-on USB Debugging.

If you are using an iPhone, simply locate the Screen Mirroring option. After the scan, tap on MirrorGo before proceeding to Step 3.
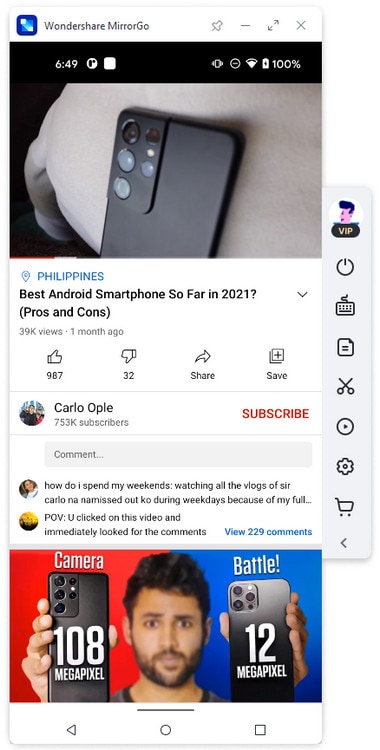
Step 3: Cast the Phone to Computer
Lastly, reaccess MirrorGo from the computer, and you’ll see the screen of the connected Android or iOS device.
Part 2: How to Cast Vivo Y17s to PC with AirDroid?
If we get started on the list of mirroring software that provides explicit services to its users, AirDroid can be considered as a frontline software for Android users for mirroring their screen on PC wirelessly. AirDroid provides a detailed feature set in the form of file transfer options, controlling your phone via computer and screen mirroring your phone to the PC with convenience. AirDroid is available for its users in the form of a desktop app and website. If you look forward to efficiently consume the platform in the form of the desktop application, you need to follow the step-by-step guide as provided below to control your Android phone from PC successfully.
Step 1: Download Application on both devices
Before using the services of the application, it is significant to install the desktop application from their official website and download the mobile application onto your Android phone through Google Play Store.
Step 2: Log in with Same credentials
For effectively mirroring your phone onto the PC screen, you are required to log in both platforms with the same username.
Step 3: Access the Appropriate Option
Select the “Screen Mirroring” button present on the window after you access the “Remote Control” tab on the sidebar of the platform. The screen is now mirrored onto the PC and can be viewed with ease.


Reflector 3 is another appreciable platform that provides you with screening services for both the Android and iPhone users. While understanding the basic differences in approaching the right options to cast your phone to PC, this article states the guideline for utilizing the services of Reflector 3 for both Android and iPhone separately.

For Android Users
Step 1: Download and Install
You need to download and install the application on your devices and have them connected to the same internet service provider. Launch the application to initiate the process.

Step 2: Open Settings on Phone
Following this, turn on your phone and slide down the finger to open the Quick settings section.
Step 3: Select the Casting Options
You need to turn on the casting option on the phone, which is either available under the name of Cast or Smart View.

Step 4: Select the Computer
A screen will open in front of you, consisting of the list of devices that can be wireless receivers of your screen. Tap the appropriate option to cast your phone onto the screen.

For iOS Users
Conversely, it is important to understand that with similar outcomes, there are different patterns of steps that are to be followed to screen your iPhone with the PC. For that, take a look at the guide provided as follows.
Step 1: Download and Launch
Download the software on both devices. Following, you need to confirm whether they are connected over the same internet connection. Then you can launch the program.
Step 2: Access Control Center
Now using your iPhone, swipe up to open the Control Center. Select the option of Screen Mirroring.

Step 3: Select the Appropriate Screen
With a list of Airplay-enabled receivers on the front, you have to tap on the right option to conclude the procedure of streaming or screening video from the phone to the computer.

Part 4: How to Cast Vivo Y17s to Computer by LetsView?
LetsView is another compelling and attractive platform that provides you the state-of-the-art environment for screen mirroring your phone to computer. This platform is available both on Google Play Store and App Store, making it an easy option for any kind of smartphone users.
For Android
To understand the method of screening your Android phone onto a PC screen, you need to follow the step-by-step guide provided below.
Step 1: Download and Launch
Ensure that the applications are downloaded on both applications, and both devices are connected with the same Wi-Fi.
Step 2: Detect your PC
While using LetsView on your phone, you need to detect your PC where you wish to mirror your screen and select it.
Step 3: Select the Appropriate Option
You’ll be led to another screen containing two options to select from. Since our objective is to mirror the screen of our Android phone to the computer, you need to select the option stating, Phone Screen Mirroring.

For iOS
Step 1: Download and Connect
You need to download the applications on both devices. Along with that, you need to make sure that both devices have the same internet connections.
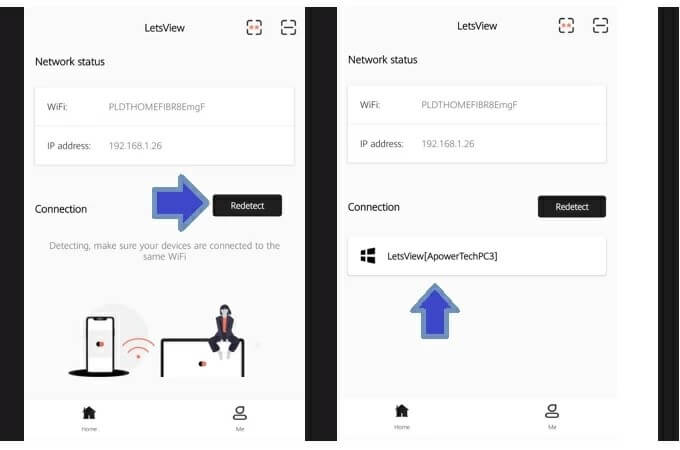
Step 2: Open Application and Detect PC
Following this, open the LetsView application on your iPhone and detect the PC by tapping on the “Redetect” button. Tap on the appropriate computer name.


Step 3: Mirror your Phone
This opens up another screen where you need to select the option quoting Phone Screen Mirroring to connect the phone to the computer screen.
Part 5: How to Mirror Phone to Computer with Dr.Fone Air
While you have looked into some great solutions to cast your phone to a PC, there is another tool that provides a similar experience in mirroring the screen of your phone onto a computer screen. Wondershare Dr.Fone Air is a great online tool designed for mirroring the phone’s screen onto the computer for free. While it is a quick solution to work with, Wondershare Dr.Fone Air features some great functionalities which make it a unique tool:
- You can easily adjust the mirrored screen by zooming in and out, taking screenshots, and rotating it.
- You are not required to use Bluetooth and NFC for connecting devices in the process.
- It is a simple and quick process to screen mirror devices onto another screen.
Screen Casting vs. Screen Mirroring: What’s the Difference?
You might have heard of screencasting and screen mirroring together many times. It may come as a surprise to you that these two terminologies hold considerable differences from each other. To simplify the difference, screencasting is performed with the motive of displaying the content of the screen on another output display in the same room.
For screen mirroring, you display the content of the screen on another display while showing all the movements of the screen. Screen mirroring gives you the leverage to use the smartphone without any interruption.

How to Use Dr.Fone Air to Mirror Phone to Computer
If you are looking forward to mirroring your phone screen to a PC using Dr.Fone Air, you must use the following steps:
Step 1: Access the Dr.Fone Air Tool
Open the official website of Wondershare Dr.Fone Air and proceed to connect your phone and PC to the same Wi-Fi connection.
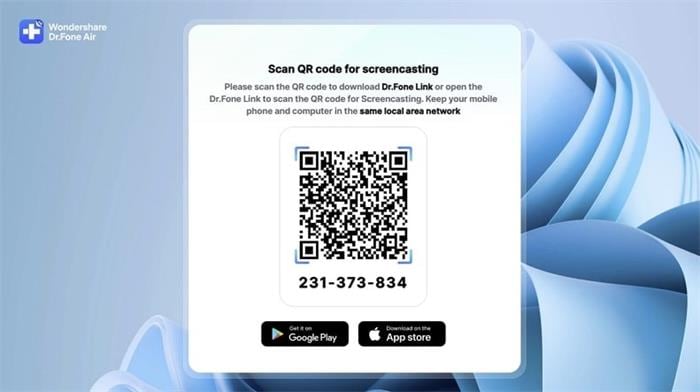
Step 2: Choose the Option for Connecting
As you connect these devices, proceed to install Dr.Fone Link on your phone. Once done, you will have to use the QR code or cast code displayed on the browser screen on your computer.
 Greeting Card Builder
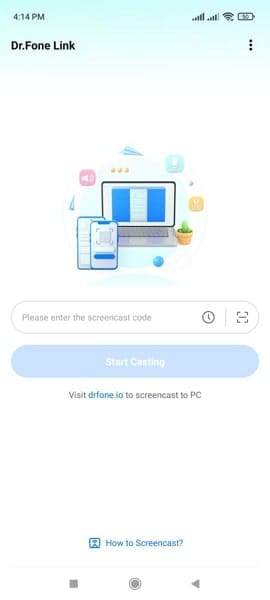
Step 3: Screen Mirrored Successfully
This will successfully execute the process and mirror the screen of your phone with the computer.

Conclusion
This article has provided a diversity of solutions for screencasting your phone to the computer. With the help of these solutions, you can quickly cast your phone to a PC without making it difficult for you. However, if you wish to have a better experience with screen mirroring your phone to a PC, you can consider using Wondershare Dr.Fone Air for effective results. This online solution won’t disappoint in providing a proper screen mirroring solution for your phone.
Process of Screen Sharing Vivo Y17s to PC- Detailed Steps
Currently, there are many companies where their employees work across different locations. For these teams, managing work between all members can get complex, and having to continually send files via email to all members. This can get tiring and complex to handle long term.
Comparatively, using the screen-sharing approach will help improve collaboration with multiple people.
In this context, you can use a capable remote access software like TeamViewer to share screens to PC from multiple devices, like Android-based smartphones and tablets. This helps professionals improve their teamwork, coordination, and interaction on projects, to name one benefit.
Read on to learn more about this software and how to screen share Android devices to it.

Part 1. What is TeamViewer?
TeamViewer is a remote access management platform for companies and regular people. They use it for better team activity management, especially remote teams. They can experience better work productivity when using this software, like with the screen-sharing features.
The latter allows for screen-to-screen content broadcasting that many people from varying locations. This is useful for multi-member meetings.
Key Features:
- Password protects the meetings from unauthorized access.
- Screen share to PC from different devices/apps.
- Handle around 10 video streams per remote control or meeting session.
- Set scheduled meetings.
Part 2. Key Benefits of the TeamViewer Screenshare Tool
When users operate with TeamViewer to screen-share to PC, there are many advantages they can enjoy. Here are some of them, explained in points for your reference.
- Improved collaboration- Professionals in different sectors and sizes can collaborate better using the TeamViewer screen-sharing feature. Organizers can share their Android screens with different meeting participants. And then the latter can work on the documents from any location or device.
- Streamlined productivity- TeamViewer users can easily share their data, like documents and presentations, with different users in real-time for discussion. This is instead of the conventional method of individually emailing them for review.
- Better onboarding and tutoring- Professionals using TeamViewer can do onboarding and training processes. For example, by sharing the screen with participants, they can visually show how processes or software types work.
- More robust Security- TeamViewer runs with AES (265-bit) encryption for sessions with RSA public/private key exchange support. This assures a safe and more controlled screen-sharing experience compared to other alternatives.
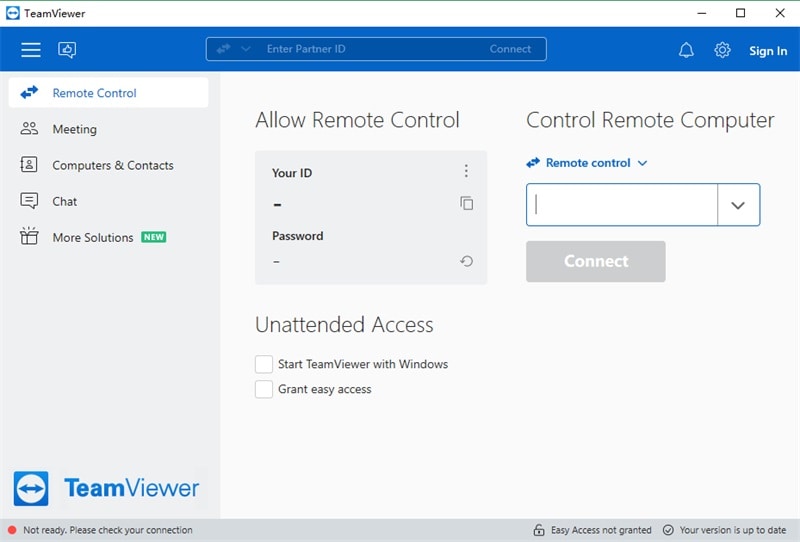
To correctly share the screen to PC, TeamViewer users can access it via Android smartphones or tablets. Here are the steps to share the screen with this platform.
Step 1: On the Android device, visit Google Play Store > install TeamViewer Host .
Step 2: If you do not have an account here, create a new one or log in.
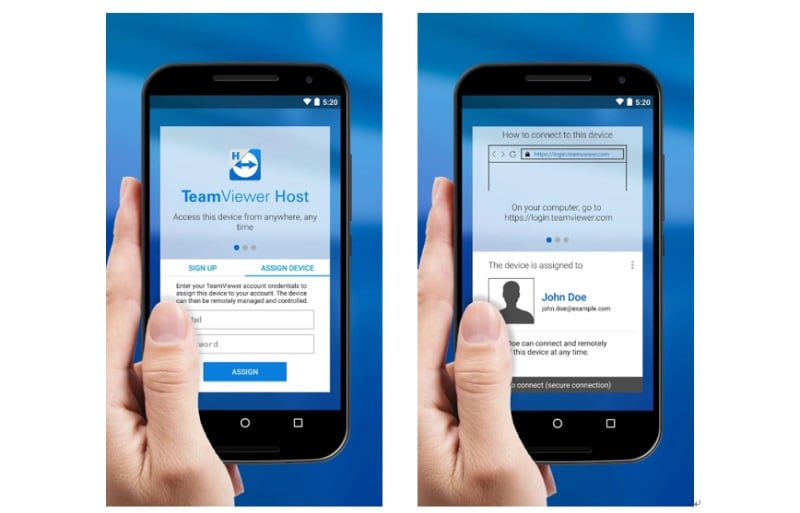
Step 3: On the PC (Windows/Linux/macOS), visit the login page via any preferred browser > Sign into the account that you created.
Step 4: A list of synced devices will appear. Tap the Connect button beside the Android device you share the screen from.
 CalendarBudget - Monthly subscription membership to CalendarBudget via web browser or mobile app. Support included.
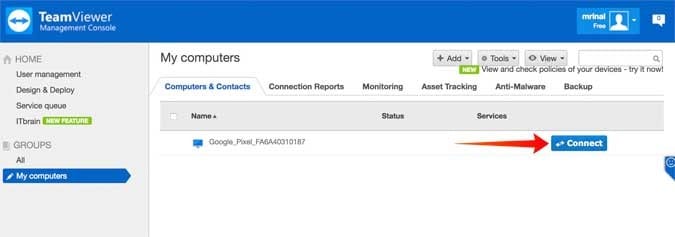
Step 5: The “Launch the TeamViewer” prompt will appear > Press OK. Before this, download and launch the app on your PC.
Step 6: The TeamViewer application will appear on your PC in a new window.
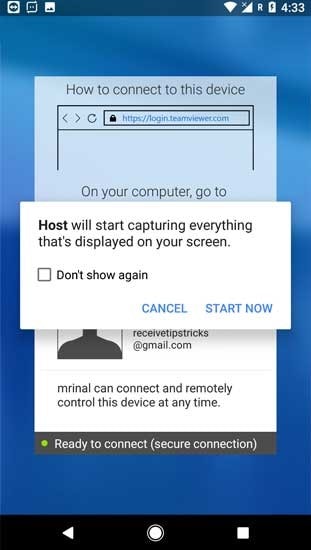
Step 7: Give the software permission for TeamViewer screen sharing on the Android smartphone. This will come up as a prompt “Host will start capturing everything that’s displayed on your screen” on your phone.
Step 8: Press Start Now > Don’t Show Again.
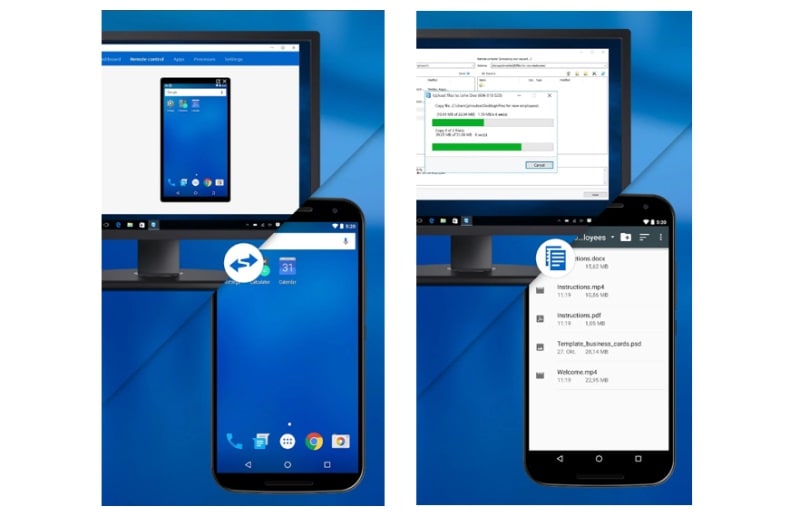
Step 9: The Android device screen will start sharing on the PC.
 SwifDoo PDF Perpetual (2-PC) Free upgrade. No monthly fees ever.
 HD Video Converter Factory Pro
Part 4. TeamViewer Reviews - Pros & Cons & Ratings
For screen sharing to PC, many companies globally turn to TeamViewer as their primary tool. Here’s the average rating of the software from users’ feedback.
Rating: 4.5 out of 5 (G2 )
Different users from companies have hailed the best user experience from this software- here are some of these reviews.
| User | Reviews |
|---|---|
| Eileen Currier | “This is a very User-Friendly software that allows someone to easily connect and fix problems.” |
| Alexandre Lundgren | “I am just impressed by the quality of TeamViewer. It is easy to learn and so powerful.” |
You will see certain advantages and disadvantages of this software when you use it to screen share to a PC.
Pros:
- Users can access it without getting an account as well.
- Easy functionality.
- Three concurrent sessions can also work with the single-user TeamViewer Remote Access plan, which costs less.
Cons:
- The free plan has limited benefits.
- Business users must pay high amounts to get a license for entire teams.
 /a>
/a>Part 5. Better Alternative for the TeamViewer Screenshare Tool
TeamViewer is helpful for screen sharing, but it is slightly complex. Besides, screen mirroring is a better alternative. During this, you can better control the elements on the screen or in-person meetings. On that note, Wondershare Dr.Fone Air is helpful software.
It is simple to use, and the software allows smooth wireless screen mirroring from Android and iOS smartphones onto Mac or Windows PC. The solution is free as well.
Price: Free
Features:
- Cross-platform.
- Easy and secure screen mirroring with controlled authorization.
- No need to attach cables or Bluetooth- it works wirelessly.
- Control screen elements like rotating screen, zoom in/zoom out, etc.
How to use it for Android-to-PC screen mirroring?
Download the Dr.Fone Link App on your Android smartphone.
Go to the official site on the PC via your preferred browser.
Connect the Vivo Y17s devices to the same network.
Sync the Vivo Y17s devices using the QR code/nine-digit Cast Code.
Finally, the screen mirroring process will begin.
Conclusion
TeamViewer is one of the best solutions users can use for professional remote team collaboration. The screen-sharing functionality is helpful for broadcasting content from an Android phone to a PC. For a more effortless experience, screen mirroring with Dr.Fone Air software works. So, you should consider that as well.
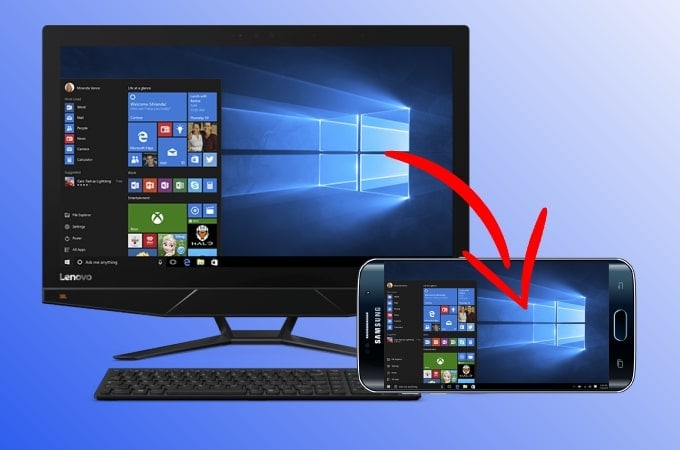
How Vivo Y17s Mirror Screen to PC?
Mirror Screening has been devised as one of the most exquisite and simplest features in sharing data that provides you with the ability to share your smaller screens onto larger ones for people to observe the information presented easily. Many mirror screening applications have been introduced and have been brought on the front to filter out the best in the market; however, the method involving sharing the screen to the PC or other associated devices have been recognized as quite simple and effective in performance. This article provides Vivo Y17s users, in specific, a list of solutions that can act as the easiest and the most convenient in allowing them to share their screen with a PC.
 With Screensaver Wonder you can easily make a screensaver from your own pictures and video files. Create screensavers for your own computer or create standalone, self-installing screensavers for easy sharing with your friends. Together with its sister product Screensaver Factory, Screensaver Wonder is one of the most popular screensaver software products in the world, helping thousands of users decorate their computer screens quickly and easily.
Part 1: Why Need Screen Mirroring?
If we consider the traditional and conventional methods of connecting AV cables, HDMI’s, or VGA adapters for connecting smaller screened devices to larger screens, these methods present too much work and a series of protocols that potentially outdated the system completely. In the environment that we survive in, it is significant for us to understand that presenters keep their data intact on their smartphones and have it efficiently shared among his colleagues before the discussion. The wireless screen technology enables presenters to pose such a system into power, which not only increases the mobility but the efficiency of the system too without any unnecessary delays in connecting the Vivo Y17s device with a larger platform. Screen mirroring can be set as the most optimal solution to such issues, which would not only allow you to enjoy presenting but save a lot of effort before developing the frame of presentation.
 DEX 3 RE is Easy-To-Use DJ Mixing Software for MAC and Windows Designed for Today’s Versatile DJ.
Mix from your own library of music, iTunes or use the Pulselocker subsciprtion service for in-app access to over 44 million songs. Use with over 85 supported DJ controllers or mix with a keyboard and mouse.
DEX 3 RE is everything you need without the clutter - the perfect 2-deck mixing software solution for mobile DJs or hard-core hobbiests.
PCDJ DEX 3 RE (DJ Software for Win & MAC - Product Activation For 3 Machines)
Part 2: How to Mirror Android to PC Wirelessly?
Screen mirroring can be covered through wired and wireless connections. If you are willing to work on a wireless solution, there are several options to come by. In this part, we will be analyzing the multiple options that can be used for Vivo Y17s mirroring to a PC.*
1. Vivo Y17s View in Vivo Y17s Flow
Vivo Y17s Flow is known for providing multiple device solutions for Vivo Y17s smartphone users. For people who are searching for an option to perform screen mirroring on their PC, they can try this official approach of mirroring Vivo Y17s devices to their PC.
With the option of providing seamless access to Vivo Y17s users, the Vivo Y17s View function gives a perfect system of mirroring the Vivo Y17s device in no time. To know how Vivo Y17s View in Vivo Y17s Flow helps in Vivo Y17s mirroring to PC,* you must look into the following steps:
Step 1: You must start by downloading and installing the Vivo Y17s Flow application on your computer and Vivo Y17s smartphone. Before launching the application for mirroring the Vivo Y17s device to a PC, you must ensure that the Vivo Y17s devices are connected to the same Wi-Fi.
Step 2: Following this, you must go through the PC version of Vivo Y17s Flow and find your phone name to generate the credentials to connect the Vivo Y17s device to the PC. This pairing process will generate a passcode that needs to be entered into the phone to initiate a connection.
 Simple and intuitive video editing
Step 3: As the pairing process succeeds, you can click on the “Smart View” button on the PC to mirror the Vivo Y17s to your PC.


2. Wondershare Dr.Fone Air – Online Screen Mirror
For a better user experience, Wondershare Dr.Fone Air provides an online, wireless screen mirroring experience with no specific requirements of user efforts. This tool features a simple environment for putting up a Vivo Y17s device for screen mirroring on the PC. Along with diverse compatibility, this tool provides a quick solution with the option of saving time and cost for the user. There are many pointers that make Wondershare Dr.Fone Air a provocative solution to work with, which are featured as follows:
- You are not required to connect your Vivo Y17ss through Bluetooth and NFC.
- There are no ads covering the tool, avoiding all sorts of damage to the user experience.
- It allows you to adjust the mirrored screen by rotating, zooming, and taking screenshots.
We will now shift towards mirroring the Vivo Y17s screen to the PC with the help of Wondershare Dr.Fone Air. For that, we will use the following steps as help:
Step 1: Launch Dr.Fone Air and Connect to Wi-Fi
You must open the Dr.Fone Air platform on the web browser of your PC. Continue with connecting the Vivo Y17s and computer with the same Wi-Fi connection.
 Any DRM Removal for Win:Remove DRM from Adobe, Kindle, Sony eReader, Kobo, etc, read your ebooks anywhere.
Step 2: Scan or Add Code for Connection
Following this, you must install the Dr.Fone Link on your device and continue connecting both devices. You can make use of the QR code or cast code for connecting both devices.
Step 3: Mirror Vivo Y17s Device to PC
On scanning the code, the Vivo Y17s devices connect with each other, and the Vivo Y17s screen successfully mirrors the PC.

3. Connect App on Windows
Windows devices come with another great option of screen mirroring a device onto the screen without requiring downloading any tool. This feature was made available on Windows 10 devices and continues to provide users with a quick solution to Vivo Y17s screen mirroring to PC.* The Connect App can be considered to connect your Vivo Y17s device with the PC by following a set of steps, which are discussed as follows:
Step 1: You need to access the “Action Center” on the bottom-right of the screen and proceed to activate “Bluetooth” from the available options. Afterward, select the “Connect” option.

Step 2: Afterward, open the “Quick Menu” of your Vivo Y17s device and enable the option of “Smart View.” You will see all the available options on your Vivo Y17s screen with whom you can create a connection. Select your device from the list and press the “Start Now” button to start the mirroring process.


Step 3: Following this, you will receive a confirmation pop-up notification on your PC. You have to hit the “OK” button to mirror your Vivo Y17s phone to your PC successfully.


4. Mirror Vivo Y17s Phone to PC with MirrorGo
There is no bigger brand for Android phones than Vivo Y17s. The phones are loaded with features that offer users convenience, such as fast charging. You can also mirror your Vivo Y17s phone to the PC with the help of MirrorGo by Wondershare.
The tool is accessible from Windows and works well with every known model of Vivo Y17s Android phones. If you wish to transfer files, play games, or watch movies from phone to PC, then MirrorGo will enable everything for you. The simplistic and fast interface of the software allows you to complete the task at hand quickly.
Wondershare Dr.Fone
Mirror your Vivo Y17s deviceto your computer!
- Play mobile games on the big screen of the PC with MirrorGo.
- Store screenshots taken from the phone to the PC.
- View multiple notifications simultaneously without picking up your phone.
- Use android apps on your PC for a full-screen experience.
4,783,042 people have downloaded it
The steps to mirror the Vivo Y17s device using MirrorGo from PC are listed follows:
Step 1: Access MirrorGo
The first step is to download the software on your PC. Run the app after installing it. Make sure the Vivo Y17s phone is connected to the PC, and the File Transfer option is enabled from the phone’s USB settings.
Step 2: Enable USB Debugging and Developer Mode
Tap on the About Phone button from Settings and tap on Build Number 7 times to activate the Developer Mode. Go to Additional Settings and check the Debugging Mode option. Tap on OK to finalize the procedure.
Step 3: Mirror the Vivo Y17s Phone using MirrorGo
Now, look over to the MirrorGo’s interface, and you will see the main screen of your Vivo Y17s device there. The mirroring will be enabled on the Vivo Y17s device.
Part 3: How to Mirror Android to PC without Root via USB
While there are many wireless solutions that you can come across for mirroring your Android device to the PC, you can also try using the wired methods. If you are not finding the right platform to establish a wireless connection, you will have to mirror the Android device to the PC through a USB connection. There are many options available, out of which we have highlighted the following tools for you:
 Software Update Pro - Check and update software installed on your computer.
1. AirDroid Cast
AirDroid Cast is a renowned method available for users who seek to mirror their Android device to their PC through a USB connection. The tool is majorly focused on providing casting solutions to users who seek to put their devices’ display on a bigger screen. While the tool establishes a strong connection, it offers powerful casting support. Although the process takes a while to conclude, it can still be considered a great option if you are looking to Vivo Y17s cast to a PC* through a USB connection. Look into the following steps to know how you can use AirDroid Cast for this purpose:
Step 1: You must download and install AirDroid Cast on your computer and proceed to launch it. Redirect to the “USB” section from the top and connect your Android to the PC through a cable connection.
Step 2: In the “Available Device” list, select the Vivo Y17s device you want to cast.

Step 3: You might have to enable USB debugging on your Vivo Y17s device. For this, access “Settings” and look for the “About phone” option. Proceed into the “Software information” section and look for “Build number” on the next screen. Tap it seven times until you become a developer, which will allow you to enable USB debugging.

Step 4: Redirect into the “Settings” of your Vivo Y17s device and find the “Developer options.” Look for the “USB Debugging” option on the next screen and turn on the toggle. As the process is concluded successfully, the Vivo Y17s screen is cast onto the PC.

2. Vysor
If you are looking to mirror your Vivo Y17s screen to the PC with another option, Vysor is a good option to work with without rooting your device. This process requires you to utilize the USB connection for establishing the screen mirroring environment. Following this, Vysor provides a diversity of options to set, which acts as the parameters of the final product being obtained. Let’s look at how you can screen mirror your Vivo Y17s device on Vysor:
Step 1: Download and install Vysor on your Windows computer and continue to launch it. As it opens on the new window, proceed to initialize the settings.
Step 2: You must connect your Google account with Vysor if required. Checkmark the options of “International Keyboard” and “Share All Devices” to mirror the Vivo Y17s on your PC.
 Allavsoft Batch Download Online Videos, Music Offline to MP4, MP3, MOV, etc format

Step 3: As you connect your Vivo Y17s to the PC through a wire, ensure that USB debugging is enabled for the Vivo Y17s device. If it is enabled, it will be automatically detected by Vysor. Continue clicking on the “View” button to observe the mirroring results on your PC.

Conclusion
This article has provided a comprehensive overview of how one can mirror their Vivo Y17s device with the right set of methods. As you have the option of adopting both wireless and wired methods, this article helps you out in making proper decisions. Wondershare Dr.Fone Air provides one of the simplest options for mirroring the Vivo Y17s device to the PC in no time. Try this free wireless option for the perfect Vivo Y17s screen mirroring to a PC.*
- Title: How to Cast Vivo Y17s to Computer for iPhone and Android? | Dr.fone
- Author: Seraphina
- Created at : 2024-07-26 08:13:50
- Updated at : 2024-07-27 08:13:50
- Link: https://screen-mirror.techidaily.com/how-to-cast-vivo-y17s-to-computer-for-iphone-and-android-drfone-by-drfone-android/
- License: This work is licensed under CC BY-NC-SA 4.0.