
In 2024, Best 3 Nokia C12 Pro Emulator for Mac to Run Your Wanted Android Apps | Dr.fone
Best 3 Nokia C12 Pro Emulator for Mac to Run Your Wanted Android Apps
Mac OS, on the other hand, is a wonderful operating system used by Apple Inc. on it’s Mac PC and MacBook. It has a marvelous user interface and great features. It will be fantastic if we were able to use Android apps on Mac PC. Luckily, it is possible by using an emulator. In this article, we will learn about the five best Android Emulators for Mac.
 Glarysoft File Recovery Pro - Helps to recover your lost file/data, even permanently deleted data.
Part 1. Why You Would Run Android Apps on Mac
- • To run around 1.2 million apps on Mac from Google Play Store.
- • To play tons of Android games on larger screen.
- • People, who spend a good amount of time in front of desktop, will find it more convenient if they were able to use apps like WeChat, WhatsApp, Viber, Line etc. on their Mac.
- • App developer can test their apps on the desktop before sending it to the Google Play Store for user reviewing.
- • Some Emulator supports battery and GPS widgets. So, developers can test their apps based on the battery performance and can also test how their apps will work on different geographical locations.
Part 2. Top 3 Android Emulator for Mac
 vMix 4K - Software based live production. vMix 4K includes everything in vMix HD plus 4K support, PTZ control, External/Fullscreen output, 4 Virtual Outputs, 1 Replay, 4 vMix Call, and 2 Recorders.
1. BlueStacks
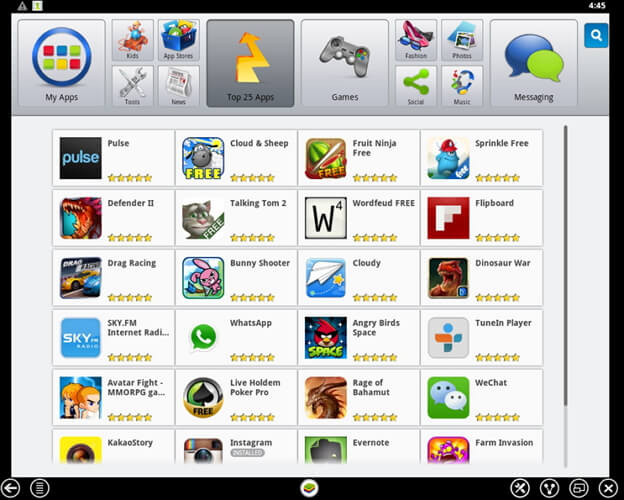
BlueStacks App Player is probably the most popular emulator for running Android apps on Mac. It is available for both Mac and Windows. It creates a virtual copy of Android OS apps on the guest OS. It uses the unique “LayerCake” technology that allows you to run android apps on your PC without any external Virtual Desktop Application. Once install user can enjoy Android games and apps such as News Feeds, Social Network on a large screen.
BlueStacks maintain an internal search manager that allows any apk, the package file format that is used to distribute and install application and middleware on any Android device, to install within it. It can be
Advantage
- • .apk files can be installed into BlueStacks from Mac simply by double clicking.
- • It can also sync between the apps on Mac and the android phone or tablet by installing BlueStacks Cloud Connect app on Android Device.
- • Apps can be launched directly from Mac dashboard.
- • No need to configure additional Internet connection as it automatically gets the Internet connection of host computer.
- • BlueStacks App Player is available for both Windows and Mac.
Disadvantage
- When running complex graphic apps it fails to respond to the input in a timely fashion.
- It does not provide any mechanism to uninstall cleanly from the host computer.
Download
- • It can be downloaded from the official website of BlueStacks . It is absolutely free.
How to use
Download BlueStacks for Mac OS X from the official website of BlueStacks and install it like any other software on your PC. Once installed, it will boot up to its Home Screen. From there you can find the installed apps, find new apps in the “Top Charts”, search apps, play games and change settings. Mouse will be the basic touch controller. To access Google Play you will have to associate a Google Account with BlueStacks.
2. Genymotion
Genymotion is a fast and wonderful third party emulator that can be used to create a virtual environment for Android. It is the fastest Android emulator on the earth. It can be used to develop, test and run Android apps on Mac PC. It is available for Windows, Mac, and Linux machine. It is easy to install and can create a customized android device. You can start multiple virtual devices at the same time. It has the pixel perfect functionality so you can be precise to your UI development. By using the OpenGL acceleration it can achieve the best 3D performance. It directly commands the virtual devices sensors with Genymotion sensors. It is evolution of the Android open source project and already trusted by about 300,000 developers around the globe.
Advantage
- • Best 3D performance is achieved through OpenGL acceleration.
- • Support full screen option.
- • Can start multiple virtual devices at the same time.
- • Fully compatible with ADB.
- • Available for Mac, Windows and Linux machine.
Disadvantage
- • Require virtual Box to run Genymotion.
- • Cannot deploy Android machine offline.
Download
- Genymotion can be downloaded from the official website of Genymotion. The latest version of Genymotion is 2.2.2. You have to choose a package that meets your requirements.
How to use
- 1. Download Genymotion. You have to create an account to download it.
- 2. Open the .dmg installer. It will also install Oracle VM Virtual Box on your computer.
- 3. Move the Genymotion and Genymotion Shell to application directory.
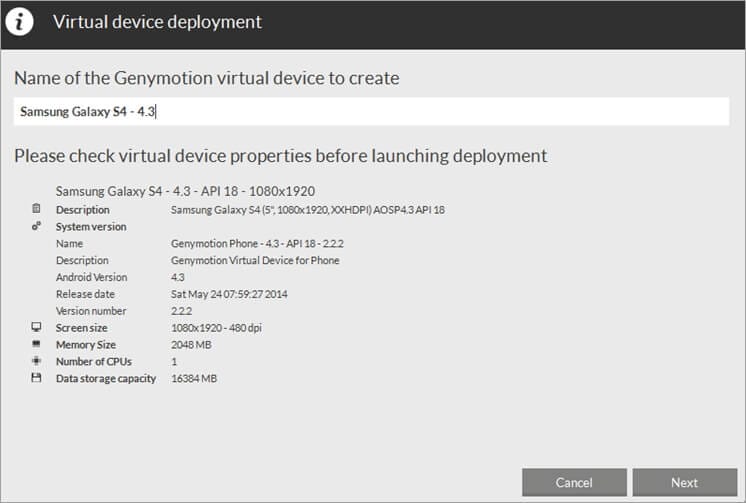
- 4. Click the icon from Application directory and the following window will appear.
- 5. To add virtual device click on the add button.
- 6. Click on the connect button.
- 7. Enter your user name and password to connect to the Genymotion Cloud and click on the connect button. After connecting with the Genymotion cloud the following screen will appear.
- 8. Select a virtual machine and click on Next.
- 9. Give a name for the Virtual machine like below and click on Next.
- 10. Your virtual device will be now be downloaded and deployed. Click on the Finish button after successful deployment of your virtual machine.
- 11. Click on the Play button to start the new virtual machine and enjoy.
3. Andy
Andy is an open source emulator that allows developers and users to enjoy more robust apps, to experience them in multiple device environments, and to stop being constraint by the limits of device storage, screen size or separate OS. User can update their Android through Andy. It provides seamless sync between desktop and mobile device. User can use their phone as joystick while playing games.
Advantage
- • It provides a seamless sync between desktop and mobile device.
- • Enable Android OS update.
- • Enable app download from any desktop browser to Andy OS.
- • Phones can be used as joystick while playing games.
- • Unlimited storage expansion.
Disadvantage
- • Increase CPU usage.
- • Consumes a lot of physical memory.
Download
- • You can download Andy from <www.andyroid.net>.
How to Use
- 1. Download and install Andy.
- 2. Launch Andy. It will take about a minute to boot and then it should see a welcome screen.
- 3. Sign into your Google Account and complete the rest of the setup screen. You will be asked to provide your Google Account Information to 1ClickSync, the app that let’s you sync between Andy and the mobile device

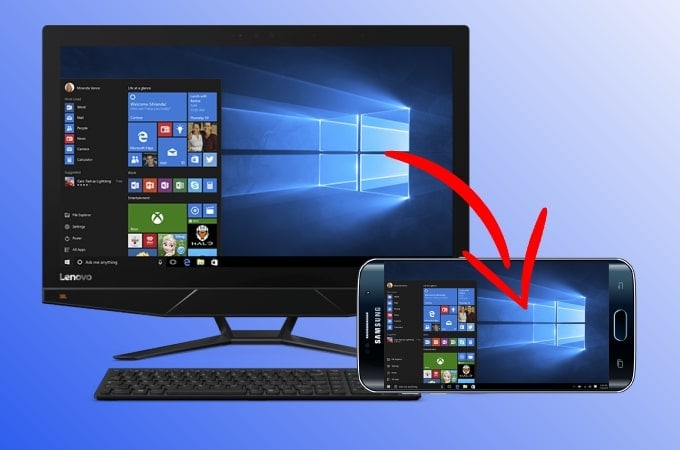
How Can Nokia C12 ProMirror Share to PC?
It usually happens with you during an office presentation or a task where you encounter with such an important video or detail that you find effective to be discussed or shown among your colleagues. At such stages, there are no properly designed cheap tools available that would help you cast the screen from your phone onto a bigger screen, allowing people to have a good look over the screen and develop their analysis out of it. Screen Mirroring has provided an ultimate solution to such needs and presented impressive and simple platforms that would allow you to mirror your device onto a bigger screen. Nokia C12 Prophones are counted among the most commonly used Android devices where people have complained about the availability of the screen sharing feature for displaying its screen onto massive ones for people to have a wider view of the objectives presented. This article discusses different mechanisms that allow you to mirror Nokia C12 Proto PC through a variety of methods involving different functions of the phone.
Part 1: Nokia C12 ProMirror Share to PC using Nokia C12 Pro’s Multi-Screen
Nokia C12 Prohas recognized the significance of the feature and has devised its mechanism by providing the screen mirroring capability on its phone. This built-in feature makes it quite easier for you to share Nokia C12 Pro’s screen to PC. The mirroring feature offered by Nokia C12 Procan be countered in a few easy steps that are quite not strenuous to understand. To get ahold of Nokia C12 Pro’s mirror sharing feature to PC, follow the steps provided below.
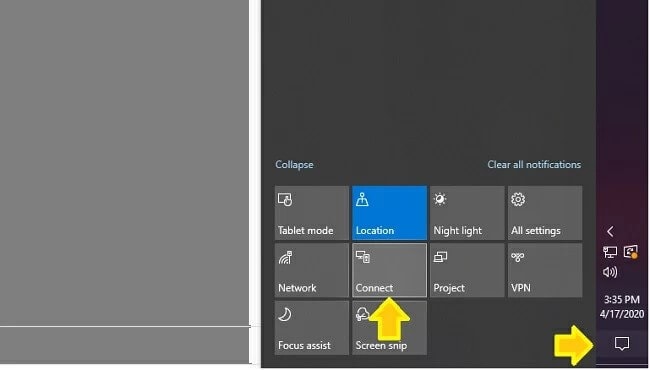
Step 1: Open Connections from Computer
It is necessary to have your devices attached for screen mirroring through a single Wi-Fi connection. After connecting your PC and Nokia C12 Prousing the same Wi-Fi source, access the Notification Center of your PC by tapping on the bottom right button to lead to a new screen. Tap on “Connect” from the list of options under the Collapse section.
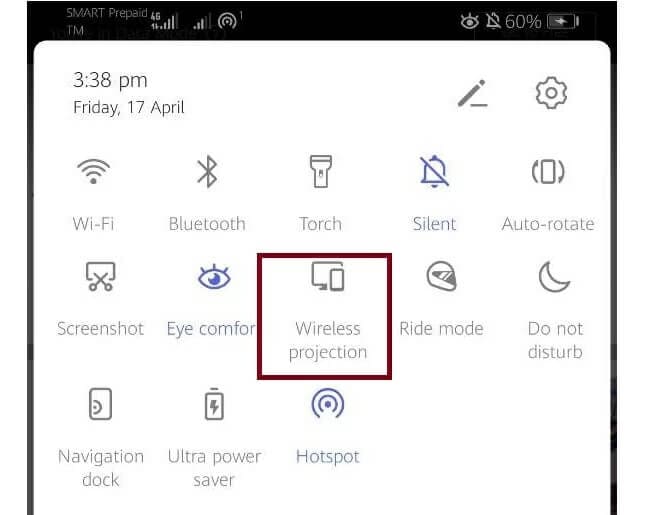
Step 2: Access Your Nokia C12 Pro
Following this, you need to select the option of mirroring Nokia C12 Proscreen to PC by accessing the Notification bar from the top of the phone. From the series of a different prompt button, you need to select “Wireless Projection” to mirror Nokia C12 Proto PC.
Step 3: Selecting the Computer
A new window opens on the front of the screen. It will consist of the Nokia C12 Pro devices that are available on the same Wi-Fi connection to get shared. After selecting the appropriate computer, you can conclude the procedure since anything opened on the screen can now be observed on the PC as well.
Part 2: MirrorGo: The Best Mirroring Application
If you are up for searching other options to mirror share Nokia C12 Proto PC, there are many other platforms that may provide you effective mirroring services. However, while understanding the saturation that exists in the market, this article intends to provide you with a perfect platform for mirror sharing your Nokia C12 Proto PC with ease.
Wondershare Dr.Fone offers the best results with HD resolution for a better experience over a big screen. This application intends to develop a controlled environment over the computer for the user, as compared to other platforms that desperately fail to offer a controlled foundation in screen mirroring. MirrorGo looks over a vast window of practical applications, for which it consists of tools that have a use apart from screen mirroring. MirrorGo offers you to record your mirrored device screen, take a screenshot of an important frame, or even have it shared across different viewing platforms. This platform seeks to induce a better approach to mirroring your Nokia C12 Proto PC as compared to the other software existing in the market. To understand the simple guide on how to efficiently utilize the platform, you need to look over the steps adjourned below.
Wondershare Dr.Fone
Mirror your Nokia C12 Pro deviceto your computer!
- Share Nokia C12 Proscreen to computer.
- Drag and drop files between your computer and phone directly.
- Send and receive messages using your computer`s keyboard including SMS, WhatsApp, Facebook, etc.
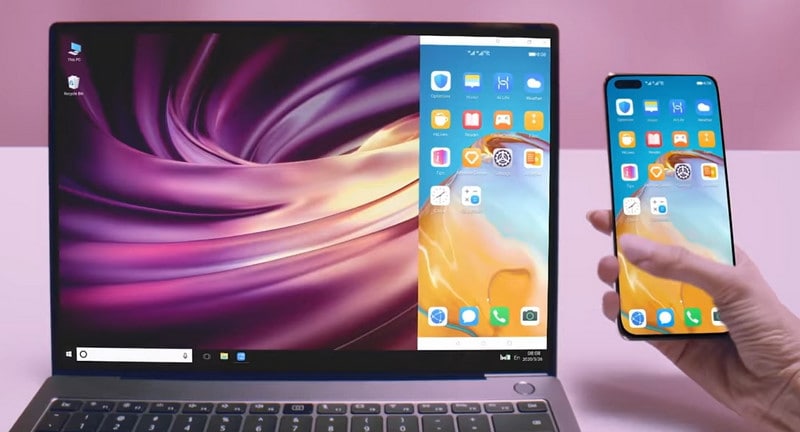
- Use android apps on your PC for a full-screen experience.
- Record your classic gameplay.
- Screen Capture at crucial points.
- Share secret moves and teach next level play.
4,227,666 people have downloaded it
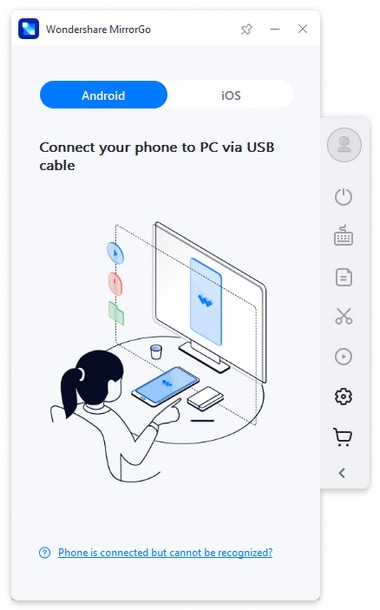
Step 1: Connecting your PC
It is important to have your PC attached to the specific Nokia C12 Prodevice that you wish to mirror onto it. For this, you can consume a USB cable to successfully establish a connection.
 KoolReport Pro is an advanced solution for creating data reports and dashboards in PHP. Equipped with all extended packages , KoolReport Pro is able to connect to various datasources, perform advanced data analysis, construct stunning charts and graphs and export your beautiful work to PDF, Excel, JPG or other formats. Plus, it includes powerful built-in reports such as pivot report and drill-down report which will save your time in building ones.
 It will help you to write dynamic data reports easily, to construct intuitive dashboards or to build a whole business intelligence cockpit.
KoolReport Pro package goes with Full Source Code, Royal Free, ONE (1) Year Priority Support, ONE (1) Year Free Upgrade and 30-Days Money Back Guarantee.
Developer License allows Single Developer to create Unlimited Reports, deploy on Unlimited Servers and able deliver the work to Unlimited Clients.
Step 2: Accessing Settings
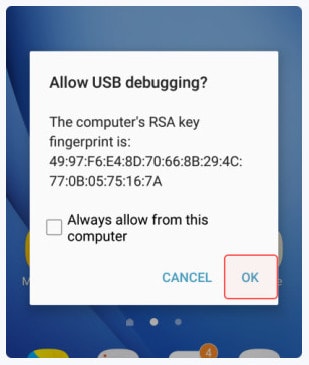
Following this, you need to access the settings of you Nokia C12 Proto open the “System & Updates” section. Click on the “Developer Options”. Then enable USB Debugging with the toggle available on the window.
Step 3: Mirror your Device
After successfully enabling USB Debugging, a pop-up appears on the Nokia C12 Prodevice, asking for an establishment of a mirroring environment. Tap “Ok” to successfully mirror your device across the PC.

Mirroring Android Devices has been made easier with a very definitive and expansive device of AllCast where you can share your Nokia C12 Proscreen to PC by following a few steps, as stated below.
Step 1: Download Applications on both devices
You need to have the AllCast application on both your PC and Nokia C12 Prophones for connecting them, and mirrors share your screen to the PC.
Step 2: Open Computer Receiver
After ensuring that the PC, as well as the mobile phone, are connected over the same Wi-Fi device, you need to initiate the process by opening the AllCast Receiver through the Chrome Application Launcher.
Step 3: Initiate Mirror Share
After getting the appropriate settings on the computer, you need to propagate towards the phone. Initiate ‘Screen Recording and Mirror’ on the Nokia C12 Pro.
Step 4: Synchronize Devices
In the options presented by “Screen Recording and Mirror,” you need to access the “Network Devices” and select the appropriate desktop model. Selecting the model will start screen sharing with ‘Chrome @’ followed by the IP Address of the computer. This allows you to mirror your Nokia C12 Proscreen to PC wirelessly through AllCast without difficulty.
 Glarysoft File Recovery Pro Annually - Helps to recover your lost file/data, even permanently deleted data.
Conclusion
This article has introduced several screens mirroring platforms that can be used to mirror share Nokia C12 Proto PC. The perfect adoption of such issues will surely lead you to understand the system more appropriately and develop a ground where you present an effective change through this function.
Process of Screen Sharing Nokia C12 Pro to PC- Detailed Steps
Currently, there are many companies where their employees work across different locations. For these teams, managing work between all members can get complex, and having to continually send files via email to all members. This can get tiring and complex to handle long term.
Comparatively, using the screen-sharing approach will help improve collaboration with multiple people.
In this context, you can use a capable remote access software like TeamViewer to share screens to PC from multiple devices, like Android-based smartphones and tablets. This helps professionals improve their teamwork, coordination, and interaction on projects, to name one benefit.
Read on to learn more about this software and how to screen share Android devices to it.

WPS Office Premium ( File Recovery, Photo Scanning, Convert PDF)–Yearly
 Nero Burning ROM:
The ultimate burning program for all your needs!
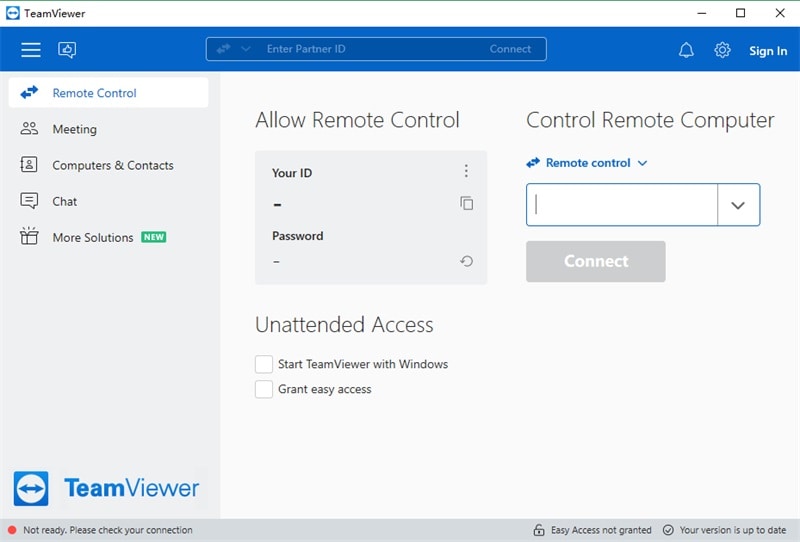
Part 1. What is TeamViewer?
TeamViewer is a remote access management platform for companies and regular people. They use it for better team activity management, especially remote teams. They can experience better work productivity when using this software, like with the screen-sharing features.
The latter allows for screen-to-screen content broadcasting that many people from varying locations. This is useful for multi-member meetings.
Key Features:
- Password protects the meetings from unauthorized access.
- Screen share to PC from different devices/apps.
- Handle around 10 video streams per remote control or meeting session.
- Set scheduled meetings.

Part 2. Key Benefits of the TeamViewer Screenshare Tool
When users operate with TeamViewer to screen-share to PC, there are many advantages they can enjoy. Here are some of them, explained in points for your reference.
- Improved collaboration- Professionals in different sectors and sizes can collaborate better using the TeamViewer screen-sharing feature. Organizers can share their Android screens with different meeting participants. And then the latter can work on the documents from any location or device.
- Streamlined productivity- TeamViewer users can easily share their data, like documents and presentations, with different users in real-time for discussion. This is instead of the conventional method of individually emailing them for review.
- Better onboarding and tutoring- Professionals using TeamViewer can do onboarding and training processes. For example, by sharing the screen with participants, they can visually show how processes or software types work.
- More robust Security- TeamViewer runs with AES (265-bit) encryption for sessions with RSA public/private key exchange support. This assures a safe and more controlled screen-sharing experience compared to other alternatives.
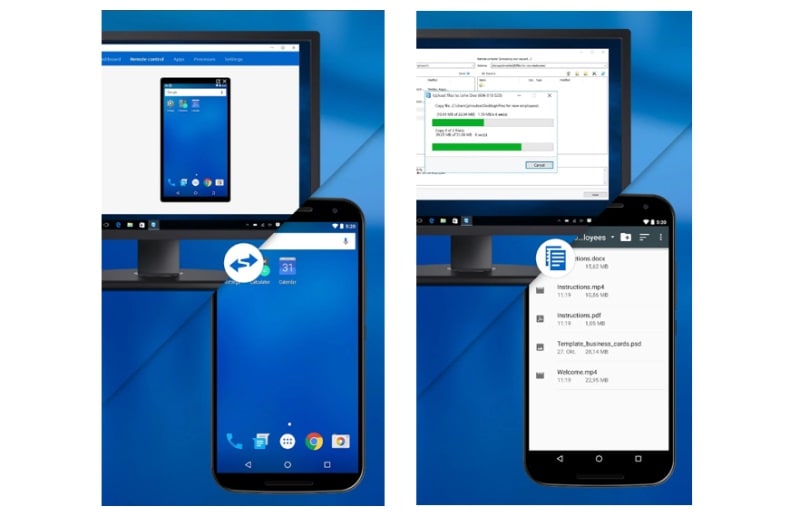
To correctly share the screen to PC, TeamViewer users can access it via Android smartphones or tablets. Here are the steps to share the screen with this platform.
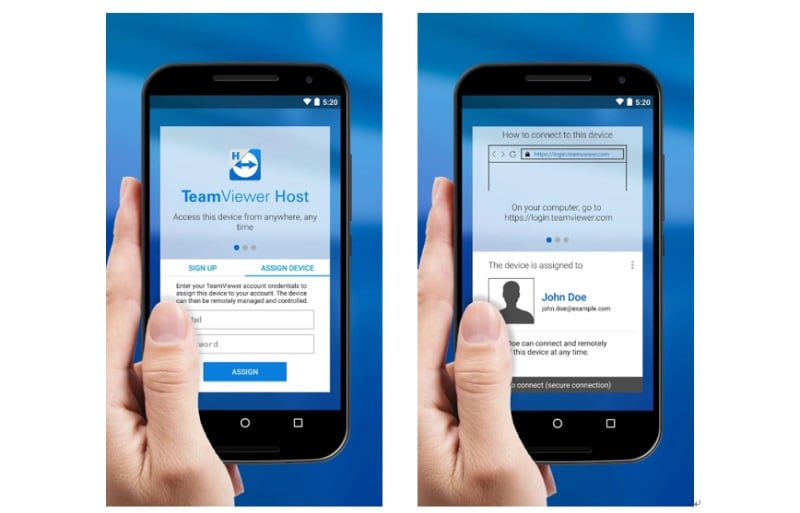
Step 1: On the Android device, visit Google Play Store > install TeamViewer Host .
Step 2: If you do not have an account here, create a new one or log in.
Step 3: On the PC (Windows/Linux/macOS), visit the login page via any preferred browser > Sign into the account that you created.
Step 4: A list of synced devices will appear. Tap the Connect button beside the Android device you share the screen from.
 PearlMountain Image Converter
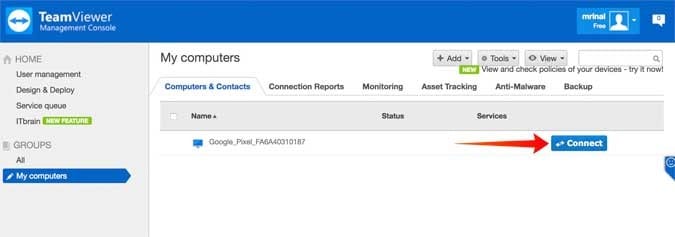
Step 5: The “Launch the TeamViewer” prompt will appear > Press OK. Before this, download and launch the app on your PC.
Step 6: The TeamViewer application will appear on your PC in a new window.
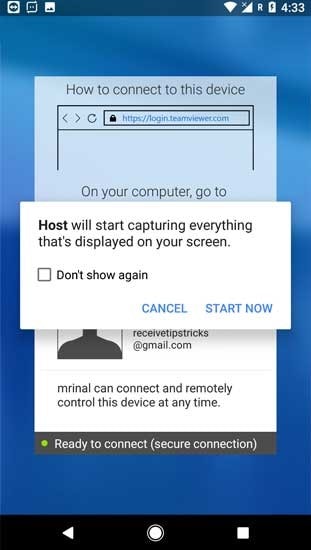
Step 7: Give the software permission for TeamViewer screen sharing on the Android smartphone. This will come up as a prompt “Host will start capturing everything that’s displayed on your screen” on your phone.
Step 8: Press Start Now > Don’t Show Again.
Step 9: The Android device screen will start sharing on the PC.
Part 4. TeamViewer Reviews - Pros & Cons & Ratings
For screen sharing to PC, many companies globally turn to TeamViewer as their primary tool. Here’s the average rating of the software from users’ feedback.
Rating: 4.5 out of 5 (G2 )
Different users from companies have hailed the best user experience from this software- here are some of these reviews.
| User | Reviews |
|---|---|
| Eileen Currier | “This is a very User-Friendly software that allows someone to easily connect and fix problems.” |
| Alexandre Lundgren | “I am just impressed by the quality of TeamViewer. It is easy to learn and so powerful.” |
You will see certain advantages and disadvantages of this software when you use it to screen share to a PC.
Pros:
- Users can access it without getting an account as well.
- Easy functionality.
- Three concurrent sessions can also work with the single-user TeamViewer Remote Access plan, which costs less.
Cons:
- The free plan has limited benefits.
- Business users must pay high amounts to get a license for entire teams.
Part 5. Better Alternative for the TeamViewer Screenshare Tool
TeamViewer is helpful for screen sharing, but it is slightly complex. Besides, screen mirroring is a better alternative. During this, you can better control the elements on the screen or in-person meetings. On that note, Wondershare Dr.Fone Air is helpful software.
It is simple to use, and the software allows smooth wireless screen mirroring from Android and iOS smartphones onto Mac or Windows PC. The solution is free as well.
Price: Free
Features:
- Cross-platform.
- Easy and secure screen mirroring with controlled authorization.
- No need to attach cables or Bluetooth- it works wirelessly.
- Control screen elements like rotating screen, zoom in/zoom out, etc.
How to use it for Android-to-PC screen mirroring?
Download the Dr.Fone Link App on your Android smartphone.
Go to the official site on the PC via your preferred browser.
Connect the Nokia C12 Pro devices to the same network.
Sync the Nokia C12 Pro devices using the QR code/nine-digit Cast Code.
Finally, the screen mirroring process will begin.
Conclusion
TeamViewer is one of the best solutions users can use for professional remote team collaboration. The screen-sharing functionality is helpful for broadcasting content from an Android phone to a PC. For a more effortless experience, screen mirroring with Dr.Fone Air software works. So, you should consider that as well.
- Title: In 2024, Best 3 Nokia C12 Pro Emulator for Mac to Run Your Wanted Android Apps | Dr.fone
- Author: Seraphina
- Created at : 2024-07-26 06:36:04
- Updated at : 2024-07-27 06:36:04
- Link: https://screen-mirror.techidaily.com/in-2024-best-3-nokia-c12-pro-emulator-for-mac-to-run-your-wanted-android-apps-drfone-by-drfone-android/
- License: This work is licensed under CC BY-NC-SA 4.0.