
In 2024, How To Do Vivo V30 Screen Sharing | Dr.fone
How To Do Vivo V30 Screen Sharing

Smartphones by Vivo V30 are rich in functionality and offer multiple benefits to users. However, do we ever wonder about using screen share in Vivo V30 ?
Whether there is a need to show unique clicks or videos on a bigger screen or want to stream amazing content on big TVs or computers, we must know how to screen share on a Vivo V30 phone. It becomes a lot easier to cater to a big audience with big screens.
So today, let us go through a detailed guide on **how to screen share in Vivo V30 ** to smart TVs and computers.
 vMix HD - Software based live production. vMix HD includes everything in vMix Basic HD plus 1000 inputs, Video List, 4 Overlay Channels, and 1 vMix Call
Part 1: Does Screen Sharing Use Bluetooth?
Bluetooth is not used for screen sharing as it does not have the bandwidth required to stream heavy media. Although it is commonly used for wireless data transfer, it is not suited for screen sharing. A major reason behind this is the slowness of Bluetooth, as its maximum speed for data sharing is up to 50MB/s. That makes it unreliable for screen sharing, making Wi-Fi the default choice.
Part 2: How to Share Screen From Vivo V30 Phone to Vivo TV Using Smart View?
Samsung Smart View is a feature in Vivo V30 devices that allows you to **screen share on Vivo V30 ** Smart TV. First introduced as an app, it is now an in-built feature of One UI.
When using the Smart View feature, you can share videos, photos, documents, games, and other things on your Vivo V30 device to your Vivo TV. The Smart View app allows you to use your Vivo V30 device as a virtual remote to control your Smart TV.

Requirements for Smart View App
The Vivo V30 Smart View app was introduced in 2011 to allow Vivo V30 users to share their device’s screen with Vivo TVs. Although it was discontinued on 05 October 2020 and replaced with Smart Things, its existing user base was not disturbed.
If they were already using the Smart View app or downloaded it before discontinuation, they can use it as long as they don’t uninstall it. These are the minimum requirements to use Smart View App on a device:
Android: It can be used on Android devices with Android OS 4.1 or above.
Samsung Smart TVs
All the Samsung Smart TVs after 2015 are compatible with Samsung Smart View. Below is the list of older Vivo TV models that offer Smart View compatibility for Samsung users:
- 2011 LED D7000 and above, PDP D8000 and above.
- 2012 LED ES7500 and above, PDP E8000 and above.
- 2013 LED F4500 and above (except F9000 and above), PDP F5500 and above.
- 2014 H4500, H5500 and above (except H6003/H6103/H6153/H6201/H6203).
- 2015 J4500, J5500 and above (except J6203).
- 2016 K4300, K5300 and above.
Samsung Devices with Smart View Feature
With the introduction of One UI in Samsung devices, the Smart View was added as an in-built feature. All Samsung devices launched with One UI can use the Smart View feature to share their device’s screen with Vivo TV. The Samsung devices that support the Smart View feature include Galaxy S Series, Galaxy Z Series, Galaxy Note Series, Galaxy A Series, Galaxy M Series, and Galaxy F Series.
Steps for Using Smart View to Share Screen
Before explaining the steps, it is important to state that available screens and settings may change depending on your device, Smart TV, or service provider. The Smart View feature is also unavailable on all Samsung devices, and you might need to use the Smart View or Smart Things app.
Ensure that your Samsung device and Smart TV are connected to the same network, and follow these steps for screen sharing:
Step 1: After connecting your device and Smart TV to the same Wi-Fi network, open the “Quick Panel” on your Samsung device. Here, press and enable “Smart View.”
Step 2: Select your Vivo TV among the available devices when Smart View is enabled. Once connected, choose the content you want to share on the TV screen.

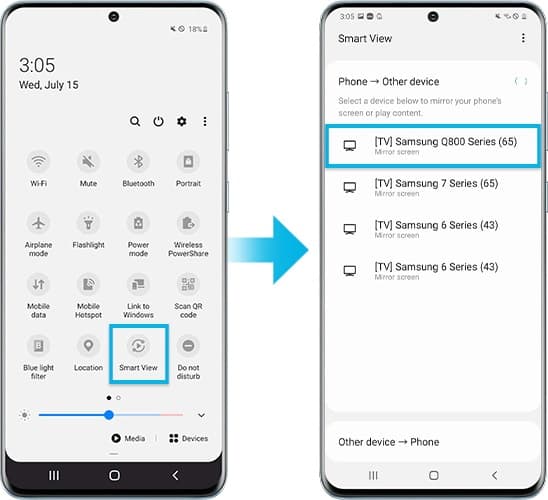
Step 3: You can select your desired content through options like My Photos, My Videos, or My Music. When the desired content is selected, you can enjoy it on a bigger screen.

Part 3: How to Share Screen From Samsung Phones to Other Smart TVs?
If your Smart TV is of another brand instead of Samsung, it is still possible to share the Samsung devices screen with your TV. Multiple tools are available online that can be used to share your Samsung device with your TV, depending on the TV brand. You can use tools like AllShare Cast, Chromecast, or Amazon Firestick.
Like Smart View, all wireless screen share tools require your Samsung device and Smart TV to be connected to the same network. Once connected, you will need to plug the respective tool’s adapter into your Smart TV, and you should be able to share your Samsung device. If your Smart TV doesn’t support Miracast, you can use AllShare Cast Wireless Hub for screen sharing.
Part 4. How to Share Screen From Samsung Phone to Computer Using Dr.Fone Air?
After learning about screen sharing to TVs, it is about sharing a Samsung phone screen with a computer. There is no need to worry, as we have a perfect wireless solution.
Dr.Fone Air is a powerful online screen mirror solution allowing screen sharing in Samsung to any computer. It can quickly mirror a Samsung phone to any web browser using a Wi-Fi connection only. Further, it is easy to download Wondershare Dr.Fone Air from its official website.
Key Features of Dr.Fone Air
- It provides great cross-platform support for screen sharing and casting. You can easily share screens from Android or iOS to Windows or Mac.
- You don’t need to give any unnecessary permissions when using Dr.Fone Air. It also doesn’t require Bluetooth or NFC for screen sharing.
- Your data during screen sharing remain protected as it doesn’t require downloading or uploading your content.
Steps of Using Dr.Fone Air for Screen Sharing
Sharing your Samsung phone screen with your Vivo TV using Dr.Fone Air is a simple and quick process. Your Samsung device and Vivo TV needs to be connected to the same Wi-Fi network. Once they are connected, follow these steps for screen sharing:
- Downloading and launching Dr.Fone Air: The first step is to download and launch Dr.Fone Air from the official website. The next step is to connect the Samsung phone and computer with the same Wi-Fi connection.
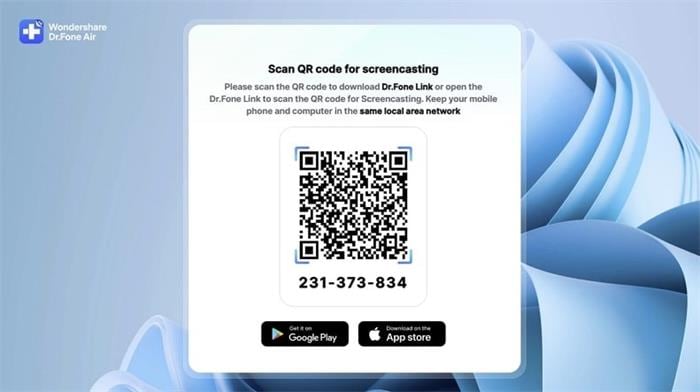
- Using QR or Cast code: The second step is to use the QR or Cast code as shown on the screen of the browser.
- Mirroring Samsung phone to computer: The Samsung phone will be automatically mirrored to the computer on successful scanning or code entering.


Conclusion
Hope everything is clear to our readers about the different methods to share the screen in Samsung. The detailed steps for screen sharing on Samsung phones to Vivo TVs and other Smart TVs make it easy for users to optimize the benefits of the big screen.
Make sure to check out is using Dr.Fone Air for sharing screens from Samsung phones to computers directly. It is a reliable, secure, and quick method to wirelessly mirror any mobile phone screen to any web browser.
Best 3 Vivo V30 Emulator for Mac to Run Your Wanted Android Apps
Mac OS, on the other hand, is a wonderful operating system used by Apple Inc. on it’s Mac PC and MacBook. It has a marvelous user interface and great features. It will be fantastic if we were able to use Android apps on Mac PC. Luckily, it is possible by using an emulator. In this article, we will learn about the five best Android Emulators for Mac.
Part 1. Why You Would Run Android Apps on Mac
- • To run around 1.2 million apps on Mac from Google Play Store.
- • To play tons of Android games on larger screen.
- • People, who spend a good amount of time in front of desktop, will find it more convenient if they were able to use apps like WeChat, WhatsApp, Viber, Line etc. on their Mac.
- • App developer can test their apps on the desktop before sending it to the Google Play Store for user reviewing.
- • Some Emulator supports battery and GPS widgets. So, developers can test their apps based on the battery performance and can also test how their apps will work on different geographical locations.
Part 2. Top 3 Android Emulator for Mac
1. BlueStacks
BlueStacks App Player is probably the most popular emulator for running Android apps on Mac. It is available for both Mac and Windows. It creates a virtual copy of Android OS apps on the guest OS. It uses the unique “LayerCake” technology that allows you to run android apps on your PC without any external Virtual Desktop Application. Once install user can enjoy Android games and apps such as News Feeds, Social Network on a large screen.
BlueStacks maintain an internal search manager that allows any apk, the package file format that is used to distribute and install application and middleware on any Android device, to install within it. It can be
Advantage
- • .apk files can be installed into BlueStacks from Mac simply by double clicking.
- • It can also sync between the apps on Mac and the android phone or tablet by installing BlueStacks Cloud Connect app on Android Device.
- • Apps can be launched directly from Mac dashboard.
- • No need to configure additional Internet connection as it automatically gets the Internet connection of host computer.
- • BlueStacks App Player is available for both Windows and Mac.
Disadvantage
- When running complex graphic apps it fails to respond to the input in a timely fashion.
- It does not provide any mechanism to uninstall cleanly from the host computer.
Download
- • It can be downloaded from the official website of BlueStacks . It is absolutely free.
How to use
Download BlueStacks for Mac OS X from the official website of BlueStacks and install it like any other software on your PC. Once installed, it will boot up to its Home Screen. From there you can find the installed apps, find new apps in the “Top Charts”, search apps, play games and change settings. Mouse will be the basic touch controller. To access Google Play you will have to associate a Google Account with BlueStacks.

2. Genymotion
Genymotion is a fast and wonderful third party emulator that can be used to create a virtual environment for Android. It is the fastest Android emulator on the earth. It can be used to develop, test and run Android apps on Mac PC. It is available for Windows, Mac, and Linux machine. It is easy to install and can create a customized android device. You can start multiple virtual devices at the same time. It has the pixel perfect functionality so you can be precise to your UI development. By using the OpenGL acceleration it can achieve the best 3D performance. It directly commands the virtual devices sensors with Genymotion sensors. It is evolution of the Android open source project and already trusted by about 300,000 developers around the globe.
Advantage
- • Best 3D performance is achieved through OpenGL acceleration.
- • Support full screen option.
- • Can start multiple virtual devices at the same time.
- • Fully compatible with ADB.
- • Available for Mac, Windows and Linux machine.
Disadvantage
- • Require virtual Box to run Genymotion.
- • Cannot deploy Android machine offline.
Download
- Genymotion can be downloaded from the official website of Genymotion. The latest version of Genymotion is 2.2.2. You have to choose a package that meets your requirements.
How to use
- 1. Download Genymotion. You have to create an account to download it.
- 2. Open the .dmg installer. It will also install Oracle VM Virtual Box on your computer.
- 3. Move the Genymotion and Genymotion Shell to application directory.
- 4. Click the icon from Application directory and the following window will appear.
- 5. To add virtual device click on the add button.
- 6. Click on the connect button.
- 7. Enter your user name and password to connect to the Genymotion Cloud and click on the connect button. After connecting with the Genymotion cloud the following screen will appear.
- 8. Select a virtual machine and click on Next.
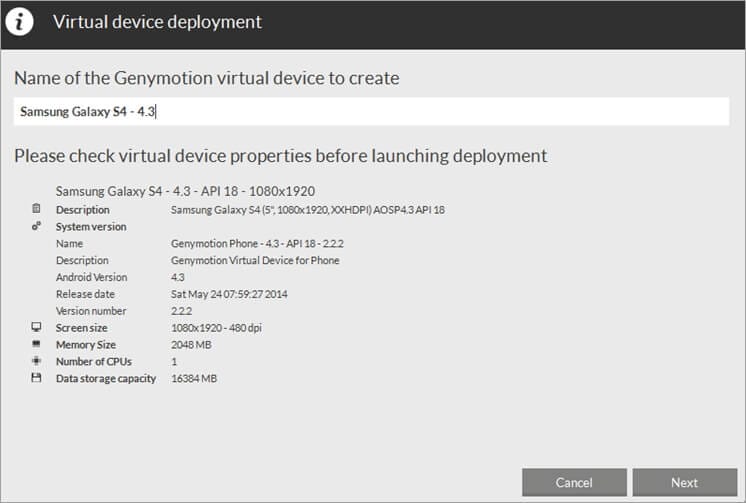
- 9. Give a name for the Virtual machine like below and click on Next.
- 10. Your virtual device will be now be downloaded and deployed. Click on the Finish button after successful deployment of your virtual machine.
- 11. Click on the Play button to start the new virtual machine and enjoy.
3. Andy
Andy is an open source emulator that allows developers and users to enjoy more robust apps, to experience them in multiple device environments, and to stop being constraint by the limits of device storage, screen size or separate OS. User can update their Android through Andy. It provides seamless sync between desktop and mobile device. User can use their phone as joystick while playing games.
Advantage
- • It provides a seamless sync between desktop and mobile device.
- • Enable Android OS update.
- • Enable app download from any desktop browser to Andy OS.
- • Phones can be used as joystick while playing games.
- • Unlimited storage expansion.
Disadvantage
- • Increase CPU usage.
- • Consumes a lot of physical memory.
Download
- • You can download Andy from <www.andyroid.net>.
How to Use
- 1. Download and install Andy.
- 2. Launch Andy. It will take about a minute to boot and then it should see a welcome screen.
- 3. Sign into your Google Account and complete the rest of the setup screen. You will be asked to provide your Google Account Information to 1ClickSync, the app that let’s you sync between Andy and the mobile device

 DLNow Video Downloader
How to Mirror Vivo V30 to Mac?
You might come across a condition where you may have to mirror your device onto a Mac. However, over observation, you may find that your Android cannot be directly connected to your Mac through the various Apple tools that are available for connecting different Apple devices. In such cases, it usually gets necessary to devise methods that allow you to mirror your Android device to a Mac OS or a Windows PC . This article marginalizes these methods and recognizes the most optimal platforms that can offer you the perfect system of mirroring your Android to a Mac. You need to have a detailed look to develop an understanding of these available methods to mirror Vivo V30 to Mac easily.
Part 1. Mirror Vivo V30 to Mac via USB
Some several methods and techniques can come quite handy in mirroring your Android to a Mac with ease. These techniques come up with different approaches that are to be discussed in the article as follows. The first approach that can be undertaken by users to mirror their device successfully is by using a USB connection for establishing a successful mirroring environment. For this case, the article segregates the two best software and tools that can allow you to mirror your Android to the Mac with ease.
1.1 Vysor
A user always prefers a tool that is readily available in the consumption market. Vysor is one efficient option when it comes to such cases, considering its availability across all major Operating Systems. The desktop Chrome application provides you the basic features to view, control, and even navigate your Android phone through your Mac. While you understand the feasibility of this platform, you should understand that Vysor allows you to use all kinds of applications across the Mac that are installed on your Android. This includes all kinds of applications and social media applications, without any exception. To understand the basic procedure of connecting Vysor with your Mac, you need to go through these simple steps as specified below.
Step 1: Download and install the Vysor application on your Android through the Play Store.
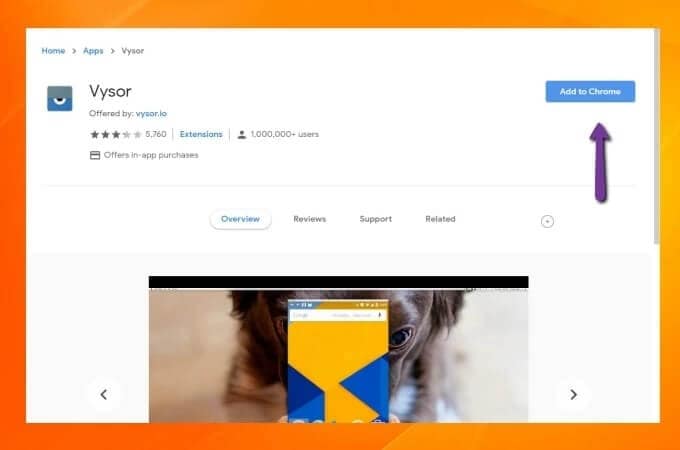
Step 2: Access your Mac and open Google Chrome. Proceed to the Chrome Web Store and search for Vysor in the application search. Install the application and launch it on your Mac successfully.

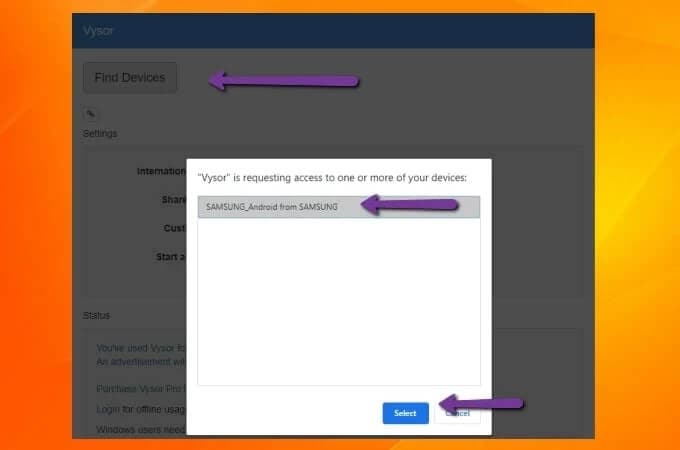
Step 3: You need to attach your Mac to the Android through a USB cable and tap Find Devices on your Vysor application on the Mac. Locate your device in the search results and tap Select to initiate the screencasting of your Android device to the Mac.

1.2 Scrcpy
Another impressive platform that may come into your mind when seeking a method to mirror your Android to the Mac is Scrcpy, an open-source Android screen mirroring tool that provides you with the perfect environment to connect your Vivo V30s with a very different and intuitive approach. This USB connectivity method can cover screen mirroring without any installation of an application. With support across all major operating systems, Scrcpy introduces you to a very impressive latency rate of a mere 35 to 70 ms. With such a performance, this platform is referred to as quite an option for screen mirroring. Along with this, it is completely available for free with other features such as file sharing, resolution adjustment, and screen recording. With no installation, Scrcpy also presents a very safe platform for screen mirroring. The major and only drawback that might exist in using Scrcpy is the technical knowledge of the command prompt that would make it arduous for several users to set up the platform. However, to make it easy and efficient to cover, the article covers the basic steps of setting up Scrcpy and successfully mirroring your Android to the Mac.
Step 1: You need to enable the USB Debugging settings from the Developer Options present on your Android device.
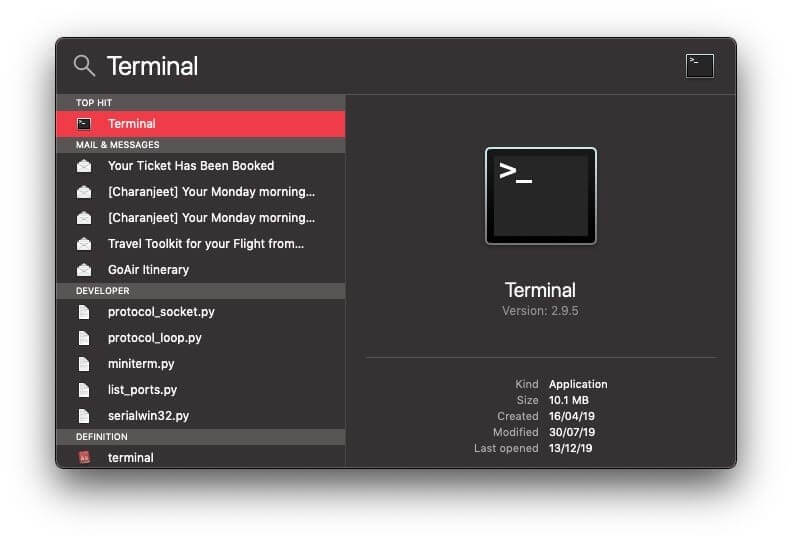
Step 2: Following this, take up your Mac and access the “Terminal” from the Spotlight on the Vivo V30 device.
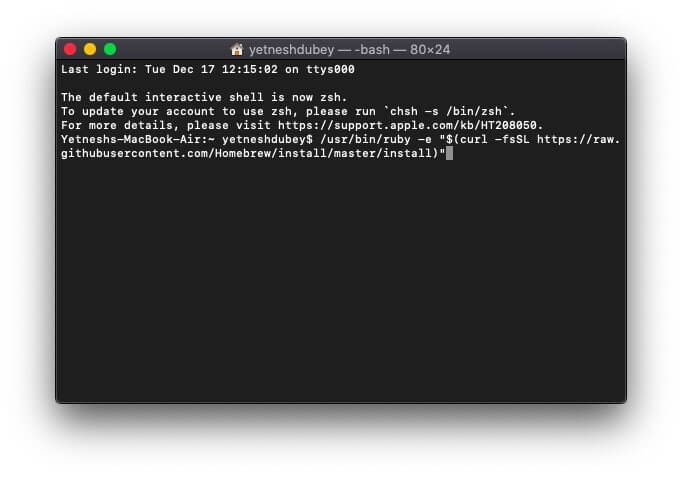
Step 3: Look across the following image to enter the command for installing ‘Homebrew’ across your Mac.
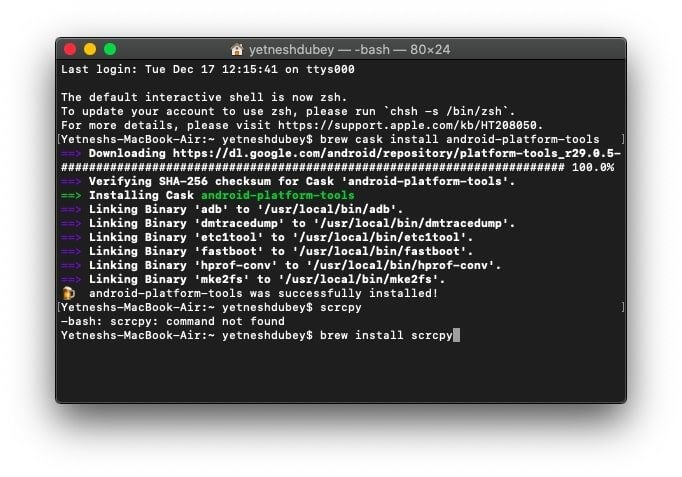
Step 4: After a considerable amount of time, you need to lead towards entering the command “brew cask install android-platform-tools” for installing the Android ADB tools across your Mac.

Step 5: Following this, enter “brew install scrcpy” on your Mac command line and proceed to install Scrcpy on your Mac.

Step 6: Connect your Android device via USB cable and confirm all USB Debugging options on your smartphone to initiate screen mirroring on your Android.
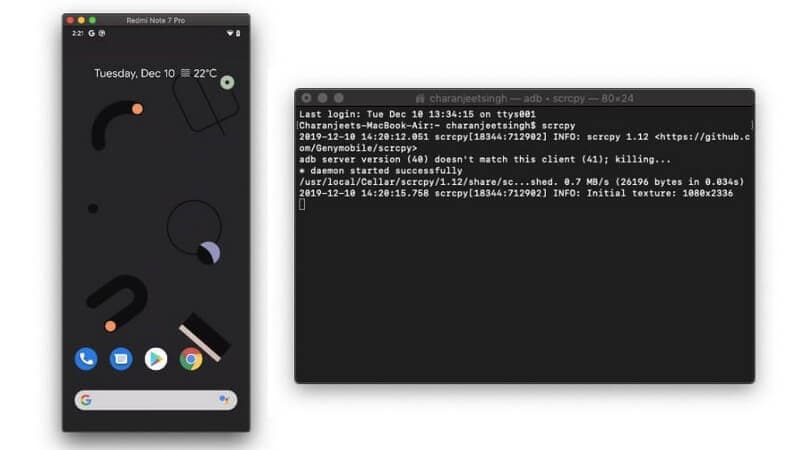
Step 7: Type in “scrcpy” on the Terminal of your Mac to turn on your screen mirroring.
Part 2: Mirror Vivo V30 to Mac via Wi-Fi
 HD Video Converter Factory Pro
1. Dr.Fone Air (FREE)
As you seek a proper solution providing the opportunity to mirror Vivo V30 to Mac, the first tool we will consider is Wondershare Dr.Fone Air . This online, free screen mirroring solution offers the perfect to mirror your smartphone to another device instantly. Known for its quick functionality, the platform does not require the use of Bluetooth or NFC for connecting devices.
The enhanced accessibility of this screen mirroring tool allows the user to integrate security. With no file or data sharing, the data displayed is secured and inaccessible.
How to Mirror your Android to Mac using Dr.Fone Air
We will now find out how to mirror an Android screen to Mac with the help of Wondershare Dr.Fone Air with its free, online solution:
Step 1: Open Dr.Fone Air on Mac
You must launch Dr.Fone Air on the browser of your Mac and ensure that the Mac and Android are connected to the same Wi-Fi network.

Step 2: Initiate Connection with Devices
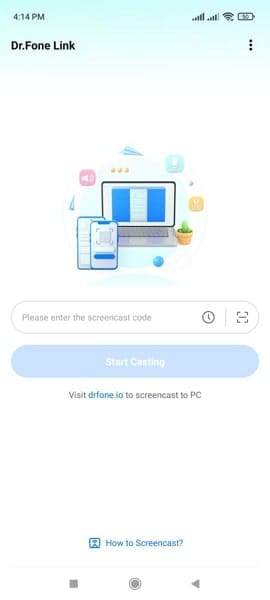
Next, you must install Dr.Fone Link on your Android device. Following this, use the QR Code or casting code displayed on the browser screen to connect both devices.
Step 3: Mirror Vivo V30 to Mac Successfully
On providing the right platform to set up, the Vivo V30 devices are connected, and your Android screen is mirrored on the Mac.
 Forex Robotron Basic Package
2. AirDroid
AirDroid is another powerful screencasting and mirroring tool that can allow you to mirror Vivo V30 to Mac with ease. While it supports diverse compatibility, you can save time and effort with this screencasting solution. Along with that, AirDroid provides you control over the Vivo V30 device, which gives you the leverage of managing the Vivo V30 device properly on the mirrored screen during remote meetings and lectures.
How to Mirror Vivo V30 to Mac with AirDroid
We will now find out how you can mirror your Android device to Mac with the help of AirDroid:
Step 1: You must download and install AirDroid on your Mac and Android using appropriate sources. As you launch the platform, select “Wireless” from the available options to perform wireless screen mirroring.
Step 2: As you wirelessly connect the Vivo V30 devices, you must scan the QR code or add the casting code on the Android device.
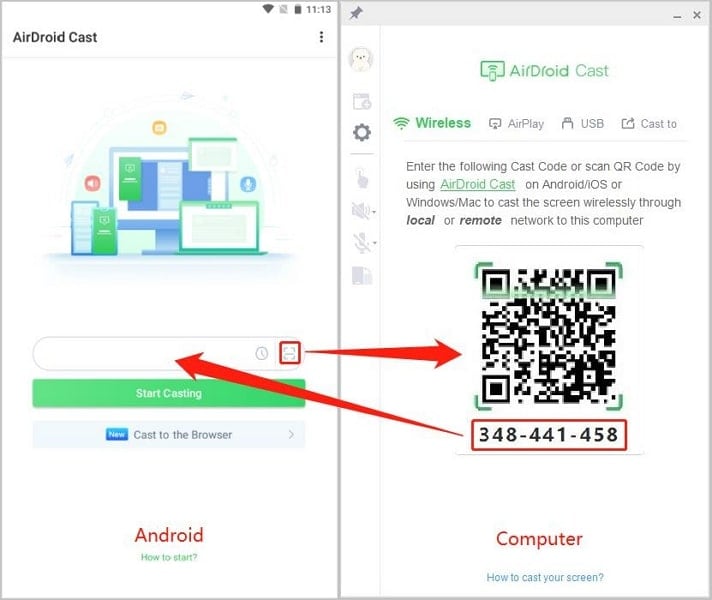
Step 3: Both devices will have to enable mirroring on asking for permission for the first time. With that, the Android and Mac are connected the Vivo V30 device is successfully mirrored.
 Epubor Audible Converter for Win: Download and convert Audible AAXC/AA/AAX to MP3 with 100% original quality preserved.
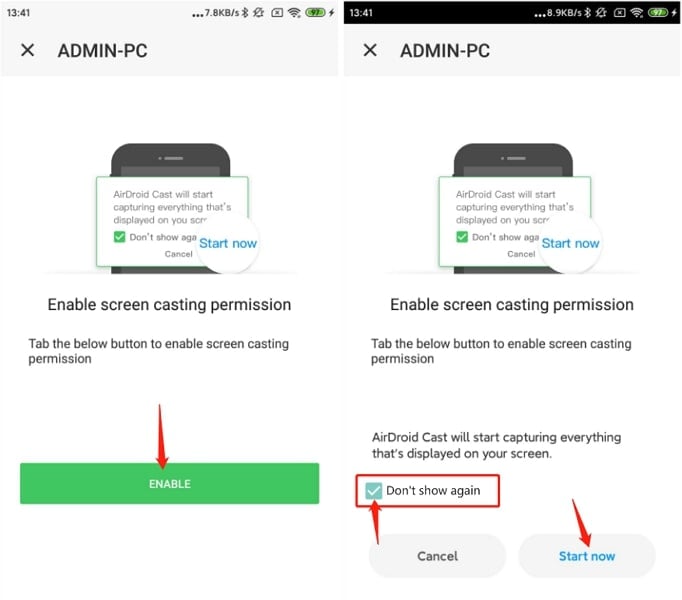
As you have reviewed how to mirror Vivo V30 to Mac, we will now figure out which direction would serve the best purpose. Let’s look into a comparative analysis of whether USB connection or wireless connections are preferred in screen mirroring:
| Cons of Using USB Connection | Pros of Using Wireless Connection |
|---|---|
| The wire that you might be used to establish the USB connection would be damaged, which is causing issues in attaching the Vivo V30 devices. | There are no threats of damaging any wire, which will disrupt the connection. |
| The mobile devices that will continue to come in the future years will be without a USB port, which means that these methods will get outdated. | As you do not require any USB port connection, you do not have to worry about getting the software supporting wireless connections. |
| On connecting an Android with a Mac through a USB, the Vivo V30 device starts charging, which takes up more battery of the Mac. | With no direct wired connections, you can save your Mac’s battery, giving you more screen time. |
| You are bound to keep your Android with the Mac, as the connections are attached through wires. | Using such techniques allows you to take the Vivo V30 device anywhere within the room while it is mirrored with the Mac. |
| Android devices cannot directly connect with the Mac as the latest models do not have USB ports. You will have to buy special extenders, which are pretty costly. | You require a strong Wi-Fi connection to connect the Vivo V30 devices, saving you extra costs. |
 Screensaver Factory, Create stunning professional screensavers within minutes. Create screensavers for yourself, for marketing or unlimited royalty-free commercial distribution. Make screensavers from images, video and swf flash, add background music and smooth sprite and transition effects. Screensaver Factory is very easy to use, and it enables you to make self-installing screensaver files and CDs for easy setup and distribution. Screensaver Factory is the most advanced software of its kind.
Conclusion
This article has provided an overview of the best methods available to mirror Vivo V30 to Mac properly. As you have had the option of mirroring the Vivo V30 devices through USB and wireless connections, it gives you clarity in selecting the best one. Tools like Wondershare Dr.Fone Air offers some exquisite experiences in mirroring screens for free, making it one of the best in the market.
Wondershare Dr.Fone
Mirror your Vivo V30 deviceto your Windows computer!
- Play mobile games on the big screen of the PC with MirrorGo.
- Store screenshots taken from the phone to the PC.
- View multiple notifications simultaneously without picking up your phone.
- Use android apps on your PC for a full-screen experience.
4,163,722 people have downloaded it
- Title: In 2024, How To Do Vivo V30 Screen Sharing | Dr.fone
- Author: Seraphina
- Created at : 2024-07-26 08:27:03
- Updated at : 2024-07-27 08:27:03
- Link: https://screen-mirror.techidaily.com/in-2024-how-to-do-vivo-v30-screen-sharing-drfone-by-drfone-android/
- License: This work is licensed under CC BY-NC-SA 4.0.