
In 2024, Process of Screen Sharing Realme 12 Pro+ 5G to PC- Detailed Steps | Dr.fone
Process of Screen Sharing Realme 12 Pro+ 5G to PC- Detailed Steps
Currently, there are many companies where their employees work across different locations. For these teams, managing work between all members can get complex, and having to continually send files via email to all members. This can get tiring and complex to handle long term.
Comparatively, using the screen-sharing approach will help improve collaboration with multiple people.
In this context, you can use a capable remote access software like TeamViewer to share screens to PC from multiple devices, like Android-based smartphones and tablets. This helps professionals improve their teamwork, coordination, and interaction on projects, to name one benefit.
Read on to learn more about this software and how to screen share Android devices to it.
Part 1. What is TeamViewer?
TeamViewer is a remote access management platform for companies and regular people. They use it for better team activity management, especially remote teams. They can experience better work productivity when using this software, like with the screen-sharing features.
The latter allows for screen-to-screen content broadcasting that many people from varying locations. This is useful for multi-member meetings.
Key Features:
- Password protects the meetings from unauthorized access.
- Screen share to PC from different devices/apps.
- Handle around 10 video streams per remote control or meeting session.
- Set scheduled meetings.
Part 2. Key Benefits of the TeamViewer Screenshare Tool
When users operate with TeamViewer to screen-share to PC, there are many advantages they can enjoy. Here are some of them, explained in points for your reference.
- Improved collaboration- Professionals in different sectors and sizes can collaborate better using the TeamViewer screen-sharing feature. Organizers can share their Android screens with different meeting participants. And then the latter can work on the documents from any location or device.
- Streamlined productivity- TeamViewer users can easily share their data, like documents and presentations, with different users in real-time for discussion. This is instead of the conventional method of individually emailing them for review.
- Better onboarding and tutoring- Professionals using TeamViewer can do onboarding and training processes. For example, by sharing the screen with participants, they can visually show how processes or software types work.
- More robust Security- TeamViewer runs with AES (265-bit) encryption for sessions with RSA public/private key exchange support. This assures a safe and more controlled screen-sharing experience compared to other alternatives.
To correctly share the screen to PC, TeamViewer users can access it via Android smartphones or tablets. Here are the steps to share the screen with this platform.
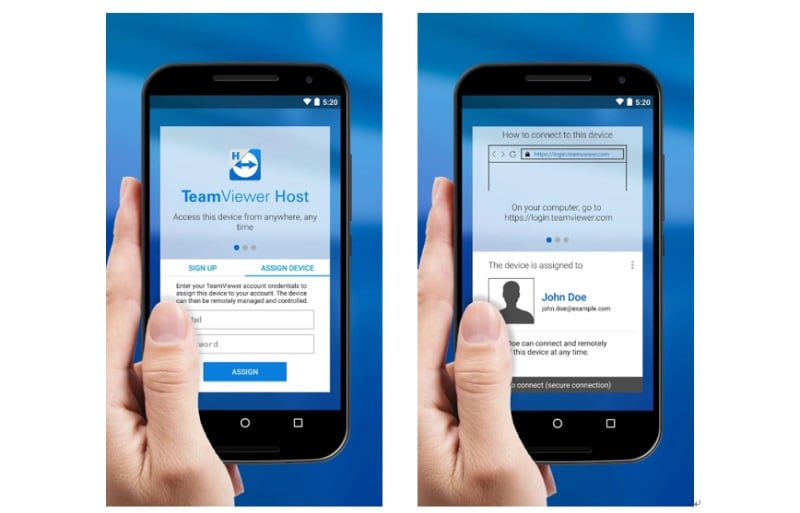
Step 1: On the Android device, visit Google Play Store > install TeamViewer Host .
Step 2: If you do not have an account here, create a new one or log in.
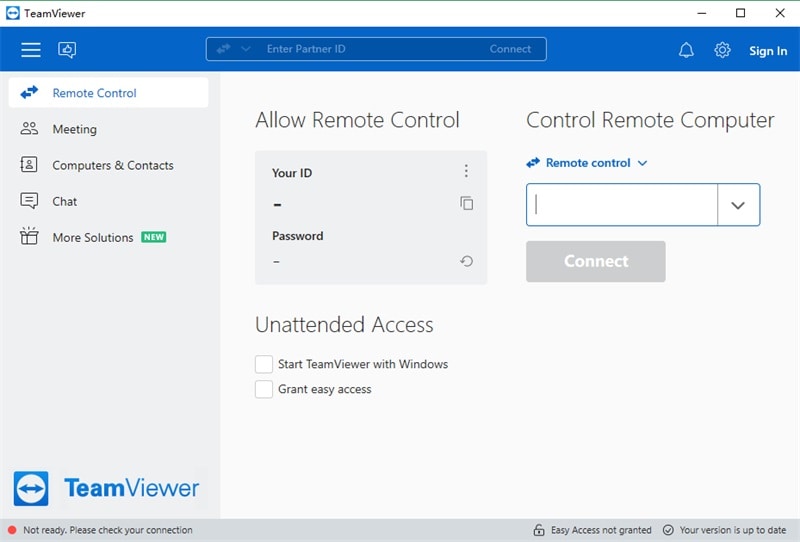
Step 3: On the PC (Windows/Linux/macOS), visit the login page via any preferred browser > Sign into the account that you created.
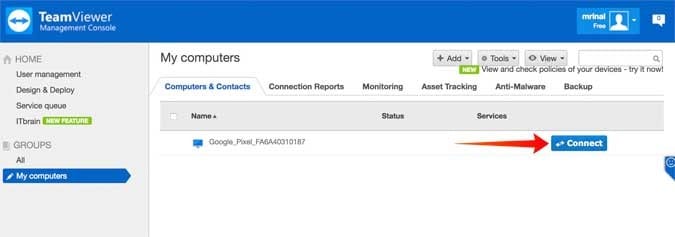
Step 4: A list of synced devices will appear. Tap the Connect button beside the Android device you share the screen from.
Step 5: The “Launch the TeamViewer” prompt will appear > Press OK. Before this, download and launch the app on your PC.
Step 6: The TeamViewer application will appear on your PC in a new window.
Step 7: Give the software permission for TeamViewer screen sharing on the Android smartphone. This will come up as a prompt “Host will start capturing everything that’s displayed on your screen” on your phone.
Step 8: Press Start Now > Don’t Show Again.
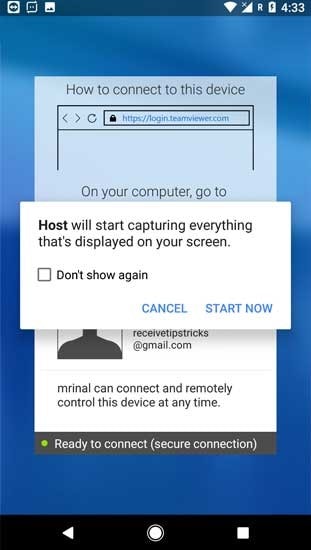
Step 9: The Android device screen will start sharing on the PC.
Part 4. TeamViewer Reviews - Pros & Cons & Ratings
For screen sharing to PC, many companies globally turn to TeamViewer as their primary tool. Here’s the average rating of the software from users’ feedback.
Rating: 4.5 out of 5 (G2 )
Different users from companies have hailed the best user experience from this software- here are some of these reviews.
| User | Reviews |
|---|---|
| Eileen Currier | “This is a very User-Friendly software that allows someone to easily connect and fix problems.” |
| Alexandre Lundgren | “I am just impressed by the quality of TeamViewer. It is easy to learn and so powerful.” |
You will see certain advantages and disadvantages of this software when you use it to screen share to a PC.
Pros:
- Users can access it without getting an account as well.
- Easy functionality.
- Three concurrent sessions can also work with the single-user TeamViewer Remote Access plan, which costs less.
Cons:
- The free plan has limited benefits.
- Business users must pay high amounts to get a license for entire teams.
Part 5. Better Alternative for the TeamViewer Screenshare Tool
TeamViewer is helpful for screen sharing, but it is slightly complex. Besides, screen mirroring is a better alternative. During this, you can better control the elements on the screen or in-person meetings. On that note, Wondershare Dr.Fone Air is helpful software.
It is simple to use, and the software allows smooth wireless screen mirroring from Android and iOS smartphones onto Mac or Windows PC. The solution is free as well.
Price: Free
Features:
- Cross-platform.
- Easy and secure screen mirroring with controlled authorization.
- No need to attach cables or Bluetooth- it works wirelessly.
- Control screen elements like rotating screen, zoom in/zoom out, etc.
How to use it for Android-to-PC screen mirroring?
Download the Dr.Fone Link App on your Android smartphone.
Go to the official site on the PC via your preferred browser.
Connect the Realme 12 Pro+ 5G devices to the same network.
Sync the Realme 12 Pro+ 5G devices using the QR code/nine-digit Cast Code.
Finally, the screen mirroring process will begin.
Conclusion
TeamViewer is one of the best solutions users can use for professional remote team collaboration. The screen-sharing functionality is helpful for broadcasting content from an Android phone to a PC. For a more effortless experience, screen mirroring with Dr.Fone Air software works. So, you should consider that as well.
A Guide Realme 12 Pro+ 5G Wireless and Wired Screen Mirroring
In simple words, screen mirroring is an approach to mirror the screens of two devices with one another. For instance, you can mirror your Android phone screen on the computer and the other way round. In this article, viewers will get to know how to mirror an Android screen on PC wirelessly or through a USB cable.
Screen Mirroring is quite useful in many ways. It allows you to display the screen of your Android phone, tablet, or PC on another device through a wired or wireless connection between both devices. In today’s life, not everyone is familiar with screen mirroring technology.
Part 1: What is Screen Mirroring?
Screen Mirroring is such technology that permits you to display your content from your device to another device. In the case of screen mirroring Realme 12 Pro+ 5G PC, this could be done through both wireless and wired connections. At the same time, screen mirroring can be done when one device continuously sends the copy of its screen to another targeted device simultaneously.
In a meeting or presentation, screen mirroring plays an important role by facilitating team members to avoid complex setups and share their screens immediately. Moreover, screen mirroring supports the BYOD model, that is, “Bring Your Own Device.” The reason for supporting this model is to lower the cost and increase efficiency.
Part 2: Prerequisites for Android Screen Mirroring
To successfully cast Android screen to PC, the screen mirroring apps should work properly. For this purpose, it is recommended to do some settings on your Android device. The steps of settings for enabling both developer options and USB debugging are discussed below:
Enable Developer option
Step 1: Open the “Settings” app on your Android phone and choose “System” settings from the list. Now click on the “About Phone” option from the top of the screen.
Step 2: Now, you need to scroll down and click the “Build Number” option five times.
Step 3: Proceed back on the “System” settings, where you will find a “Developer” option present.
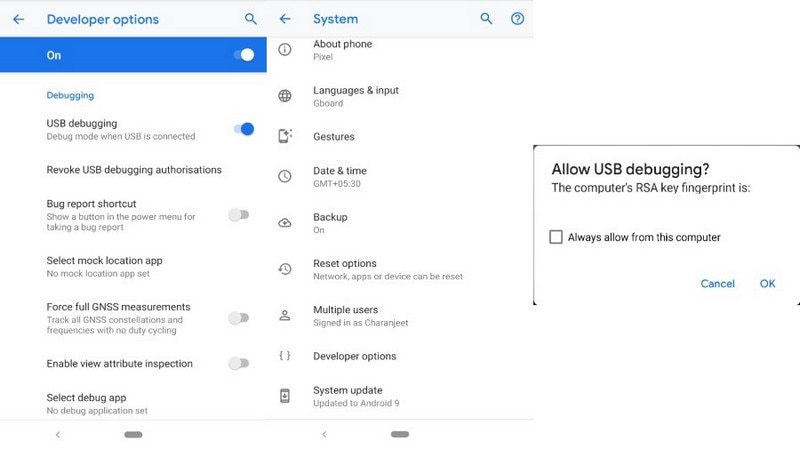
Enable USB Debugging
Step 1: First, open your Android phone “Settings” and go to “System” settings. Now click on the “Developers” option on the next screen.
Step 2: Now go down and turn on the “USB Debugging” option.
Part 4: Efficient and Fast Wireless Android Screen Mirroring Tool - MirrorGo
If you are looking for an advanced experience of mirroring your Android device with the PC, Wondershare Dr.Fone features an intelligent solution with efficiency. Whether you are presenting your business idea across a large screen or enjoying gaming with your friends, MirrorGo presents a quick and simple solution for mirroring your device with ease.
Wondershare Dr.Fone
Mirror your Realme 12 Pro+ 5G deviceto your computer!
- Utilize the Game Keyboard for mapping the keys across your keyboard to an Android device.
- Easily manage and control your Android phone across the PC with the help of peripherals.
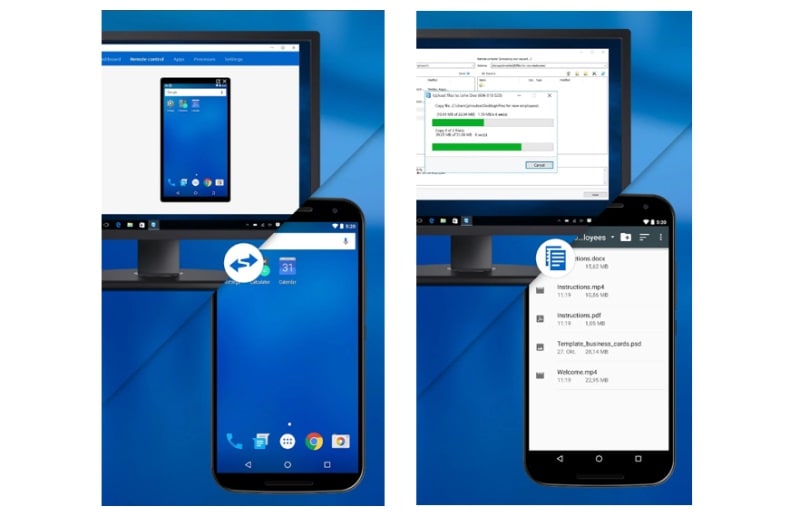
- MirrorGo enables an easy route of transferring files between the PC and Android device.
- Users can record their screens using the tools available on MirrorGo.
4,025,791 people have downloaded it
To understand the simple process of mirroring your Android screen across the PC, you need to follow the steps explained as follows:
Step 1: Download, Install and Launch
Users are requested to download the latest version of MirrorGo from their official website. Once installed, launch the application on the computer.
Step 2: Same Internet Connection
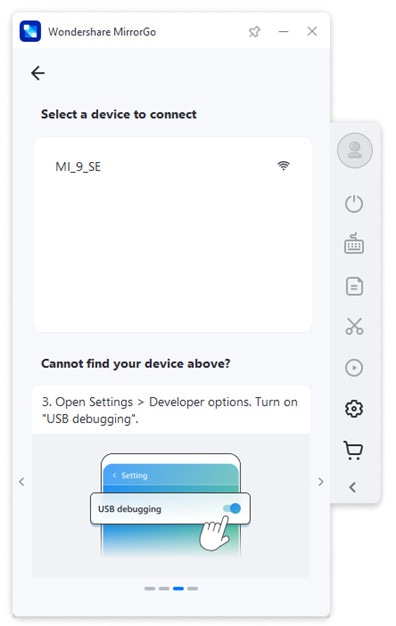
The user needs to ensure that the PC and Android device are connected across the same Wi-Fi connection. Once done, tap on the option of “Mirror Realme 12 Pro+ 5G PC via Wi-Fi” on the lower bottom of the application’s interface.
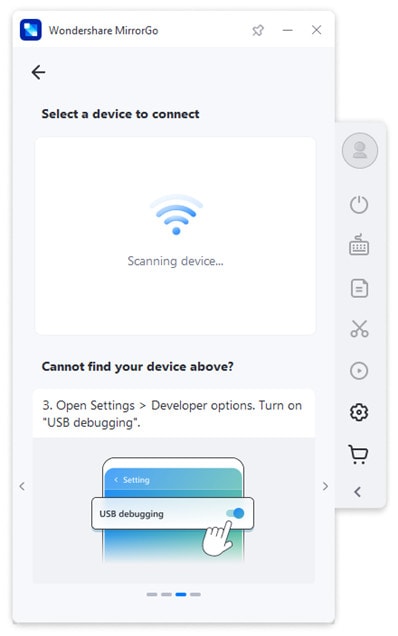
Step 3: Attach through USB over Unsuccessful Connection
If the user fails to mirror the Realme 12 Pro+ 5G device directly through Wi-Fi, they can connect their Android device with the PC via USB. Before that, it is important to turn on USB Debugging across the Android device for successful connection. Once the phone appears under “Select a device to connect,” you can remove the Android phone from the USB connection.
Step 4: Mirror and Control
Over selecting the Realme 12 Pro+ 5G device for connection, a mirroring platform is established on the PC, and the user can now easily manage and control the Android screen across the PC.
Part 3: Ways to Screen Mirror Android with USB Cable
In this part of the article, we will discuss the most efficient ways to mirror Android screen on PC via USB cable. These ways include efficient applications like Vysor and ApowerMirror. Both of these applications allow a wired USB cable connection between two devices for the purpose of screen mirroring.
3.1 Screen Mirror Android Using Vysor
Vysor is a substitute screen mirror application that helps you to control your Android device through a laptop or PC. By using Vysor, you can play games, project your content in meetings or presentations, share data, etc., through screen mirroring.
Well, the advantages of this screen mirroring application include a bigger screen size, a high-resolution mirror, and no compulsory requirement for root access. It also supports Windows, GNU/LINUX, and macOS. Some of the steps below will show you how to do screen mirroring Realme 12 Pro+ 5G PC or laptop using Vysor.
Step 1: Simply download the Vysor application from your “Google Play Store” application on your Android device.
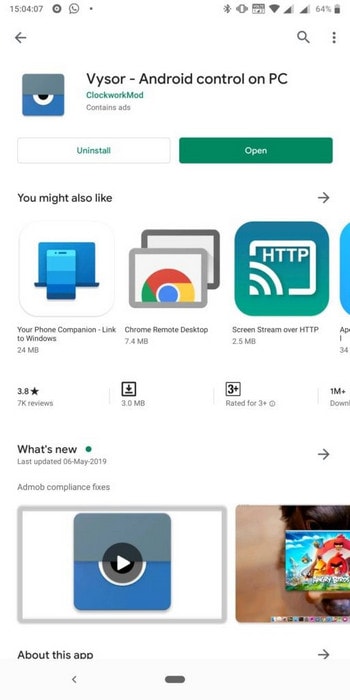
Step 2: Now, you need to download the Vysor application for your PC or laptop in order to access screen mirroring. Vysor is available for all Mac, Chrome, Windows, and Linux.
Step 3: After complete downloading, you can now connect your Android device with a PC using a USB cable or Micro-USB.
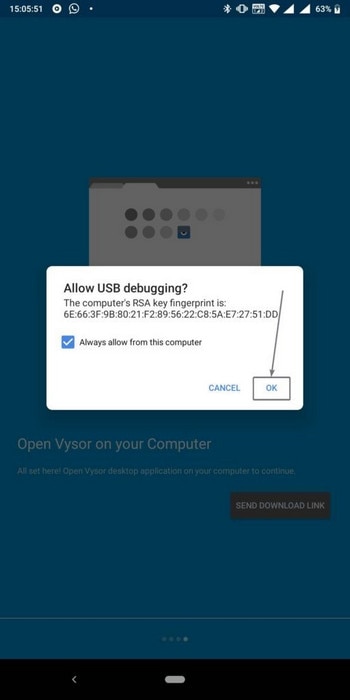
Step 4: After a successful connection, you can now open the “Vysor” app on your Android device to check the basic setup. During the basic setup procedure, you need to turn on the “USB debugging” option. You can find it in the “Developers Options” for the proper working of the Vysor app.
Step 5: You need to allow USB debugging for your PC after opening Vysor. You just have to select “Ok” from the box that appears on the screen of your Android device.
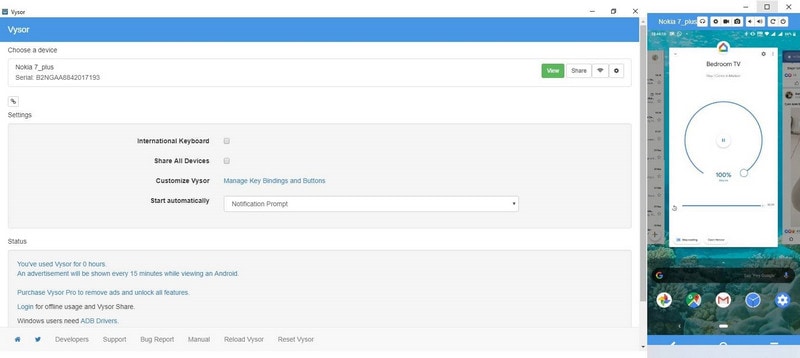
Step 6: You can now see your Android device name on your PC on the Vysor app. You just need to click on the “View” option to see your Android device.
3.2 Control Android Screen Using ApowerMirror
ApowerMirror counts as one of the best screen mirroring applications among all the others. This app mainly applies the mainstream mirroring technology that is the reason for its ultimate mirroring experience. You are required to follow some steps that are listed below to cast Android screen to PC via ApowerMirror:
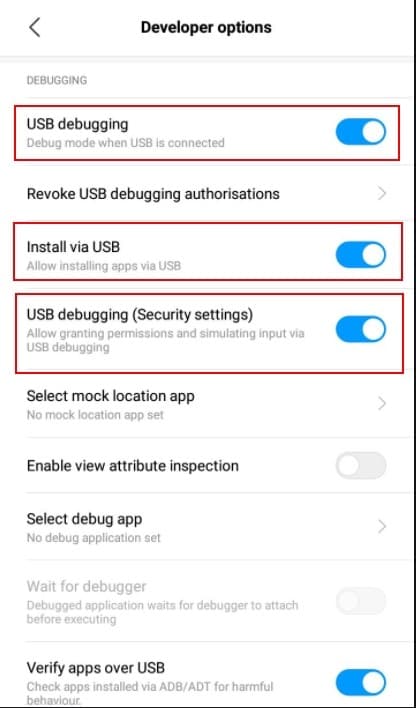
Step 1: Open your Android device “Settings” app and scroll down at the bottom of the page to see the settings of “Developer options.” Now further check the option of “USB debugging” and turn it on.
Step 2: In this step, you need to download ApowerMirror on your PC and install its setup. Now open the app from the Desktop.
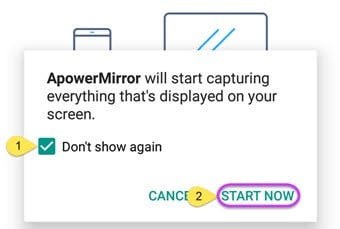
Step 3: Now, use a USB cable to connect your Android device with your PC. After that, check the notification that appears on your Android device. Begin the mirroring process by clicking on the “Start Now” option in that notification.
Step 4: At last, you can now entertain yourself on a much bigger screen by controlling your Android device.
Final Words
This article covers everything about screen mirroring and its working with the need to cast Android screen to PC. We have discussed the concept of screen mirroring both by wired or wireless connection. With the help of this article, you can now share your Android screen on a laptop or PC and can share data like documents, images, games, etc.
Furthermore, Wondershare introduces us to software like MirrorGo. It helps us to build a wireless connection between devices that we want to connect for screen mirroring purposes.
3 Facts You Need to Know about Screen Mirroring Realme 12 Pro+ 5G

Screen mirroring Realme 12 Pro+ 5G lets you share your presentations, videos, pictures, and music to a large screen. If you are not contented with the display of your smartphone you can use this feature to enjoy streaming on TV or PC. Realme 12 Pro+ 5G has provided screen mirroring features in its latest versions and it is easy to use. The built-in feature in Realme 12 Pro+ 5G is named “Mirrorshare” but in some devices, you can also go for a wireless display option.
Part 1. What is MirrorShare Realme 12 Pro+ 5G ?
Screen mirroring Realme 12 Pro+ 5G is not a difficult task. Realme 12 Pro+ 5G facilitates its users in the best ways. That’s why they have introduced the built-in feature of Mirror share that can easily help in mirroring the screen of your smartphone to TV or PC. Screen mirror functioning is almost the same in every device. You can display your mobile screen on a PC or TV to watch videos, pictures, and share files. Mirrorshare is the same as Miracast and works similarly as a “Multi-Screen Mirroring” app that supports some other Realme 12 Pro+ 5G models.
Follow the following simple guide to enjoy the large screen display.
1. Make sure that your phone and TV are connected to the same Wi-Fi network.
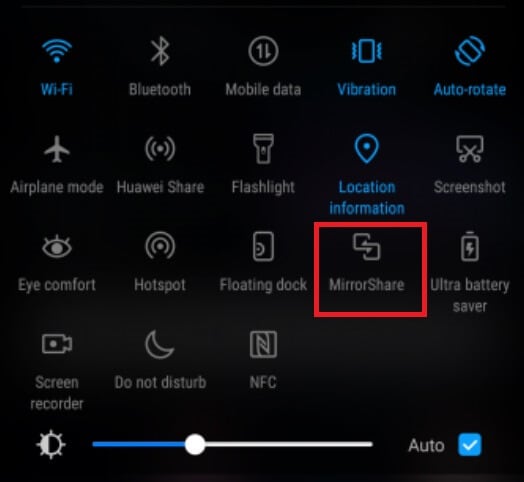
2. From your swipe down and tap on the Mirror share option.
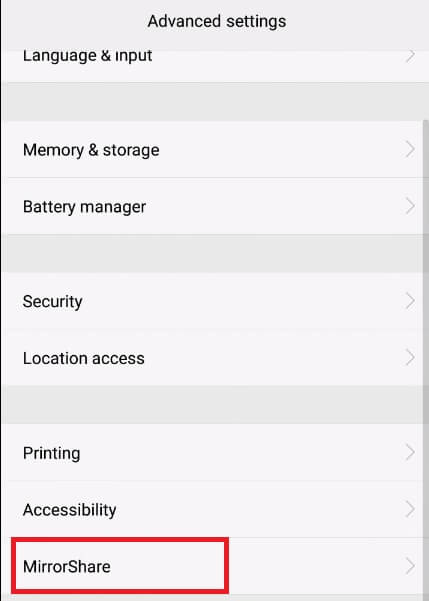
3. You can also go to Settings and select advanced settings.
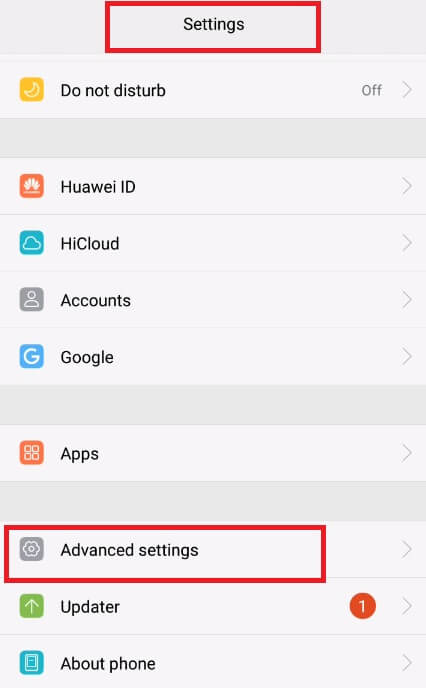
4. Tap on “MirrorShare.”
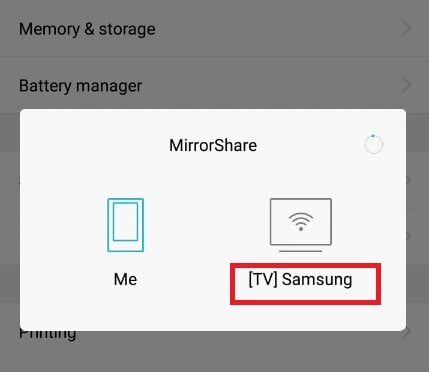
5. From the list of scanned available devices select the name of your TV.
6. On your TV go to network settings.
7. Select the Screen sharing option.
8. Your phone and TV are now connected. You can easily share your files and enjoy the large screen experience.
If you want to stop mirroring just tap on “Disconnect” and your devices are no longer connected.
Part 2. How to Screen Mirroring Realme 12 Pro+ 5G to TV?
Screen mirroring Realme 12 Pro+ 5G can help you to stream videos on a TV screen. You can use the MirrorShare feature of Realme 12 Pro+ 5G to easily connect your phone to any TV. There is no need for a third-party app. Screen Share built-in feature of TV also helps in mirroring the screen of your Realme 12 Pro+ 5G set. Just press the home button from remote and select the ScreenShare option. On mobile, swipe down and tap on wireless projection and then choose the name of your TV. In this way, your screen will be shared with the TV. As your devices are now connected you can easily experience your videos or even browse the internet on a large screen.
Part 3. Mirror or Control a Realme 12 Pro+ 5G Phone from the Computer using MirrorGo
Huawei is among the top brands that support the Android OS on their phones. Moreover, the Realme 12 Pro+ 5G devices are easy to manage. Additionally, you can enable screen mirroring on Realme 12 Pro+ 5G smartphones using services such as Wondershare Dr.Fone without any hassle.
The app provides an intuitive interface to connect an Android or iOS device and manage its content with the computer screen. Furthermore, it is a much safer alternative to choppy or sluggish emulators.
Wondershare Dr.Fone
Mirror your Realme 12 Pro+ 5G deviceto your computer!
- The application provides the means to share files across the PC and the Realme 12 Pro+ 5G device.
- Other than screen mirroring Realme 12 Pro+ 5G , you can control the apps and even take screenshots from the computer.
- View multiple notifications simultaneously without picking up your phone.
- Screen Recording is a handy function provided by MirrorGo for streamers.
3,564,710 people have downloaded it
The steps to mirror share Realme 12 Pro+ 5G phone on PC with Wondershare Dr.Fone are mentioned below:
Step 1: Connect the Realme 12 Pro+ 5G Phone to PC
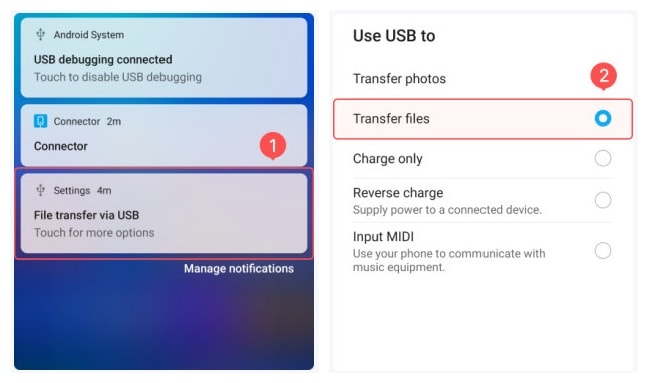
Use a USB cable to connect the Realme 12 Pro+ 5G Android phone with the PC. The app will automatically detect the Realme 12 Pro+ 5G device. However, ensure that you have the File Transfer option enabled under the USB Settings. Otherwise, you will not be able to share any content from one platform to another.
Step 2: Access Developer Mode
There are certain options that you will need to enable to fully control the Realme 12 Pro+ 5G device with MirrorGo. Head over to the Settings menu and open About Phone. The Developer Mode option will be available there; simply tap on it 7 times.
The next thing that you will need to do is switching on USB Debugging. Remain in the Settings menu and locate the Additional Settings tab. Find the USB Debugging option and toggle it on.

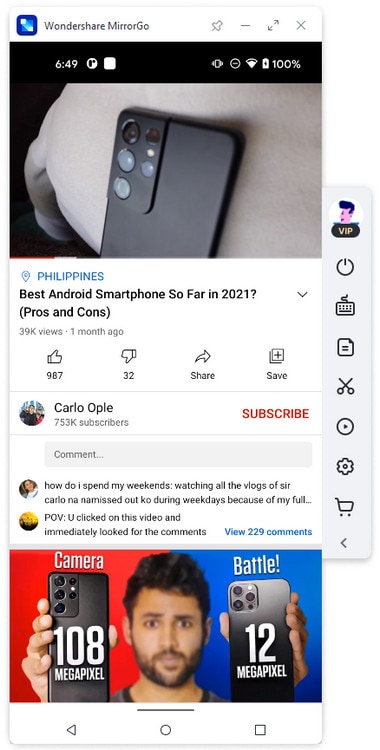
Step 3: Start Screen Mirroring Realme 12 Pro+ 5G from PC
Access MirrorGo from the computer. You will see the contents of your Realme 12 Pro+ 5G device on the app interface. From there, you can start the mirroring process!
Conclusion
Screen mirroring Realme 12 Pro+ 5G to TV or PC is as easy as casting your iPhone screen to any TV or PC. If you are contented with the display of your phone you can use the Mirror share built-in feature of Realme 12 Pro+ 5G to stream videos, music, and pictures on TV or PC. A third-party app like MirrorGo Android recorder also facilitates the mirroring of your smartphone to PC. Realme 12 Pro+ 5G facilitates its users to a large extent. You can apply the above-mentioned features to cast your phone screen to TV or PC.
Also read:
- [New] 2024 Approved Fast-Forward Memories Samsung Timelapse Basics
- [New] Defending Your Videos Against YouTube Copyright Strikes
- [Updated] 2024 Approved Mobility Meets Entertainment Top Portable Viewers
- Elite E-Learning Leader Labeler
- Enhanced Site Traffic with Advanced Web Tracking Solutions | Crafted with Cookiebot
- How Can Infinix Note 30 VIP Racing EditionMirror Share to PC? | Dr.fone
- How to Cast Tecno Camon 20 Pro 5G Screen to PC Using WiFi | Dr.fone
- How To Stream Anything From Tecno Pop 8 to Apple TV | Dr.fone
- In 2024, 8 Best Apps for Screen Mirroring Honor 90 Pro PC | Dr.fone
- In 2024, Effective Guide to Cast Apple iPhone 14 to MacBook without Hindrance | Dr.fone
- In 2024, How To Stream Anything From Oppo Find X6 Pro to Apple TV | Dr.fone
- In 2024, Recommended Best Applications for Mirroring Your Samsung Galaxy A24 Screen | Dr.fone
- In 2024, Top 10 AirPlay Apps in Google Pixel 8 for Streaming | Dr.fone
- Rectifying Realtek Controller Error Post-Update
- Seamless Installation of Intel HD520
- Social Media Stardom in a Nutshell Master These 9 Tactics for Insta Glory for 2024
- Why Your WhatsApp Location is Not Updating and How to Fix On Itel A60 | Dr.fone
- Title: In 2024, Process of Screen Sharing Realme 12 Pro+ 5G to PC- Detailed Steps | Dr.fone
- Author: Seraphina
- Created at : 2025-02-26 23:27:12
- Updated at : 2025-03-03 04:22:41
- Link: https://screen-mirror.techidaily.com/in-2024-process-of-screen-sharing-realme-12-proplus-5g-to-pc-detailed-steps-drfone-by-drfone-android/
- License: This work is licensed under CC BY-NC-SA 4.0.