
In 2024, The Top 10 Apple iPhone 7 Plus Emualtors for Windows, Mac and Android | Dr.fone
The Top 10 Apple iPhone 7 Plus Emualtors for Windows, Mac and Android
Are you wondering how to run a mobile app on your desktop to get a better user experience? Your computer is Windows or Mac? Because the solutions for running iOS apps on Windows and Mac aren’t common. But we will list the best iOS emulators for PC (Windows and Mac), even Android. You can always find the one you want. Let’s get started:
1.Apple iPhone 7 Plus emulator for PC
There is a growing demand for Apple iPhone 7 Plus emulators for pc so that it creates an environment to run the iOS applications on PC. It is popular because it lets you use all the games and applications originally designed for Apple iPhone 7 Plus to be accessible over PC.
1. iPadian
This is an iPhone/iPad simulator that allows you to experience iOS although you don’t have an ios device. so that you can see the difference between your Android device and the iOS one with it.
Features of iPadian: Run apps that are designed for the iPadian simulator(+1000 Apps and Games) including Facebook, Spotify, Tiktok, Whatsapp, and more.
Downside: iMessages is not supported.
Platform: Windows, Mac, and Linux.

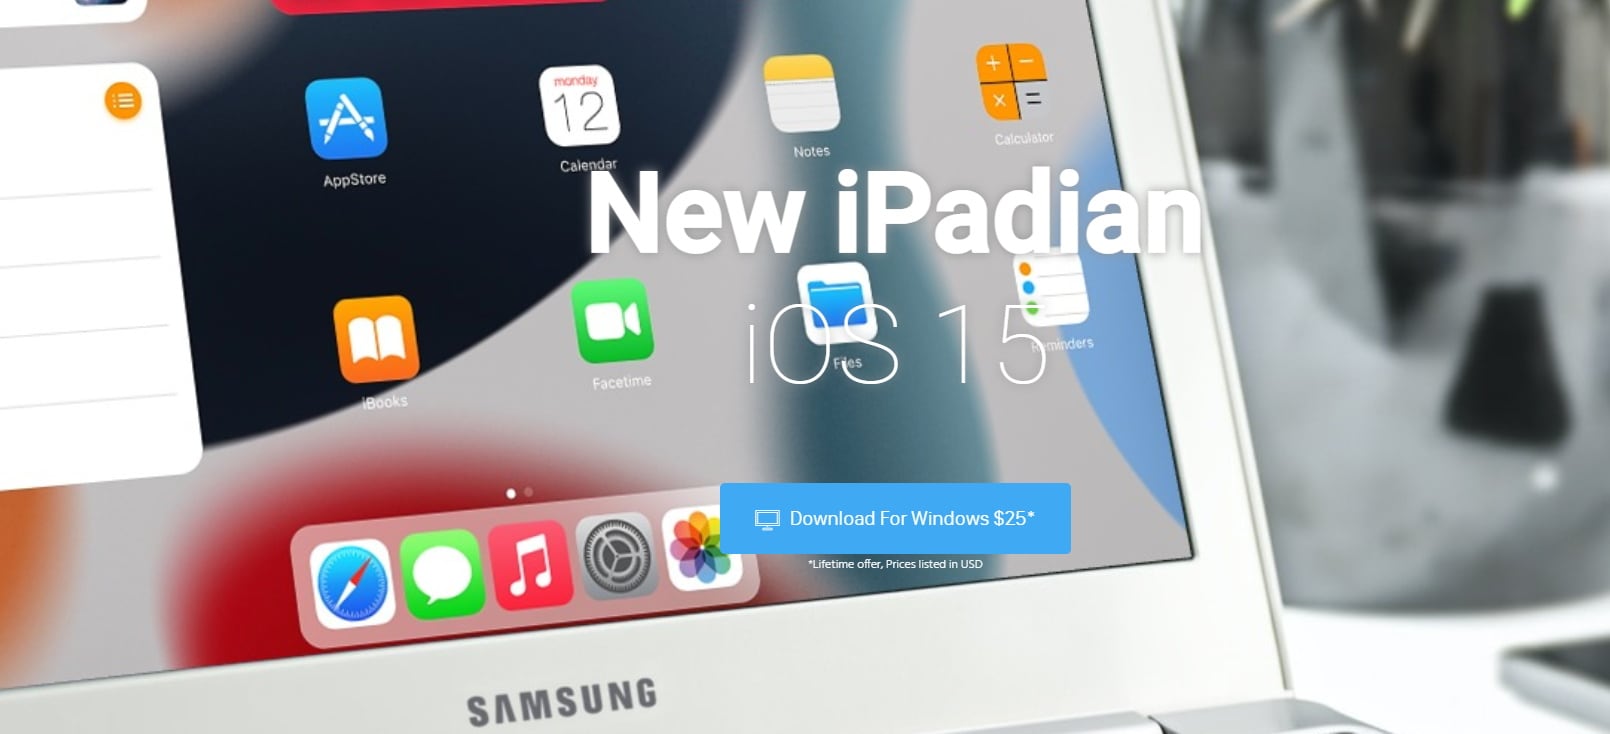
Link: https://ipadian.net/
2. Wondershare Dr.Fone
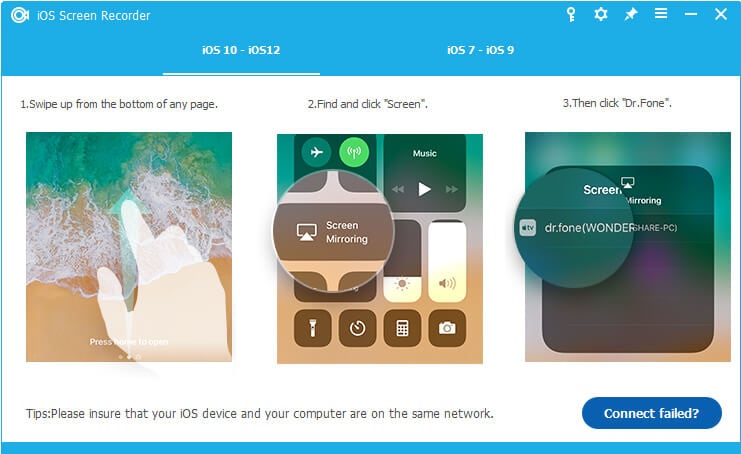
Wondershare Dr.Fone enables you to mirror and record your Apple iPhone 7 Plus screen to the computer. So you can also enjoy the ultimate big-screen experience with Dr.Fone. Apart from that, presenters, educators, and gamers can easily record the live content on their mobile devices to the computer for replay & sharing.
 Project Manager - Asset Browser for 3Ds Max
![]()
Wondershare Dr.Fone
Enjoy ultimate big screen recording and mirroring from your iOS device!
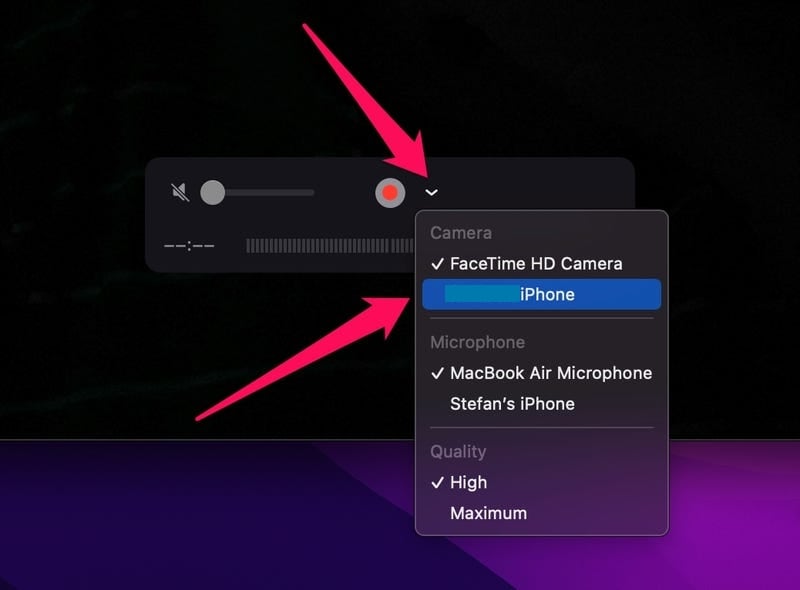
- One click to mirror or record your Apple iPhone 7 Plus or iPad to your computer wirelessly.
- Play the most popular games (like Clash royale, clash of clans, Pokemon …) on your PC easily and smoothly.
- Support both jailbroken and non-jailbroken devices.
- Compatible with iPhone,iPad, and iPod touch that runs iOS 7.1 to the latest iOS version.
- Contains both Windows and iOS versions.
4,049,282 people have downloaded it
3. AiriPhoneEmulator
This is a complete package by using which you will not be able to play games only, but also make and receive calls. This will help you send voice messages, and add the details of your favorite contacts. All applications available in the apple store will be able to run on this without any difficulties.
Downside:
- • It is not fully functional
- • The web browser, Safari, and many other applications which are found on the original phone are not found in this replica.
Link:https://websitepin.com/ios-emulator-for-pc-windows/
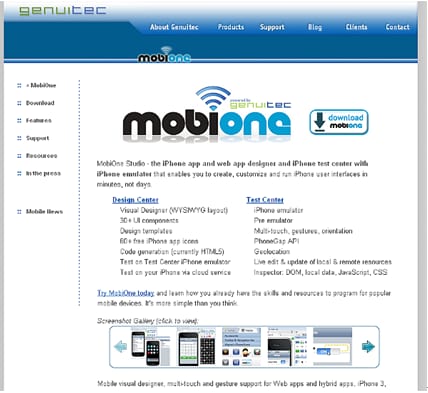
4. MobiOneStudio
This is one more iOS emulator which can help developers to test their applications on cross-platforms. Let’s you play the games also without any hitch. It also helps in building cross-platform applications in minutes.
Downside:
- • It takes time and patience to learn the skill
- • It is not exactly a freeware but, available as a fifteen-day free trial

2.Apple iPhone 7 Plus Emulator for Mac
Unlike Android, there are not many iOS emulators available in the market so there are very few alternatives. So it becomes a bit tedious for checking iOS applications. Here are the 3 best iOS emulators which can be used for checking and testing iOS applications.
1. App.io
This one is the simplest way of testing your iOS application. All That needs to be done is upload the iOS application on App.io and from here it can be streamlined onto any device pc/Mac/Android phones.
Downside:
- • it is not free.
- • It can be used as a 7-day free trial

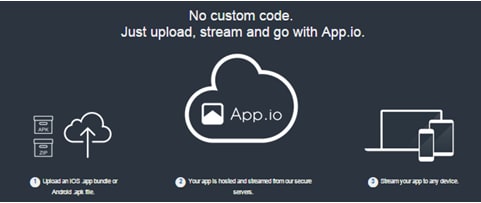
Link:http://appinstitute.com/apptools/listing/app-io/
2. Appetize.io
This one is just like App.io. This gives you the freedom to deploy the applications in the cloud and then use these on other platforms to see how they work. It also provides a live iOS demo.
Downside:
- • It is somewhat sluggish at the start
Link:https://appetize.io/demo?device=iphone5s&scale=75&orientation=portrait&osVersion=9.0
3. Xamarin Testflight
This is one more platform to test your iOS applications. This one is tied up with Apple and gives you a platform to test and run the applications.
 DLNow Video Downloader
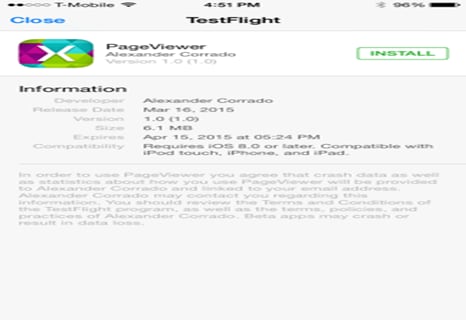
Link:http://developer.xamarin.com/guides/ios/deployment,_testing,_and_metrics/testflight/
3. Top Online Apple iPhone 7 Plus Emulators
Emulators have long been in the market because there is a need to fill the void of running one application meant for a specific smartphone to run across various platforms. For example, a game application developed for Android phones should be made available for smartphones running on other OS. Mobile phone emulators are therefore designed to bridge this gap. Apple iPhone 7 Plus emulators are designed so that applications, and games that are designed for iPhones are made available for other cross-platforms as well. People use Apple iPhone 7 Plus emulators to test websites and also for checking various Apple iPhone 7 Plus applications as well.
Here are some online Apple iPhone 7 Plus emulators which can test how the website will look like if it is made to run on an iPhone. It is great to test and redesign even if you do not have an Apple iPhone 7 Plus at your disposal.

1. ScreenFly
This is one site that helps the developers to check the website on various screen sizes. It supports Apple iPhone 7 Plus 5 and 6. The best advantage is it breaks the screen resolutions into pixels, so that minute adjustment can be made. It also has query signals which can be sent to clients to let them check how the website will look and feel so that any changes can be made then and there.
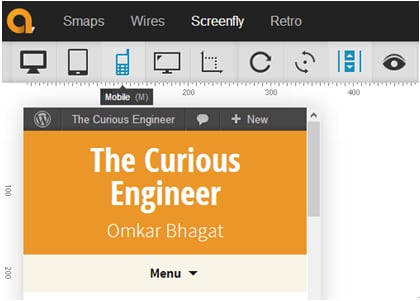
Features:
- • It is one online emulator which can handle a large number of devices including tablets and TV.
- • It does a good job of showing how your website will look on the latest gadgets
- • It has a simple interface and nicely done transitions.
Downside:
- • Does not account for rendering differences between devices
Link:http://quirktools.com/screenfly/

2.Transmog.Ne
This online emulator lets you check the website from the comfort of your desktop. Here are some great features of this emulator.
- • It is free
- • You can test the website in various screen sizes
- • Makes available to you, how the website will look like on a big screen
- • Refine the mobile device detection process
- • Helps you to debug your site by using Firebug or Chromebug
- • It simulates a touchscreen interface as well

This is one more online website that helps you in checking how your website will look on an iPhone. With the phenomenal rate at which smartphones are getting used, it is important that your website should look good not only on a desktop but also on a smartphone. iPhone4 is a simple to use web tool that simulates an iPhone4. Users can slide to unlock the virtual Apple iPhone 7 Plus by using their mouse pointer and then they enter the web application’s URL. The web application will behave as it is being run on an Apple iPhone 7 Plus 4.
Features of this Emulator
- • Free Apple iPhone 7 Plus 4 simulator online
- • Try out web applications on virtual iPhone4
- • Saves time in testing
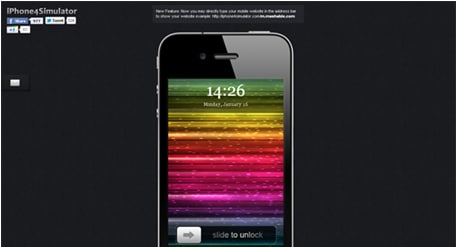
Downside:
- • This has very less features
- • A developer will require far more features than what is being currently provided
Link:http://iphone4simulator.com/
4.iOS Emulator for Android
As the two makers are front runners in the smartphone markets, there are not many emulators to run each one’s applications on the other. However, many Android users want to test and run iOS applications to run on their devices. They can download an iOS emulator for Android and use the iOS apps on their devices
How to Screen Share on Apple iPhone 7 Plus?
iPhone has become an excellent resource for performing multiple procedures through a smartphone. With numerous methods getting popular, screen sharing has become an everyday utility for many users. While you screen share an iPhone to another device, it gives you more control over the screen size, allowing you to share the content with more people at the same time.
In this context, there are specific methods that users can try out that will work with their iOS system. Go ahead and read this post if you want to know all the steps involved in how to enable screen sharing on iPhone.
Parental Control Software
Method 1: Share Your Apple iPhone 7 Plus to a TV or Mac Using AirPlay
The first method that you can use to share your Apple iPhone 7 Plus screen with another device is AirPlay. This direct method allows iOS users to share their device’s screen in a matter of seconds. Although the procedure is swift, you can also control the audio of the content being played on an iPhone.
What Are the Requirements?
- For iPhones/iPad users, iOS 14 and later versions are suitable, while Mac users can activate this function on macOS Monterey or newer.
- To allow some of the Siri features to operate while operating AirPlay to screen share iPhone devices, you should get HomeKit first.
- Not all video apps or Samsung Smart TVs will work with AirPlay.
If we talk about screen sharing Apple Apple iPhone 7 Plus to TV or Mac through AirPlay, they have a different set of operations. Let’s find out more about how to process screen sharing on these devices:
Screen Sharing iPhone on TV
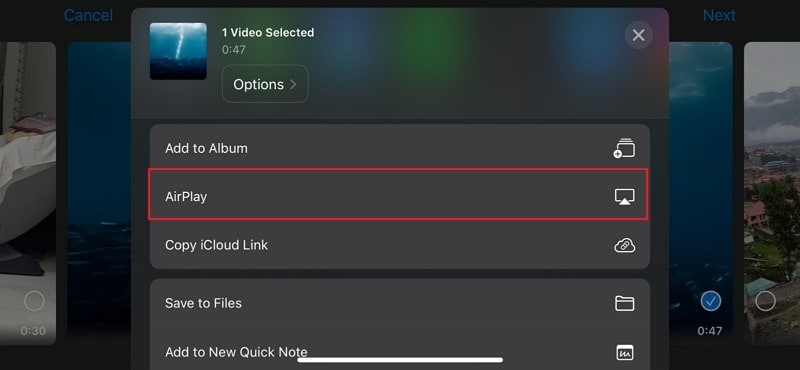
Step 1: To screen share your Apple iPhone 7 Plus to a TV, you must connect both devices to the same Wi-Fi network. Open the video that needs to be shared on the TV.
Step 2: Look for the “Share” button on the video and tap the “AirPlay” option to continue connecting your Apple iPhone 7 Plus to the Apple TV. You must select your TV after tapping on the “AirPlay” option.
Screen Sharing iPhone on Mac
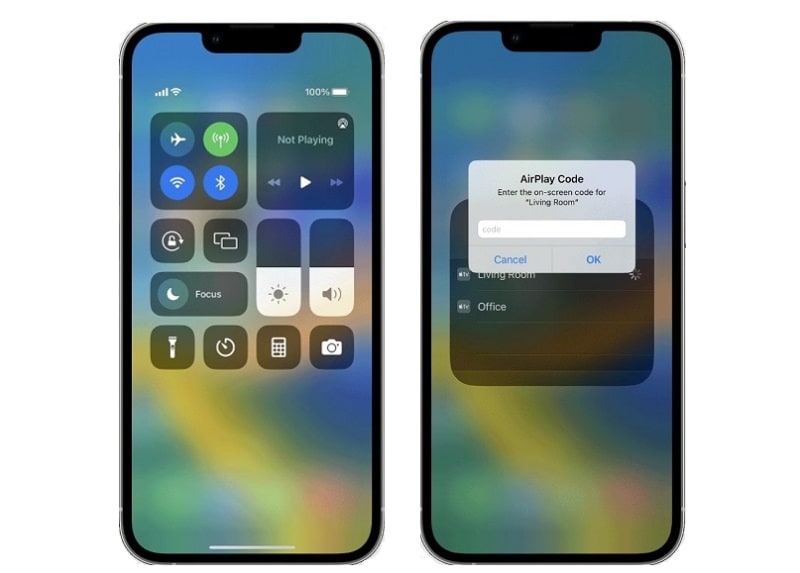
Step 1: To share your screen on Mac, you must connect your Apple iPhone 7 Plus and Mac to the same Wi-Fi network and proceed to open the “Control Center” of your Apple iPhone 7 Plus by sliding down from the top-right corner of the screen.
Step 2: Select “Screen Mirroring” from the options and hold to lead to the next screen. Look for the “Mac” option in the list to establish a connection between both devices.
 WonderFox DVD Ripper Pro
Method 2: Share Your Apple iPhone 7 Plus to a Mac via QuickTime Player
QuickTime Player is a built-in video processing tool in Mac providing unique and compelling video management services for free. This tool features some great functions, which include recording the screen and watching videos of high quality. It can also be a great utility to share the iPhone’s screen with a Mac. The operation process here is relatively easy for users with macOS X Snow Leopard or macOS Mojave.
What Are the Requirements?
- Users must use iPhones or iPad devices with iOS 8 and Yosemite Mac OS X or above.
Let’s find out how to screen share on iPhone with the help of QuickTime Player:
Step 1: Connect your Apple iPhone 7 Plus to the Mac with a lightning cable. Next, launch QuickTime and continue to the “File” tab on the top.

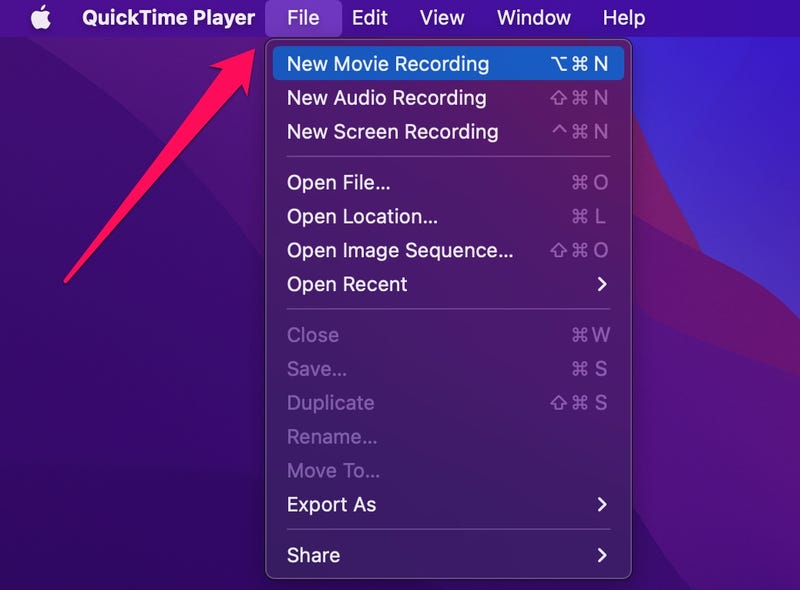
Step 2: Select “New Movie Recording” to open a new window. Look for the “arrow” adjacent to the “Red” recording button. Select iPhone from the list of devices to screen the Apple iPhone 7 Plus device to the Mac.
Method 3: Share Your Apple iPhone 7 Plus Screen Over FaceTime (SharePlay)
FaceTime can be another great technique to consider screen sharing Apple iPhone with other people. If you wish to show something important to some people, you can dial them through FaceTime and share the important thing in no time. FaceTime has recently adopted the SharePlay technology to give a wholesome experience in screen sharing.
Users with iOS 15.4, iPadOS 15.4, or later can initiate a FaceTime call with the Music or Apple TV app for sharing music or video content, respectively. Where the applications can change, the process remains the same. FaceTime is quite diverse in functionality, which involves sharing the iPhone’s screen.
What Are the Requirements?
- iPhones and iPads running on iOS/iPadOS 15.4 and above allows users to start the FaceTime call through the Apple TV app (+ other supported streaming apps) and Music app (+ other music app alternatives). Then, they can use SharePlay for video/music sharing via the call with other participants.
- To screen share Apple iPhone 7 Plus to iPhone via FaceTime, the person sharing the content and the recipient should both have iOS 15.1+ (iPhones), macOS 12.1+ (Mac), or iPadOS 15.1+ (iPads).
- Users need Apple ID to access FaceTime.
With all these provisions in mind, you must follow the steps explained below to share your Apple iPhone 7 Plus screen over FaceTime with ease:
Step 1: You must start a FaceTime call and connect with your respective personnel. As you connect successfully, select the “Share Content” button on the top of the screen to start screen sharing.
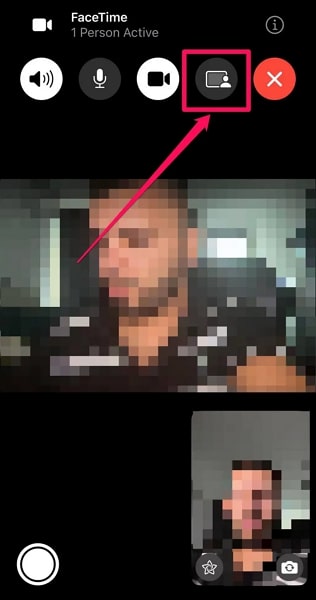
Step 2: To establish a connection, select the “Share My Screen” button, which will initiate a countdown for sharing the screen.
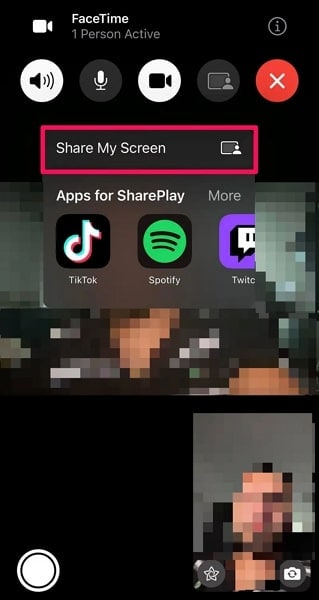
Step 3: To end the screen sharing, you will have to tap on the “Share Content” button again to disconnect screen sharing.
 Screensaver Factory, Create stunning professional screensavers within minutes. Create screensavers for yourself, for marketing or unlimited royalty-free commercial distribution. Make screensavers from images, video and swf flash, add background music and smooth sprite and transition effects. Screensaver Factory is very easy to use, and it enables you to make self-installing screensaver files and CDs for easy setup and distribution. Screensaver Factory is the most advanced software of its kind.
Method 4: Share Your Apple iPhone 7 Plus Screen to a Mac or Windows PC Using a Third-Party App
If you are not satisfied with the provided methods above and intend to extend your screen sharing to Windows PC along with the Mac, you will need a third-party application to execute the process. There are multiple third-party applications existing for this purpose; however, we will help you select the best one in the options.
 CalendarBudget - Monthly subscription membership to CalendarBudget via web browser or mobile app. Support included.
 1. Dr.Fone Air (iOS 12.0 or Later)
Wondershare Dr.Fone Air comes up with the best solution to screen share iPhone on Mac or Windows PC with ease. The tool comprises any easy-going solution with no particular technicalities in operating it. While it is a free online solution, it provides one of the highest-quality experiences of screen sharing.
To learn more about Dr.Fone Air, we have highlighted its prominent features for you to understand more about the online platform:
- It does not require Bluetooth, NFC, and other relevant services to mirror the screen.
- There are no ads associated with this online solution.
- You can easily adjust the shared screen by rotating, zooming, and taking screenshots.
As you wish to figure out how to use Dr.Fone Air to perfection for sharing your Apple iPhone 7 Plus’s screen on the computer, look ahead into the steps:
Step 1: Open Dr.Fone Air and Connect Devices
Launch Wondershare Dr.Fone Air on your computer’s browser and continue connecting both devices under the same Wi-Fi connection.
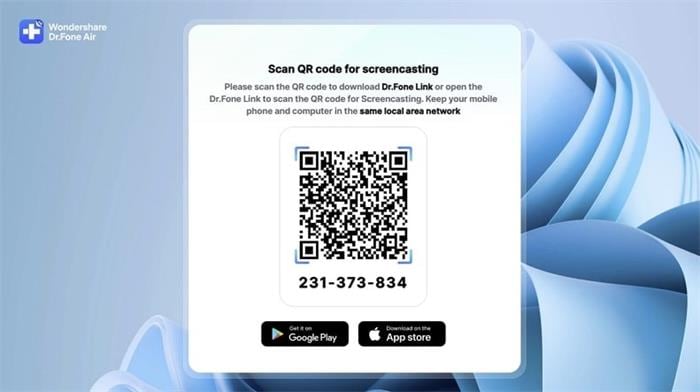
Step 2: Scan Code for Connection
You must download and install Dr.Fone Link on your Apple iPhone 7 Plus and launch it. Then, use the QR code or screencast code displayed on the browser’s window to connect devices.
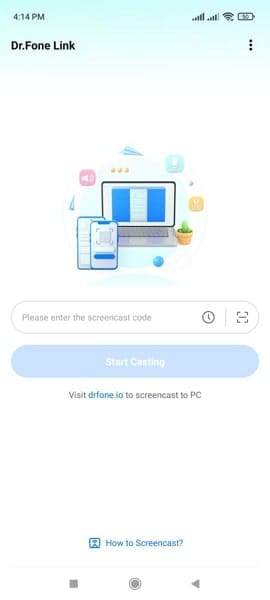
Step 3: Successfully Mirror Apple iPhone 7 Plus to Computer
With the captured or added screencast code, the iPhone is now mirrored to the computer.

2. Reflector (iOS 11.0 or Earlier)
If you have an iOS device with iOS 11.0 or earlier, you might have to look for other options. Reflector can be a good third-party application for sharing the screen on Mac and Windows. Since it utilizes AirPlay technology to connect devices for sharing screens, it creates an AirPlay receiver on the Windows PC.
The Reflector serves as a great tool to mirror the Apple iPhone 7 Plus to other screens. If you wish to know how to execute the process using Reflector, look through the steps below:
Step 1: You have to connect the iPhone and the computer to the same Wi-Fi connection and launch Reflector on your computer.
Step 2: Continue to open the Control Center by swiping from the top and selecting the option of “Screen Mirroring.” You will have to hold the button to access the next screen. Select the computer from the list and establish a connection between the Apple iPhone 7 Plus devices.
 SwifDoo PDF Perpetual (2-PC) Free upgrade. No monthly fees ever.
Conclusion
Multiple high-quality tools and programs are available for iPhone users to share their phone screen on Mac devices or vice versa. You can use these preset options or try out a more feature-rich, cross-platform screen mirroring software like Dr.Fone Air .
Consider the uses and benefits of all options and then decide on your preferred approach for sharing on-screen content via iPhones.
How to Screen Mirror your Apple iPhone 7 Plus Display?
Today, we are going to explore some different methods of how to do screen mirroring. We will divide the article into 4 parts; each part dealing with one method. It is very important for iOS users to know these ways of screen mirroring.
Part 1: Use HDMI to connect Apple iPhone 7 Plus to TV
We are going to show you how to use HDMI for connecting your Apple iPhone 7 Plus/iPad to your TV in this part of the article. Using HDMI is the simplest way to connect an Apple iPhone 7 Plus to the TV for screen mirroring and streaming video, playing games etc. This method connects by use a cable that supports the port of the TV and our iPhone. We need a HDMI Adaptor cable called Lightning Digital AV Adaptor . Let’s learn the easy and simple steps:
Step 1. Connect Lightning Digital AV Adaptor to iPhone/iPad
As we know, HDMI adapter plays the most significant role in this method, we have to connect the Digital AV Adaptor to the iPhone or iPad in this step.

WPS Office Premium ( File Recovery, Photo Scanning, Convert PDF)–Yearly
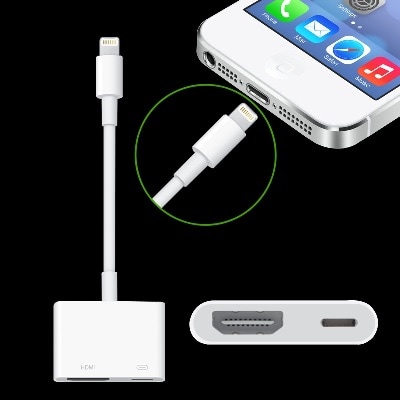
Step 2. Connect the Adaptor to TV using HDMI Cable
Now in the second step, we have to connect the same adaptor to the TV using a high-speed HDMI cable that supports the port of the TV.

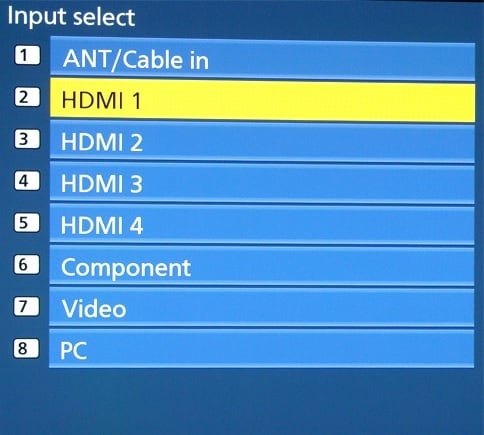
Step 3. Select HDMI Input
This is the final step and the iPhone will be connected to the TV for streaming what want. We have to select the HDMI input source from the TV Settings in this step. After we configure this, we have successfully done it.
Part 2: Use Airplay to Mirror Apple iPhone 7 Plus to Apple TV
We are going to teach you how to use Airplay to mirror your Apple iPhone 7 Plus to your Apple TV in this part. Screen Mirroring using Airplay is the easiest and best choice for all iOS users.
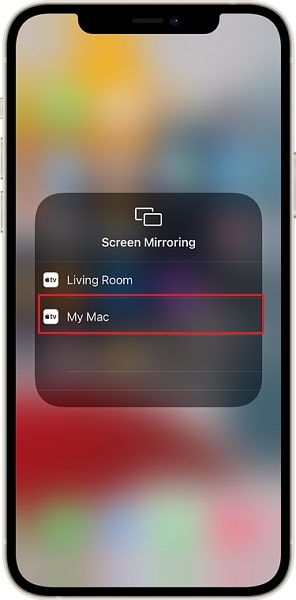
Step 1. Open Control Panel
Airplay mirroring your Apple iPhone 7 Plus/iPad to Apple TV is an easy process. In this first step, we have to swipe up from the bottom bezel on the Apple iPhone 7 Plus to open the Control Panel.
Step 2. Tapping on the Airplay Button
After opening the Control Panel on your Apple iPhone 7 Plus, we need to swipe it horizontally so that we can get the Now Playing Screen. We can easily see airplay button now, and we have to tap on the Airplay Button in this step.
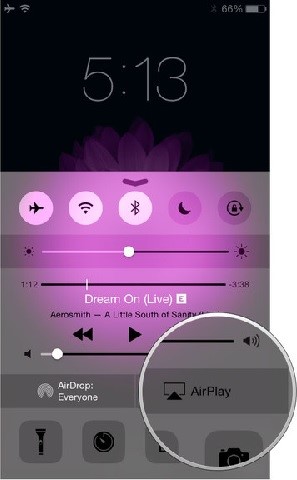
Step 3. Selecting Apple TV
In this step, we have to select where we want to airplay mirror. As we are going to airplay mirror our Apple iPhone 7 Plus to the Apple TV, we have to tap on Apple TV as shown in the below screenshot. This is how we can airplay mirror any iPhone/iPad to an Apple TV just in few simple steps without having any issue.

 Forex Robotron Gold Package
Part 3: Use Chromecast to Mirror Apple iPhone 7 Plus to TV
Chromecast is a wonderful tool used for mirroring Apple iPhone 7 Plus to your TV so that you can broadcast content from the phones. As a media streaming device, Chromecast works well on iPhone, iPad, Android phones and tablets. We can easily buy this device in the eBay and use it. This part of the article will teach you how to use Chromecast.
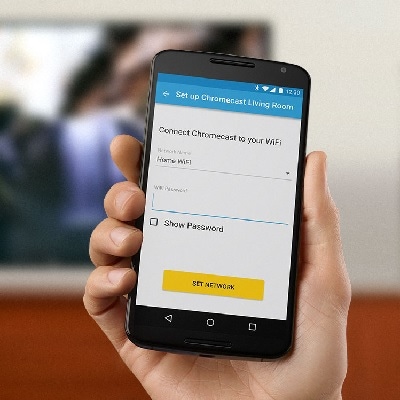
Step 1. Plugging Chromecast into the HDTV
First of all, we have to plug the Chromecast device into our TV and power it as shown in the screenshot. After that, we have to visit chromecast.com/setup and download the app for our iPhone.


Step 2. Connecting to Wi-Fi
In this step, we are going to connect Chromecast to our Wifi internet.
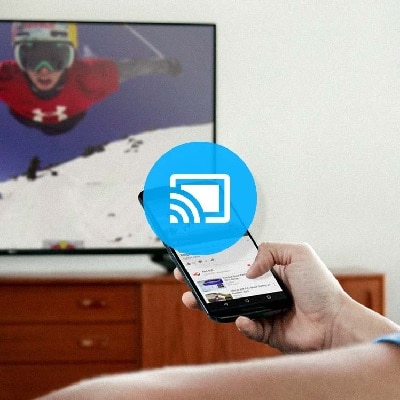
Step 3. Tap on Casting
This is the final step in which we have to tap on the Cast button in the cast enabled-application. This is how we can mirror our iPhone screen to the TV using Chromecast.
Part 4: Use Wondershare Dr.Fone to Stream the Whole Apple iPhone 7 Plus Screen
When it comes to Screen Mirroring in an easy and simple way, Wondershare Dr.Fone of Dr Phone is the most suitable option. You will see how we can use Wondershare Dr.Fone to stream the whole screen of our iPhone and iPad in this part of the article.
Dr.Fone - Wondershare Dr.Fone
Easily record the screen of your Apple iPhone 7 Plus, iPad, or iPod
- Mirror your iOS device on your computer screen wirelessly.
- Record games, videos, and more on your PC.
- Wireless mirroring your Apple iPhone 7 Plus for any situation, such as presentations, education, business, gaming. etc.
- Supports devices running iOS 7.1 to iOS 11.
- Contains both Windows and iOS versions (the iOS version is unavailable for iOS 11).
3,629,353 people have downloaded it
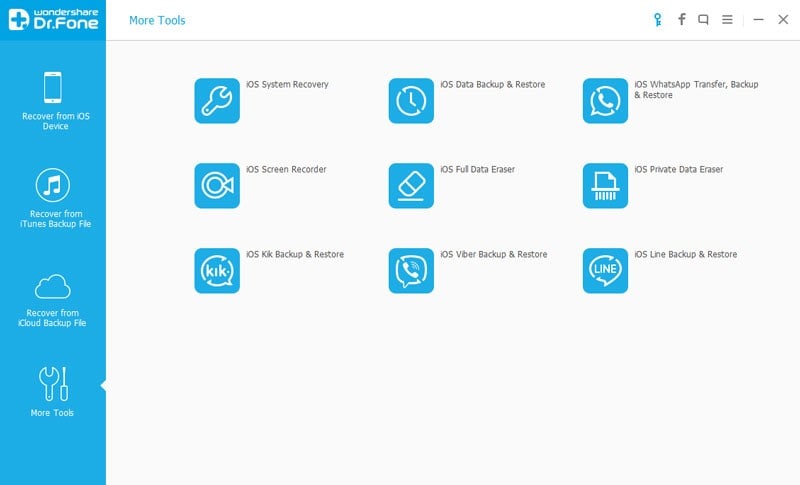
Step 1. Run Dr Phone
First of all, we need to run Dr Phone on our computer and click on the ‘More Tools’.
Step 2. Connecting Wi-Fi
We have to connect both our computer and Apple iPhone 7 Plus to the same Wifi internet. After connecting, we need to click on ‘Wondershare Dr.Fone’ which will pop up the Wondershare Dr.Fone as in the image below.

Step 3. Turn on Dr Phone Mirorring
In this step, we have to enable Dr Phone mirroring. If you have iOS 7, iOS 8 and iOS 9, you have to swipe and click on ‘Aiplay’ option and choose Dr Phone as target. After that you check on Mirroring to enable it.

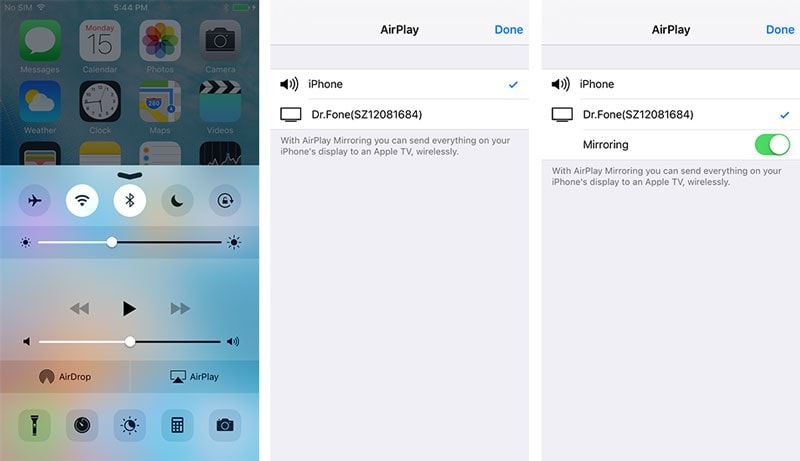
For those who have iOS 10, they can swipe and click on Airplay Mirroring. After that, you need to choose Dr Phone.

Step 4. Click Button to Start Recording
We can see two buttons on the screen of our computer. In this final step, we have to tap on the left circle button to start the recording and the square button is for displaying full screen. Pressing Esc button on the keyboard will exit full screen and clicking on the same circle button will stop recording. You can also save the file.

We learnt different ways of screen mirroring in this article. You can use any one of the mentioned methods according to your need and enjoy streaming content on your TV.
- Title: In 2024, The Top 10 Apple iPhone 7 Plus Emualtors for Windows, Mac and Android | Dr.fone
- Author: Seraphina
- Created at : 2024-07-26 05:20:35
- Updated at : 2024-07-27 05:20:35
- Link: https://screen-mirror.techidaily.com/in-2024-the-top-10-apple-iphone-7-plus-emualtors-for-windows-mac-and-android-drfone-by-drfone-ios/
- License: This work is licensed under CC BY-NC-SA 4.0.